
You are using an out of date browser. It may not display this or other websites correctly.
You should upgrade or use an alternative browser.
You should upgrade or use an alternative browser.
- Status
- Not open for further replies.
Re: Gun Cab WIP Pics
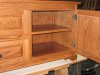
David, I got some 1/2 inch overlay Blum hinges from Woodcraft. BLUM Face Frame Hinges The ones I got were the #02R85. I practiced on two pieces of scrap. This was my first time using a Euro style hinge. They worked out fine, the door is square to the frame and I didn't have to fuss with it at all.
Tom (Toolferone) recommended a self centering drill bit set and I can't believe how easy it makes hinge installation. The bit doesn't move at all (thanks, Tom).
Chuck
Chuck,
Thats a mighty fine piece. What type of hinges are you using. I need some advice for my entertainment center.
David, I got some 1/2 inch overlay Blum hinges from Woodcraft. BLUM Face Frame Hinges The ones I got were the #02R85. I practiced on two pieces of scrap. This was my first time using a Euro style hinge. They worked out fine, the door is square to the frame and I didn't have to fuss with it at all.
Tom (Toolferone) recommended a self centering drill bit set and I can't believe how easy it makes hinge installation. The bit doesn't move at all (thanks, Tom).
Chuck
J
jeff...
Re: Gun Cab WIP Pics
wow - nice piece of work
wow - nice piece of work
Re: Gun Cab WIP Pics
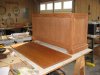
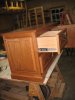
Well, it's slowly coming along. Managed to get the feet on, made a transitional molding piece, glued it up and performed touch up sanding.
I wiped on stain today using a batch that Mike (mshel) had made me. It's a burnt umber base in turpentine. I have mentioned several times that I don't like stain. Well, I'm gonna revise my stance. This stain looks absolutely beautiful. The stain applies smoothly, a matched tone is easy to achieve. It has really brought out the grain and has made the entire piece a uniform attractive color. :-D
Pics attached.
Now I must figure out the PC PSH-1 sprayer I bought a while back. I'm going to spray lacquer for the topcoat. I bought a gallon of Mohawk Clear WW lacquer, satin. This will be the first time I've sprayed lacquer. Does anyone have any suggestions for settings, etc?
Chuck
Attachments

Re: Gun Cab WIP Pics
Looking great my friend. But where are the pics of the upper half? The color is right on IMHO. Can't wait to see the finished piece. You should consider spraying a coat of sealer on the whole piece prior to shooting lacquer. Just my opinion.
Mike
Looking great my friend. But where are the pics of the upper half? The color is right on IMHO. Can't wait to see the finished piece. You should consider spraying a coat of sealer on the whole piece prior to shooting lacquer. Just my opinion.
Mike
Re: Gun Cab WIP Pics
Mike (Mshel) was the brains behind the effort. I believe he's been working with stains for a little while. We wiped on different stain recipes from his private stash. He can provide the details. IIRC we used burnt umber for one sample, van dyke brown for a second, burnt umber with rose lake for a third. I supplied the samples to the customer and he liked the burnt umber. From there Mike just made me a batch using the burnt umber and turpentine.
Here's a link to Sal Marino's home page. Scroll down and click on "How to Make your own oil stain". Also look at stain recipes.
Chuck
Very nice Chuck ! I do like that stain. Did you just sneak up on the color or was there a recipe ?
I have been building a bed for my daughter and that seems to be the color she has been asking for.
Mike (Mshel) was the brains behind the effort. I believe he's been working with stains for a little while. We wiped on different stain recipes from his private stash. He can provide the details. IIRC we used burnt umber for one sample, van dyke brown for a second, burnt umber with rose lake for a third. I supplied the samples to the customer and he liked the burnt umber. From there Mike just made me a batch using the burnt umber and turpentine.
Here's a link to Sal Marino's home page. Scroll down and click on "How to Make your own oil stain". Also look at stain recipes.
Chuck
Re: Gun Cab WIP Pics
oops! :eusa_doh: Here's the home page.
Sal Marino
Scroll down to select "Stain Formulas" and also :How to Make your own oil stain". Mshel can let you know what he uses for the pigment. Turpentine works fine for a carrier.
Chuck
hey Chuck, link kinda missing there:roll:
oops! :eusa_doh: Here's the home page.
Sal Marino
Scroll down to select "Stain Formulas" and also :How to Make your own oil stain". Mshel can let you know what he uses for the pigment. Turpentine works fine for a carrier.
Chuck
Re: Lower Cab is Done
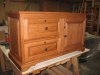
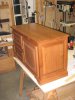
Applied final lacquer coat last night. Rubbed lightly with steel wool and cleaned with cloth. Customer will wax if so desired. :lol:
It's a good feeling to be halfway there. Now I need to tackle the top! :-D
Chuck
Applied final lacquer coat last night. Rubbed lightly with steel wool and cleaned with cloth. Customer will wax if so desired. :lol:
It's a good feeling to be halfway there. Now I need to tackle the top! :-D
Chuck
Attachments
Re: Gun Cab WIP Pics
That looks awesome, Chuck! I can't wait to see the top!
Thanks for the stain recipe page too.
That looks awesome, Chuck! I can't wait to see the top!
Thanks for the stain recipe page too.
Re: Lower Cab is Done
Chuck, from the pics you have done an OUTSTANDING job!
How did you finally do your locks?
Chuck, from the pics you have done an OUTSTANDING job!
How did you finally do your locks?
Re: Lower Cab is Done
I used cam locks. The sets came with an offset cam lever, which will work for the drawers, and a straight cam lever. I bent the straight cam lever just to rig it for now. The metal is fairly soft so I will mark a piece and bring it into work. We have a metal brake so I can bend an offset that will look nice and be functional.
I fully agree with your earlier comment about how flimsy these locks are. They will not slow down a thief but will definitely keep honest folks/kids out.
Chuck
Chuck, from the pics you have done an OUTSTANDING job!
How did you finally do your locks?
I used cam locks. The sets came with an offset cam lever, which will work for the drawers, and a straight cam lever. I bent the straight cam lever just to rig it for now. The metal is fairly soft so I will mark a piece and bring it into work. We have a metal brake so I can bend an offset that will look nice and be functional.
I fully agree with your earlier comment about how flimsy these locks are. They will not slow down a thief but will definitely keep honest folks/kids out.
Chuck
Re: Gun Cab WIP Pics
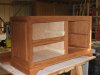
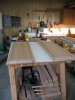
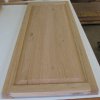
I got back in the shop this weekend (between basketball games) and managed to get the upper cabinet frame cut out. I dry fit the face frames front and rear and finished the raised panel sides. RP pics attached.
The side frames are 59"H x 17" W. The panels are 54"H x 14"W. I intend to rout mortises and use false tenons (homemade loose tensons) on the rail ends to add more glue surface than the 3/8 stub tenons standard with my RP bit set. I thought about adding a center rail behind the raised panel, M&T into the stiles for strength and to keep the stiles from moving (bowing) with moisture change.
Do you think the loose tenons top and bottom are enough? The bottom tenon will be 2"W x 1/4 thk. The top 3"W x 1/4 thk. Mortise depth 3/4 inch.
The cab rear will be 1/2 ply, glued into dados in the rails/stiles to add strength.
I'll post a few more pics later this week when I start gluing up. I'm going to be getting intimate with my ROS for a while first! :lol:
Chuck
Attachments
Re: Gun Cab WIP ...Update
Great job Chuck. Good to see you have a router to do your raised panels with. Having the right tools make a big difference.
Great job Chuck. Good to see you have a router to do your raised panels with. Having the right tools make a big difference.
Re: Gun Cab WIP Pics
Looking good. I think you will have more than enough strength with what you are doing.
I am a bit concerned though.
From your pics, your shop seems to be quite clean and free of debris, sawdust, etc, and fairly well organized. Very disturbing to me. I do not feel right unless there is something on the floor for me to trip over.
Re: Gun Cab WIP Pics
Well, I'm not commenting on how the remainder of the shop looks. It's all about framing the right view, huh? :lol: :lol:
Chuck
Looking good. I think you will have more than enough strength with what you are doing.
I am a bit concerned though.
From your pics, your shop seems to be quite clean and free of debris, sawdust, etc, and fairly well organized. Very disturbing to me. I do not feel right unless there is something on the floor for me to trip over.
Well, I'm not commenting on how the remainder of the shop looks. It's all about framing the right view, huh? :lol: :lol:
Chuck
Re: Gun Cab WIP Pics
Amen on that one brother! :icon_thum
Well, I'm not commenting on how the remainder of the shop looks. It's all about framing the right view, huh? :lol: :lol:
Chuck
Amen on that one brother! :icon_thum
- Status
- Not open for further replies.
Premier Sponsor
Our Sponsors
LATEST FOR SALE LISTINGS
-
-
-
-
 SOLD -- $75: Gast moa v113 Vacuum Pump Veneer, 60" bag and board
- Started by peterdnight
- Replies: 1
-
GONE: Gladiator 5 cleats, 10 hangers, Paper Towel and Shelf
- Started by peterdnight
- Replies: 3