Gun Cab Delivered!! Few pics

Status
Not open for further replies.

cpowell

New User
Chuck
I've stained the RP edges, glued the end panels, glued the carcass. I also cut and fitted the bottom ply shelf, center shelf (solid) and top.

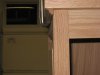
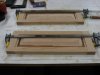
I have attached a few pics. One shows the molding to go between the sides and top. I will put a VERY slight roundover (1/8 maybe) on the edges of the top.

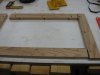
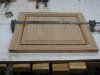
I included a pic of the frame I would like to use to secure the top. The top will be anchored with the front screws while the holes on the sides and back will be slotted (1/2 inch) to allow seasonal movement. I figured on centering the screws in the slots, giving +/- 3/16th movement either direction. The distance between front and back screw holes is around 13-14 inches. I have debated putting any screws at all on the back but have used this technique in the past and haven't had any problems. Wood is KD oak, with MC at shop equilibrium. Is my thinking sound?

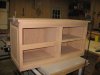
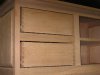
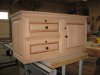
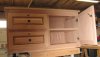
I also included a pic of the cabinet to-date. Hopefully I'll dimension drawers tonight. Drawer box will be DT construction with RP false fronts, per the customer's request. I am still searching for a cam lock that will accommodate the 7/8 drawer face thickness plus 7/8 face frame thickness. The lock is intended to keep little hands out. I can't glue up the drawers until I finalize the lock hardware. Was thinking about THIS cam lock. The Hardware Hut - Product #NCL-C8060-4G-KA413A - National 1-3/4in. Disc Tumbler Cylinder Cam Lock - Keyed Alike (Antique Brass) I haven't installed drawer/door locks before so this represents a new opportunity to screw something up! :lol:

Chuck
 

Attachments

  • Molding Detail Small.JPG
    Molding Detail Small.JPG
    57.6 KB · Views: 214
  • Top Frame Small.JPG
    Top Frame Small.JPG
    65.9 KB · Views: 201
  • Cab Assy Small.JPG
    Cab Assy Small.JPG
    70.7 KB · Views: 220

Travis Porter

Travis
Corporate Member
Re: Gun Cab WIP Pics

Looks great Chuck. Panels look good, and the sample molding on the side is a nice touch.

I used the cam locks a couple of times in the past. I found out the hard way growing up they are not real secure. My brother would use a screwdriver to turn the entire lock assembly and open it to steal money from me. :-x

One thing you could do is cut a groove in the bottom of the rail for the lock plate to rotate into. A #20 biscuit slot would probably work. That way you could use standard sized cam locks. My .02 for what it is worth.
 

WoodWrangler

Jeremy
Senior User
Re: Gun Cab WIP Pics

Looking great! I would like to build something similar for my fishing poles ... can't wait to see the finished product!
 

cpowell

New User
Chuck
Re: Gun Cab WIP Pics

Looks great Chuck. Panels look good, and the sample molding on the side is a nice touch.

I used the cam locks a couple of times in the past. I found out the hard way growing up they are not real secure. My brother would use a screwdriver to turn the entire lock assembly and open it to steal money from me. :-x

One thing you could do is cut a groove in the bottom of the rail for the lock plate to rotate into. A #20 biscuit slot would probably work. That way you could use standard sized cam locks. My .02 for what it is worth.

Brothers are good for special things like that. Security from thieves is not the purpose so the cam lock should be just fine.

The biscuit jointer is a good idea and pretty idiot proof - not that I couldn't botch it up. I sold my biscuit jointer a while back because I hadn't used it for over a year or more...go figure! :lol: :lol:

I've got a friend in Wilson who may let me borrow one if I ask nice. :-D

Do you know if the depth of the blade is adjustable?

Chuck
 

NCPete

New User
Pete Davio
Re: Gun Cab WIP Pics

I sold my biscuit jointer a while back because I hadn't used it for over a year or more...go figure! :lol: :lol:

And it is still working as well as the day I got it, thank you, Chuck! :eusa_danc


Do you know if the depth of the blade is adjustable?

I believe that when adjustments are made for biscuit size, that is basically a depth setting, so, yes????
 
J

jeff...

Re: Gun Cab WIP Pics

Cranking out some nice stuff there Chuck :icon_thum
 

Travis Porter

Travis
Corporate Member
Re: Gun Cab WIP Pics

IIRC, they come with 2 blades one straight for inset drawers and one offset I believe for 3/4. I think there were a couple of adjustments, but they were not much.
 

cpowell

New User
Chuck
Re: Gun Cab WIP Pics...Update

I managed to get into the shop last night and again this afternoon.

Got the drawers cut out, dovetailed, sanded and assembled. Mounted the drawer slides. Dimensioned stock for RP drawer faces and door. Routing was a breeze this time around. I guess I've moved up the RP learning curve a little. Sanded panels and stained RP edges then glued up.

Waiting on lock hardware and knobs.

Pics attached.

Chuck
 

Attachments

  • Inner Drawer Small.JPG
    Inner Drawer Small.JPG
    61.9 KB · Views: 208
  • Drawer Face Small.JPG
    Drawer Face Small.JPG
    63.5 KB · Views: 221
  • Cab Door Small.JPG
    Cab Door Small.JPG
    72.5 KB · Views: 213

cpowell

New User
Chuck
Re: Gun Cab WIP Pics...Update

Hand cut or machine cut dovetails?

Frame and panels look great!

Keller jig. Since the drawers have false fronts I didn't want to trouble with learning to make hand cut DTs. Plus I am at the point on this project where "good enough" applies. ;-)

Chuck
 

MikeH

New User
Mike
Re: Gun Cab WIP Pics

Chuck you're making progress and it looks great! Keep the pics coming.
 

sapwood

New User
Roger
Re: Gun Cab WIP Pics

Great progress Chuck! Reads as if you're moving with confidence now. Love the dovetail drawers :icon_thum

Don't slow down,
Roger
 

cpowell

New User
Chuck
Re: Gun Cab WIP ...Update

I didn't get to spend much time in the shop this past week but managed to put in a few hours yesterday. Ran the drawer fronts, door, inner shelf and top through a 1/8 roundover to just soften the edge a little. Sanded all the door/drawer frames.

I tried installing the molding and ended up ditching it entirely. I just didn't like the look after I got all 4 sides glued up an clamped down. Pulled them off before the tack set and sanded the glue off after a few hours drying time.

Mounted the door and drawer faces, and installed locks and knobs. I discovered a design error on the drawer faces. My plan to attach the false fronts was to use two screws into the top face frame and two screws into the bottom face frame. While I had room to screw into both top and bottom drawer face frames from the inside on the top drawer, I needed another 1/4 inch of frame width to do the same on the bottom attachment on the bottom drawer.

I screwed into the raised panel. I allowed 1/8 inch movement all round and the panel is only 4 inches total width. I don't believe there will ever be a problem with movement. If I had attached the false fronts before I had installed the drawer bottom I would have been fine. :eusa_doh:

The locks I used will need to be modified slightly. I need to add some bends in the metal locking lever to accommodate the installation. Fortunately we have a metal brake at work so that is not a problem.

It's starting to look pretty good now. Have a few errands to run and then hope to stain this afternoon. This is really my first experience with darkening wood...I don't like doing it. PITA and makes the wood look like something it's not. But, since he needs to match color with existing oak furniture it is necessary.

Pics attached.

Chuck

Edit in: Just realized I need to make the feet. Time to find a resource on bracket feet I guess.
 

Attachments

  • IMG_0041.JPG
    IMG_0041.JPG
    91.6 KB · Views: 215
  • IMG_0043.JPG
    IMG_0043.JPG
    89.1 KB · Views: 206
  • Front door open.JPG
    Front door open.JPG
    50 KB · Views: 205

NCPete

New User
Pete Davio
Re: Gun Cab WIP ...Update

there is a 'tip' on making bracket feet on The Woodworking Channel that shows making bracket feet, seems to run every other time I get on there.

nice job, Chuck!
 

Splinter

New User
Dolan Brown
Re: Gun Cab WIP Pics

Chuck, that is looking like a fine piece of furniture. Looking forward to the finish product.
 

DaveO

New User
DaveO
Re: Gun Cab WIP Pics

Chuck that is really coming together nicely. A very fine piece that will be cherished for a very long time. Great job! :eusa_clap :eusa_clap


Dave:)
 
Status
Not open for further replies.

Premier Sponsor

Our Sponsors

LATEST FOR SALE LISTINGS

Top