
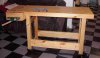
I finished my workbench last week. Haven't had time to take pictures between stuffing my face, making the stuff to stuff my face, and unwrapping presents.
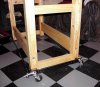
I based it on two plans from Popular Woodworking, basically combining the 24 hour workbench with the slab from the fancier one. I have no idea how many hours I put into this thing, but triple seems about right. It's all Southern Yellow Pine, made by ripping down 2x8's from the BORG. Finished with a couple of coats of BLO and paste wax. I made the mobile base by Frankensteining parts from two Portamate bases (the $30 ones from the BORG). I needed two extra long rails, which works out well since the other base will be used for my drill press. The short rails are sufficient for that.
Originally, I wasn't going to put anything on the forum until I read a post elsewhere about someone ready to throw in the towel. He had made a series of mistakes, and decided maybe woodworking wasn't for him. Ha! If you ever feel that way, send me a PM and I'll make you feel like a genius! From the highlight reel:
(1) When measuring for the location of the nut (for the bench bolt), measure either from the end of the tenon, or from the start of the rail, but not at random. Unless you want to learn how to cut a 1" plug to correct your mistake.
(2) When calculating the height of your workbench, don't forget to add in the height of your mobile base, or you'll be trimming the bottom of the legs. When trimming, try to keep the saw straight, so that you don't end up with three legs 31" and one 30 7/8"
(3) When shimming a leg cut short by 1/8", GLUE THE SHIM TO THE BOTTOM OF THE LEG. Not the top. Yes, it's easy to lose track of what goes where as you're rotating the frame, but this is important. Otherwise, you end up having to cut off the shim, cut a new shim, and glue it in the correct spot.
(4) Read the instructions when installing your vise.
The only thing that went exceptionally well was drilling the holes for the bench dogs and holdfasts. I used a plunge router to drill the first inch, then finished it with a spade bit (with extension). I clamped a piece of scrap to the bottom to prevent tearout.
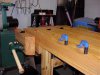
The funny thing is, after it's all said and done, I'm exceptionally pleased how it turned out, despite the endless list of things that went wrong. It's heavy enough not to move when planing/ sawing/ chiseling, but light enough I can move it around. Already made a couple of gouges, so I no longer have any hangups of tossing tools onto it or slipping with a screwdriver.
I based it on two plans from Popular Woodworking, basically combining the 24 hour workbench with the slab from the fancier one. I have no idea how many hours I put into this thing, but triple seems about right. It's all Southern Yellow Pine, made by ripping down 2x8's from the BORG. Finished with a couple of coats of BLO and paste wax. I made the mobile base by Frankensteining parts from two Portamate bases (the $30 ones from the BORG). I needed two extra long rails, which works out well since the other base will be used for my drill press. The short rails are sufficient for that.
Originally, I wasn't going to put anything on the forum until I read a post elsewhere about someone ready to throw in the towel. He had made a series of mistakes, and decided maybe woodworking wasn't for him. Ha! If you ever feel that way, send me a PM and I'll make you feel like a genius! From the highlight reel:
(1) When measuring for the location of the nut (for the bench bolt), measure either from the end of the tenon, or from the start of the rail, but not at random. Unless you want to learn how to cut a 1" plug to correct your mistake.
(2) When calculating the height of your workbench, don't forget to add in the height of your mobile base, or you'll be trimming the bottom of the legs. When trimming, try to keep the saw straight, so that you don't end up with three legs 31" and one 30 7/8"
(3) When shimming a leg cut short by 1/8", GLUE THE SHIM TO THE BOTTOM OF THE LEG. Not the top. Yes, it's easy to lose track of what goes where as you're rotating the frame, but this is important. Otherwise, you end up having to cut off the shim, cut a new shim, and glue it in the correct spot.
(4) Read the instructions when installing your vise.
The only thing that went exceptionally well was drilling the holes for the bench dogs and holdfasts. I used a plunge router to drill the first inch, then finished it with a spade bit (with extension). I clamped a piece of scrap to the bottom to prevent tearout.
The funny thing is, after it's all said and done, I'm exceptionally pleased how it turned out, despite the endless list of things that went wrong. It's heavy enough not to move when planing/ sawing/ chiseling, but light enough I can move it around. Already made a couple of gouges, so I no longer have any hangups of tossing tools onto it or slipping with a screwdriver.

")