
You are using an out of date browser. It may not display this or other websites correctly.
You should upgrade or use an alternative browser.
You should upgrade or use an alternative browser.
Let's see it.....your bench
- Thread starter Chris C
- Start date
- Status
- Not open for further replies.
Do you have to be able to see the top of the bench to post a pic?
The only way I could post a picture of mine showing the actual bench was to use a picture from right after it was finished being built. Before the clutter started. Maybe I should post an 'after' picture - nah - that would be ugly.
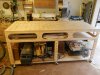
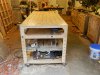
I just got mine done over the Christmas break. It is inspired by Ron Paulk's designs. It is built from 23/32 pine plywood I got from Home Depot for $30/sheet. It has very few voids and is pretty good plywood. The top is bored with 20mm holes created by a Freud router bit and spaced with pegboard and a Woodrave router base. I like the fact that tools can be moved to the lower level to keep the top surface more clean. It rolls on 3 inch totally locking casters I got form eBay. They are pretty good.
Attachments
Here is a bench I made a few years ago alongside Jeremy (Woodwrangler) after he had decided to do one as well. I'm not really sure where we came up with the design, but I made it out of some Sapele and maple I had laying around. The center trays can be flipped for storage or a smooth work surface, or to allow for middle clamping. Someday I will complete the bottom for better storage options.


Here is my workbench I built about a year ago. I was thinking about making a build journal on it. This was my first major project.
It is a Nicholson (English) style workbench. All of the lumber was taken from 2x12 SYP boards from the home store, with the exception of the vise jaw, which is 8/4 white oak. I made this workbench entirely by hand with vintage hand tools that I restored. Not a great picture, but its all I have right now.

It is a Nicholson (English) style workbench. All of the lumber was taken from 2x12 SYP boards from the home store, with the exception of the vise jaw, which is 8/4 white oak. I made this workbench entirely by hand with vintage hand tools that I restored. Not a great picture, but its all I have right now.
Love all these bench pics. Reminds me I really need to build a proper bench.
Here is my workbench I built about a year ago. I made this workbench entirely by hand with vintage hand tools that I restored.
Is that from the naked woodworker?
.JPG")


Here's mine. Split-top Roubo, Benchcrafted hardware and plans. Made from Ash. The split top made it much easier for me to make, because I was able to joint and plane with my Grizzly 12" jointer/planer combo machine. It's a little too big for my 1-car garage workshop, but I don't care. The little white strip at the top of the sliding deadman is a plastic spacer. The deadman was a little grabby, but with the spacer in, it slides easy with one finger.


How about an adjustable bench made from hard maple and American beech:
From low:

To high:

and in between in 1" increments:

The adjustable legs and ratchet mechanism appear spindly and unstable, but are just the opposite. The bench is rock solid at all heights.


It has three types of vises- a full-width, twin-screw, end vise (with recessed sprockets and chain, and custom cover),


a quick-release face vise,

and a sliding tail vise.


Since they run cross-grain, the end aprons (end caps) were not glued, but left to float to allow for seasonal expansion. There are no exposed bolts or plugged bolt holes to mar the appearance of the end caps. Instead, they are held snug to the bench with hidden bolts which can be tightened easily.

The end caps are positioned with blind, full-width mortise and tenon joints. Barrel bolts (in holes drilled from the bottom of the aprons), threaded rod (in holes drilled in back of the aprons and inserted in a hole drilled in the ends of the bench) and a nut w/washer (in a pocket on the underside of the bench) hold the aprons securely to the bench. Large, hand-cut dovetails keep the apron corners tight.

And then there is the adjustable height assembly table:

From low:
To high:
and in between in 1" increments:
The adjustable legs and ratchet mechanism appear spindly and unstable, but are just the opposite. The bench is rock solid at all heights.
It has three types of vises- a full-width, twin-screw, end vise (with recessed sprockets and chain, and custom cover),
a quick-release face vise,
and a sliding tail vise.
Since they run cross-grain, the end aprons (end caps) were not glued, but left to float to allow for seasonal expansion. There are no exposed bolts or plugged bolt holes to mar the appearance of the end caps. Instead, they are held snug to the bench with hidden bolts which can be tightened easily.
The end caps are positioned with blind, full-width mortise and tenon joints. Barrel bolts (in holes drilled from the bottom of the aprons), threaded rod (in holes drilled in back of the aprons and inserted in a hole drilled in the ends of the bench) and a nut w/washer (in a pocket on the underside of the bench) hold the aprons securely to the bench. Large, hand-cut dovetails keep the apron corners tight.
And then there is the adjustable height assembly table:

Congratulations Mike!
I will bet that feels great to have your bench!
(and it looks good too!)

Alan, that is an extraordinary bench and beautiful. How well does it perform when its adjusted high?
It does great, even better than I had hoped. The top no longer looks like that- wear, tear, and carelessness
- Status
- Not open for further replies.
Premier Sponsor
Our Sponsors
LATEST FOR SALE LISTINGS
-
-
-
 SOLD -- $75: Gast moa v113 Vacuum Pump Veneer, 60" bag and board
- Started by peterdnight
- Replies: 1
-
GONE: Gladiator 5 cleats, 10 hangers, Paper Towel and Shelf
- Started by peterdnight
- Replies: 3
-
SOLD -- $100 Makita mac700 portable air + grex pin nailer + 2 others + 50' hose
- Started by peterdnight
- Replies: 1