
You are using an out of date browser. It may not display this or other websites correctly.
You should upgrade or use an alternative browser.
You should upgrade or use an alternative browser.
Guitar #2...Cedar
- Thread starter Chris C
- Start date
- Status
- Not open for further replies.
I made the fingerboard today. Had a piece of scrap walnut that was a good candidate. Both faces had been through the planer already. I jointed both edges true then scribed a line all the way around. Then plane to the line. Simple.


Sized down to 7/32. Time to mark and cut the kerfs for the frets.
Sized down to 7/32. Time to mark and cut the kerfs for the frets.


Earlier last week I bent a few test strips of cherry just to see how they wanted to act. The last piece I bent came out pretty well so I'm going to use it. I sanded down the inside of the strip with 150 grit to remove any imperfections (ripples, minor kinks, etc).
Then I took a mill file and ground both edges safe on the belt sander.

I test fit the binding and marked any irregular transitions in the binding channel which caused gaps that were difficult to close. Then used the file to smooth and blend the channel until the gaps were eliminated. It's difficult to see the subtle imperfections in the channel until you test fit the binding.
File a small bit, then check the fit. Repeat if necessary. I was unsure how well that would address a couple of bigger gaps but it worked perfectly.
I do have two small areas that have a gap of 1/32 or so but I don't want to file those areas any more unless absolutely necessary.. I may be able to close them when I glue. If not, I can fill it afterwards and it will never show.
Then I took a mill file and ground both edges safe on the belt sander.
I test fit the binding and marked any irregular transitions in the binding channel which caused gaps that were difficult to close. Then used the file to smooth and blend the channel until the gaps were eliminated. It's difficult to see the subtle imperfections in the channel until you test fit the binding.
File a small bit, then check the fit. Repeat if necessary. I was unsure how well that would address a couple of bigger gaps but it worked perfectly.
I do have two small areas that have a gap of 1/32 or so but I don't want to file those areas any more unless absolutely necessary.. I may be able to close them when I glue. If not, I can fill it afterwards and it will never show.
Chris - this mini file set from harbor freight is the cats meow for smoothing out binding channels and other things during guitar builds. It has lots of different propfiles, is cheap 3.99 and effective - buy two or three sets for this price.

http://m.harborfreight.com/12-piece-precision-needle-file-set-4614.html
http://m.harborfreight.com/12-piece-precision-needle-file-set-4614.html
Chris - this mini file set from harbor freight is the cats meow for smoothing out binding channels and other things during guitar builds. It has lots of different propfiles, is cheap 3.99 and effective - buy two or three sets for this price.
Thanks Jeff..I'll check those out.

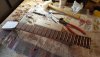
It was a busy day today. First I cut the fret slots in the fingerboard. I had marked them previously...Martin 25.4 scale.

Then I marked the taper and planed it down. I started to sharpen the iron on my Sargent 422 but then remembered the Stanley #6 that I picked up a few weeks ago. I knew it was razor sharp so I decided to give it a turn. That is a nice user plane. Made quick work of the taper.


Next I ground down the barrel bolts I'm using to attach the neck. They were a touch wide for the mortise. They fit perfectly now. I need to drill the bolt holes in the neck a little deeper or shorten the bolts....but I'll think on that a while first. They'll draw up snug but bottom out before they get tight.

It's getting closer. I'll have some liquid hide glue here this week. Hopefully I'll be able to attach the bindings this week
 .
.
I also started the final shaping of the neck...still a lot of spokeshave and scraper work left to do.
Then I marked the taper and planed it down. I started to sharpen the iron on my Sargent 422 but then remembered the Stanley #6 that I picked up a few weeks ago. I knew it was razor sharp so I decided to give it a turn. That is a nice user plane. Made quick work of the taper.
Next I ground down the barrel bolts I'm using to attach the neck. They were a touch wide for the mortise. They fit perfectly now. I need to drill the bolt holes in the neck a little deeper or shorten the bolts....but I'll think on that a while first. They'll draw up snug but bottom out before they get tight.
It's getting closer. I'll have some liquid hide glue here this week. Hopefully I'll be able to attach the bindings this week
.I also started the final shaping of the neck...still a lot of spokeshave and scraper work left to do.
I glued on the edge binding today. It came out OK...actually better than that but I’m being a tad picky today. But I did learn a few valuable lessons and I guarantee the next will be better. It has a few gaps that I had to fill...probably won't be that noticeable after I finish it. I think a dark purfling strip would make it easier to install the binding and hide a few flaws. I'll incorporate that on the next build.


Over the last few days I've started cleaning up the neck joint, put the radius on the fretboard (16 degrees) and installed the frets.


Next I need to finish shaping the neck and fitting the neck joint.
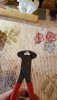
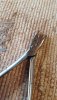
I found the nippers at Agri-Supply...ground them down on the belt sander so they will cut nearly flush. Not bad for $5.99. The other tool is a pair of dental pliers of some sort. They must be for making braces or such. They have a groove that fits the tang on the fret wire perfectly...makes bending them a snap,
Next I need to finish shaping the neck and fitting the neck joint.
I found the nippers at Agri-Supply...ground them down on the belt sander so they will cut nearly flush. Not bad for $5.99. The other tool is a pair of dental pliers of some sort. They must be for making braces or such. They have a groove that fits the tang on the fret wire perfectly...makes bending them a snap,
Attachments
I started shaping the neck and heel today. I also made the bridge blank..... Walnut just like the fretboard.

Then I had to check the set of the neck. Cumpiano says an airspace of 25/64 to 7/16 at the saddle slot is ideal for a 3/8" bridge.

Bingo..... Don't know how that happened but I'll take it.
Then I had to check the set of the neck. Cumpiano says an airspace of 25/64 to 7/16 at the saddle slot is ideal for a 3/8" bridge.
Bingo..... Don't know how that happened but I'll take it.
This is so great. Thanks for sharing! I have fantasies about being skilled enough to do this one day.
I also really appreciate the understated aesthetics of your guitar... never really cared for mother of pearl rosettes or anything ornate.
Do knots affect the tone at all?
I also really appreciate the understated aesthetics of your guitar... never really cared for mother of pearl rosettes or anything ornate.
Do knots affect the tone at all?
This is so great. Thanks for sharing! I have fantasies about being skilled enough to do this one day.
I also really appreciate the understated aesthetics of your guitar... never really cared for mother of pearl rosettes or anything ornate.
Do knots affect the tone at all?
Thanks. I tried to keep it simple. The knots should have no effect as the back and sides have (in theory) little to do with tone.
I started finishing the soundbox yesterday...with Tru-oil. So far so good.


Setting the bridge ...


Tape dam to hold bridge in place. I used Tru-oil...6 coats. Scraped and sanded it off for gluing the bridge.

In the clamps...there is a clamping caul inside the guitar I made specifically to fit over the X-bracing under the bridge.

648.97 mm (25.55 inches)..... bingo.

A few things left to do but it should be playing this week...
Tape dam to hold bridge in place. I used Tru-oil...6 coats. Scraped and sanded it off for gluing the bridge.
In the clamps...there is a clamping caul inside the guitar I made specifically to fit over the X-bracing under the bridge.
648.97 mm (25.55 inches)..... bingo.
A few things left to do but it should be playing this week...
It's not finished yet but I couldn't stand it. The frets need dressing....fretboard is not glued down...and a few other odds and ends. But I had to hear it play so I had a friend who is an accomplished player give it a turn...
https://www.youtube.com/watch?v=nbP8xvWXuns
https://www.youtube.com/watch?v=nbP8xvWXuns
- Status
- Not open for further replies.