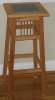
LOML Googled plant stand plans, found what she liked, and downloaded from PlansNow. She printed the plans and presented them to me when I got home from work. So, there you go!
I modified all the dimensions to fit the area I had available for the stand footprint. I found the plans to be only moderately useful. I used the basic 4 degree bevel/miter on the top/bottom of the legs, then modified the distance between rails to get the desired balance. As with all "bought plans", there are elements that are useful and some that are not. I found some of the recommendations for techniques to be unnecessarily time consuming and overly complicated. The plans called for a self-centering dowel jig (new tool!), which made it easy to match up tenon centerlines on the legs with the rails, however, I used my own approach to establish reference lines to make the joints accurate and tight.
I found out the importance of marking sides of the legs that get the mortises. Yeah, I cut two holes in one leg on the wrong side. :eusa_doh: Of course, I didn't have any more 6/4 stock to cut another. That leg goes to the back. :-D I actually was pleased with the plugs I cut to cover up. The grain and color are very close.
As far as angles, once you decide the miter/bevel angle at the top of the legs, all of the other pieces get the same angle. The top rail gets 4 degree bevel on top and sides mitered to 4 degrees. The center and bottom rails just get 4 degree mitered sides. All the bevel rip cuts were done on the TS. All end grain bevel and miter cuts on the CMS.
To cut the tenons on the legs and rails, I laid out a single pair of legs and set the rails in place then marked the non-beveled edge for a reference. I used the reference line to determine the doweling jig start point then offset to create a rounded tenon. I made the inserts (mortises?) using TS and roundover bit.
I believe it was worth the 5 dollars paid for the plan. I can see now that the same techniques would apply to any piece with splayed legs and I now understand how to go about cutting the pieces and marking references for a tight fit. I believe applying this splay angle concept to a table would be very easy.


")