
You are using an out of date browser. It may not display this or other websites correctly.
You should upgrade or use an alternative browser.
You should upgrade or use an alternative browser.
Intarsia Wall Project
- Thread starter JNCarr
- Start date
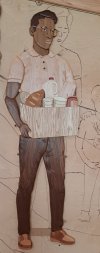
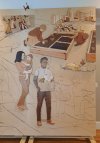
Here is the latest addition to "The Wall". Several thousand pounds of food are donated each year by the parishioners. This is the first character of three depicting parishioners carrying food out to the community. 60"h by 18"w. 129 pieces (not including spacers). Basswood, birch, bloodwood, cedar, cherry, cypress, hard maple, poplar, red oak, sapele, walnut (heart and sap), wenge. Spacers are 3, 6, 9 and 12 mm Baltic birch ply. This brings the total for the project up to 639 pieces.
Attachments
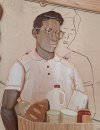
Thanks - still a lot of learning to do.The human face is one of the hardest to do in intarsia. Joe, you really
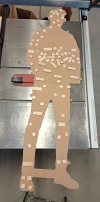
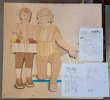
The last month's work has been completing the design of the sky, background and path, cutting many of those and working on the latest figures - a woman and boy carrying a box of food. These are cut and dry fit including spacers. Many thanks to @bobby g for donation of the yellow heart for the bananas and to @hahn_ab for a bunch of 3mm baltic birch to be used as spacers.
There are 172 pieces - ash, basswood, birdseye maple, bloodwood, birch, canary wood, cherry, cypress, hard maple, poplar, purple heart, red grandis, red oak, sapele, torrefied ash, walnut, white oak, wormy maple, zebra wood.
Next up is sculpting using the drawn artwork as reference and finishing each piece individually.
Attachments
Last edited:
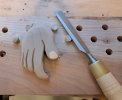
The creases were formed by using a 1/16 diameter, 6 degree taper bit using a fluting cut path in VCarve. If I want to leave a sharp crease, the flute is started at 0" depth on the inside and driven to around 0.2" on the outside. If I want to just mark where a softer crease will go, I finish the cut depth at around 0.08" - just enough to see and chisel/sand out.Beautiful as always Joe! How did you create the "creases" in the clothing?
Premier Sponsor
Our Sponsors
LATEST FOR SALE LISTINGS
-

-
-
-
-
 SOLD -- $75: Gast moa v113 Vacuum Pump Veneer, 60" bag and board
- Started by peterdnight
- Replies: 1