Intarsia Wall Project

JNCarr

Joe
Corporate Member
A few months back, I committed to designing and building a "somewhat large" intarsia project for our church.
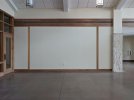
The work will cover a significant portion of one of the entry area's (Narthex) walls - the resulting image will be 15' wide by 9'-3" high. For you math types - yes, that's very close to the golden rectangle.
The first picture shows the wall and the added left and right boundaries rendered onto it.
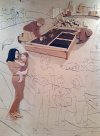
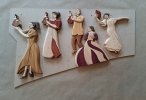
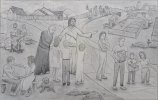
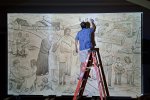
After about 2 months of discussions and rough drawings, the final blocking image was approved as shown. The image will depict seven of the many ministries that go on in the church.

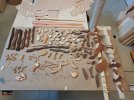
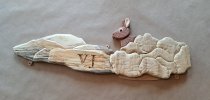
First step - figure out how to construct a large integrated image that would consist of an estimated 2000-2500 individually cut and shaped pieces of wood.
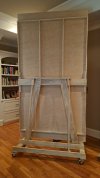
I decided on using 3 panels on marine grade Baltic birch plywood as the substrates. Each panel comes as 5' x 10' so the lengths could be cut to the desired 111".
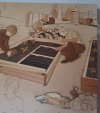
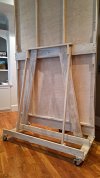
Each panel would have a "poor man's" torsion box frame and be moved about on a custom trolly.
The next step was to figure out how to physically handle such a large project in my small shop. Answer - there's no way. So my office/library became the assembly area - fortunately we have very high ceilings.
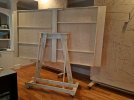
To get the panels through our doors, a pivot was added to allow the panels to be rotated 90 degrees. The pivot point was off centered to the panel to accommodate the caster height. See pictures.

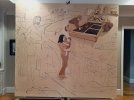
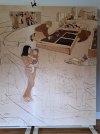
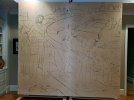
After the trollies were built and panels attached, they were lined up on one wall of our great room and the rough blocking image was projected and traced onto the panels. While the actual scenes will all be detailed to much greater degree and will likely change from the blocking drawing, this gives a good overall perspective to work with. The panels were then rotated 90 degrees and wheeled into the office. Although all three panels can be lined up, it's pretty tight so I can work on two of them at a time and move the third aside.

More to come.
 

Attachments

  • Narthex wall with side frame.jpg
    Narthex wall with side frame.jpg
    2 MB · Views: 189
  • Blocking Final.jpg
    Blocking Final.jpg
    7.2 MB · Views: 181
  • Panel on Frame Upright.jpg
    Panel on Frame Upright.jpg
    1.1 MB · Views: 188
  • Trolly Closeup.jpg
    Trolly Closeup.jpg
    5.5 MB · Views: 188
  • Panel on Frame Rotated.jpg
    Panel on Frame Rotated.jpg
    3.5 MB · Views: 181
  • Tracing the Artwork.jpg
    Tracing the Artwork.jpg
    2.5 MB · Views: 198
  • Two Panels with Garden cleats.jpg
    Two Panels with Garden cleats.jpg
    8.4 MB · Views: 194

JNCarr

Joe
Corporate Member
Each scene will be drawn in final detail, cut out, coated with a finish (no stains, paints, dyes) and assembled onto a 1/4" MDF backer board that is a bit undersized - see top of the garden scene poly picture. This allows a more manageable assembly and the ability to place the scene on the main panels to make a final determination about the position relative to the entire scene at life size. The scenes are screwed onto the backer using tabs added to the MDF. Once all the scenes are placed and the background mounted between them, most of the tabs will be cut off and each scene glued to its backer. The exceptions are those scenes with significant overlap across panels, such as the woman and child. To facilitate installation at the church, those will be mounted in the field after the panels are mounted. Background pieces one side of the field mounted scene will also be left off and dressed in the field - there is no way the panels will align in the field EXACTLY as they are when they're being built.

Currently three scenes have been cut out and assembled - the garden scene, entered in the monthly contest, a woman holding a child and the Durham cityscape. These account for 336 pieces not including the spacers used to add depth to some pieces - spacers shown in garden scene.
 

Attachments

  • Garden Woman Cityscape closeup.jpg
    Garden Woman Cityscape closeup.jpg
    2.8 MB · Views: 139
  • Garden Woman and Cityscape.jpg
    Garden Woman and Cityscape.jpg
    5.8 MB · Views: 139
  • Garden scene Poly coating.jpg
    Garden scene Poly coating.jpg
    2.7 MB · Views: 138

ptt49er

Phillip
Corporate Member
Not only is that an overwhelming project, the detail so far is incredible! Looking forward to seeing the progress!
 

drw

Donn
Corporate Member
Joe, I am reminded of Michelangelo taking on the Sistine Chapel! This is a huge undertaking, but knowing you and your attention to detail I know you are up to the challenge. What church do you attend (because when your work is complete Adele and I want to see it!)?
 

JNCarr

Joe
Corporate Member
Joe, I am reminded of Michelangelo taking on the Sistine Chapel! This is a huge undertaking, but knowing you and your attention to detail I know you are up to the challenge. What church do you attend (because when your work is complete Adele and I want to see it!)?
This will be installed at Holy Infant Catholic Church on NC54. Dont gas up the car yet - it'll be another 9 months (if I'm lucky).
 

Michael Mathews

Michael
Corporate Member
Wow! I'm glad you're in the one picture. That really helps to give perspective on the size of this project! Can't wait to see it finished!
 

creasman

Jim
Staff member
Corporate Member
Joe, simply amazing! Can't wait to see the finished work! I hope you all are planning an open house.
 

bluesman

New User
tom
Hi Joe! What an awesome undertaking!! Looking so beautiful already. I am Tom, new member, was looking to design one of these for a wall in my home, about half the size of yours, approx., 8 long and 4 to 5 tall, half circle of a pacific NW forest scene...animals, birds, fish, etc. would like to know if I may pick your highly developed gray cells for design and production? Blessings to you and yours, Tom
 

JNCarr

Joe
Corporate Member
Hi Joe! What an awesome undertaking!! Looking so beautiful already. I am Tom, new member, was looking to design one of these for a wall in my home, about half the size of yours, approx., 8 long and 4 to 5 tall, half circle of a pacific NW forest scene...animals, birds, fish, etc. would like to know if I may pick your highly developed gray cells for design and production? Blessings to you and yours, Tom
Thanks for the kind words, Tom. My first piece of advice - "Don't try this at home!". Just kidding, but be prepared to spend a LOT of time on it.
I'm happy to help however I can. FYI, since you are new, the REAL expert in intarsia is @ScottM and in scrollwork @Berta and @Artisan Pirate (as well as Scott).
As for artwork, if you are not designing your own, you might want to check out Judy Gail Roberts for patterns.

Will send you a PM.
 

ScottM

Scott
Staff member
Corporate Member
Hi Joe! What an awesome undertaking!! Looking so beautiful already. I am Tom, new member, was looking to design one of these for a wall in my home, about half the size of yours, approx., 8 long and 4 to 5 tall, half circle of a pacific NW forest scene...animals, birds, fish, etc. would like to know if I may pick your highly developed gray cells for design and production? Blessings to you and yours, Tom
Joe gives me to much credit but I do know something about intarsia. You first start with an idea, which you have. Then you go to the design. Best to draw it out on paper and then draw it to 100% scale. The next step is wood selection. Grain is important but color is critical. Then comes cutting, shaping and assembly. Simple right?
My advice is start off small. There are excellent beginner books and patterns by Judy Gale Robert, Kathy Wise and Janette Square. BTW Janette is almost a neighbor of yours. Her studio is in Eugene, OR.
 

bluesman

New User
tom
Joe gives me to much credit but I do know something about intarsia. You first start with an idea, which you have. Then you go to the design. Best to draw it out on paper and then draw it to 100% scale. The next step is wood selection. Grain is important but color is critical. Then comes cutting, shaping and assembly. Simple right?
My advice is start off small. There are excellent beginner books and patterns by Judy Gale Robert, Kathy Wise and Janette Square. BTW Janette is almost a neighbor of yours. Her studio is in Eugene, OR.
Thank you so much Scott.
I have had the idea for some time now due to large, peaked walls on 2 sides of our bedroom. My idea is to turn the artwork into a transparency, project it onto paper in my shop, yes, full scale, trace it out, add any details I want. Then, start with one animal or other detail and do it one piece at a time. I have many different woods for coloring, tools for texturing, etc. I have had some books by the authors you mentioned for some time, just never thought I would be entering into one of this magnitude!! HAHAHA.....but that is how we learn! Stretch the imagination and boundaries! Live in the shop for a year, eat scraps, shun humanity...all for the sake of craftsmanship...HAHAHAHA
Blessings to you and yours Scott
Tom
 

ScottM

Scott
Staff member
Corporate Member
Thank you so much Scott.
I have had the idea for some time now due to large, peaked walls on 2 sides of our bedroom. My idea is to turn the artwork into a transparency, project it onto paper in my shop, yes, full scale, trace it out, add any details I want. Then, start with one animal or other detail and do it one piece at a time. I have many different woods for coloring, tools for texturing, etc. I have had some books by the authors you mentioned for some time, just never thought I would be entering into one of this magnitude!! HAHAHA.....but that is how we learn! Stretch the imagination and boundaries! Live in the shop for a year, eat scraps, shun humanity...all for the sake of craftsmanship...HAHAHAHA
Blessings to you and yours Scott
Tom
Tom I like your style. Feel free to bounce any questions or ideas off of me. Once you do start, take and share lots of pictures.
 

JNCarr

Joe
Corporate Member
The latest additions to the project are the complimentary planter box on the far right, the rock, bush and rabbit and the Santa Nino parade in the mid-upper section.
The planter box is made of cedar, walnut, maple and tiger wood - 56 pieces
The rock/bush/rabbit consists of spalted tamarind, poplar, sapele, maple, walnut and basswood for the glint in the rabbit's eye - 34 pieces.
The "VJ" carved in stone is "Vive Jesu" French for "Live Jesus"
The San Nino parade has canary wood, walnut (selected sapwood and heartwood). sapele, cypress, birch, bloodwood, purple heart, basswood, birdseye maple, hard maple - 86 pieces
My better half did the concept art for the San Nino.
All in all 510 pieces to date.

Thanks for looking --
 

Attachments

  • Animal Mineral Vegitable.jpg
    Animal Mineral Vegitable.jpg
    1.8 MB · Views: 90
  • Build on 12.19.23.jpg
    Build on 12.19.23.jpg
    2.1 MB · Views: 82
  • Garden CLoseup 12.9.23.jpg
    Garden CLoseup 12.9.23.jpg
    1.8 MB · Views: 88
  • San Nino Parade.jpg
    San Nino Parade.jpg
    2.7 MB · Views: 89

Premier Sponsor

Our Sponsors

LATEST FOR SALE LISTINGS

Top