Desk/shop light

Status
Not open for further replies.

Pop

New User
Pop Ryan
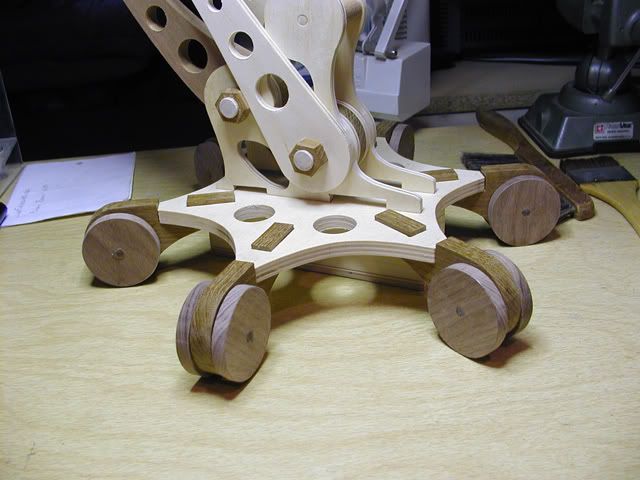
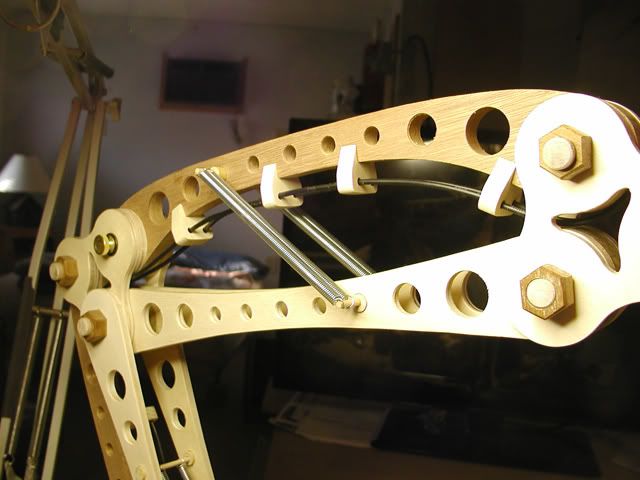
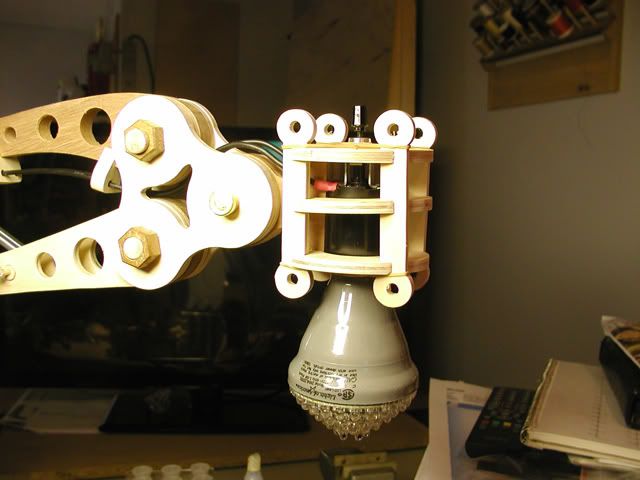
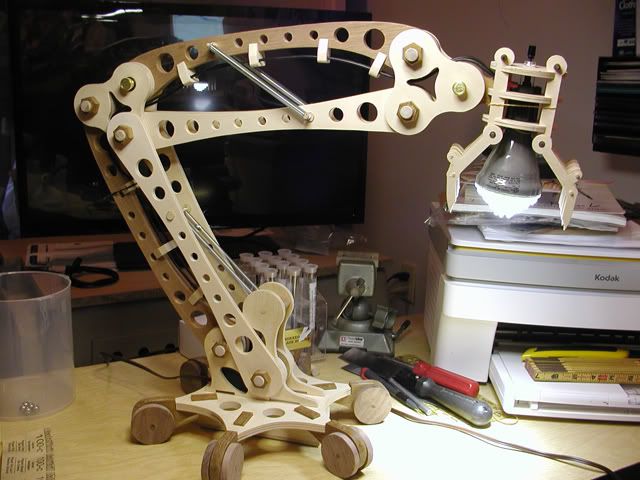
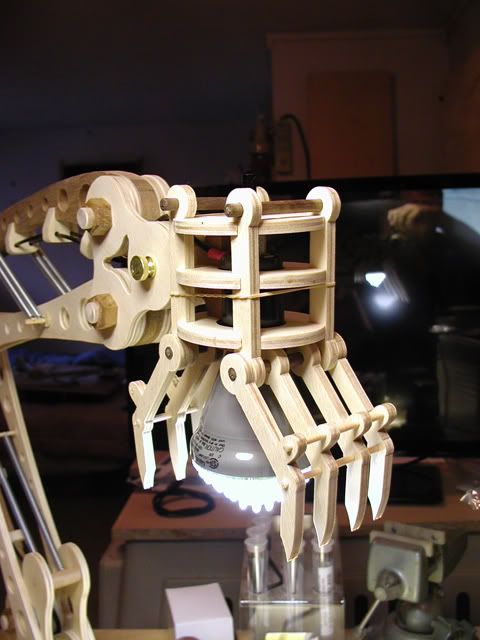
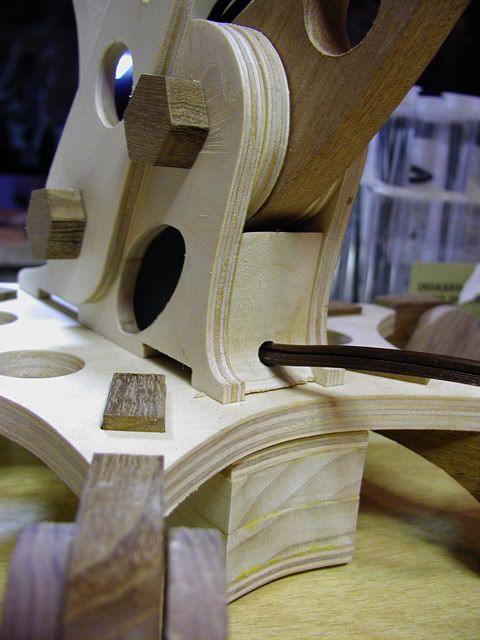
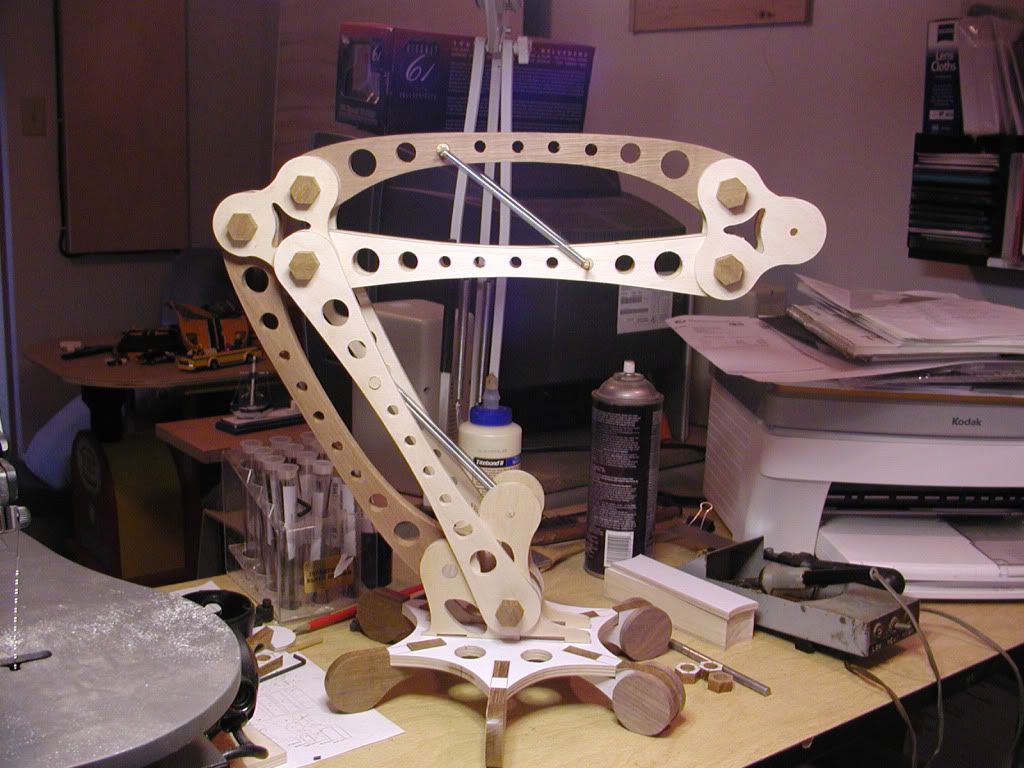
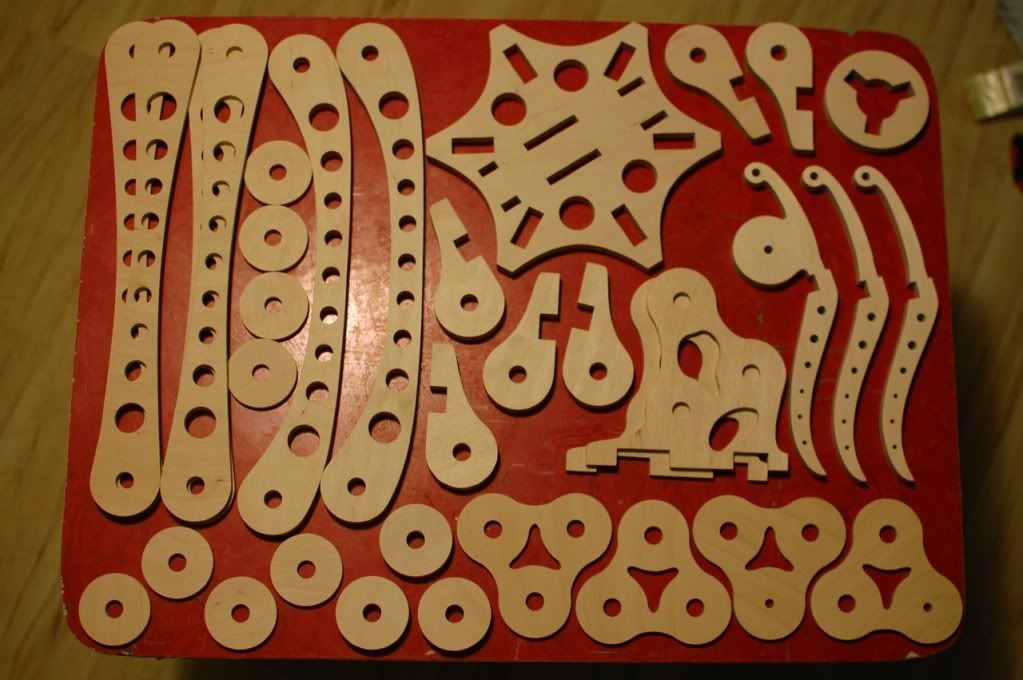
Saw this a while ago and was intrigued with the design. Found a set of plans over the Winter but wasn't able to get out in the shop to get started. As usual I can't let well enough alone so I'm modifying the original plans to suite me. Adding nuts and bolts head to pivot dowels and changing hot high intensity light for an LED I'll design and build from shop scraps left over from LED tail lights I made for Ethel a couple years ago. I'll need to design a power supply to use since I designed the tail lamps to use 12v dc car source. I'll post more as I go along... Got to adjust some of my time in the shop now because of more joint disintegration but GREAT to get back out making sawdust and splinters.

P1010941.jpg


FNLDKGWGDTLSSE8.jpg
 
Last edited:

lbtripp

New User
Lyell
COOL!! Would like to see pictures of the finished lamp.:icon_thum:icon_thum

How long did it take you to cut all those parts out??
 

Sealeveler

Tony
Corporate Member
Some beautifully precise cutting there.I'll trade you my black metal junk light for your piece of art.
Tony
 

ehpoole

Moderator
Ethan
Rather than go to the trouble of designing your own power supply, you can simply purchase a 12VDC wall-wart adapter, snip off the [connector] end and wire it direct to your lamp (with a switch, of course).

There's no real reason to reinvent the wheel for such a simple job. :wink_smil

Though, if you really want to design your own power supply, a 15-24VAC transformer, a 1A or 2A bridge rectifier, a pair of filter capacitors, a small (0.1uF ceramic) filter capacitor, and a 7812 voltage regulator with a heatsink. and you will have a nice, simple, linear regulator that can provide up to 1-1.5A at 12VDC (provided the transformer is rated atleast 1-1.5A @ 15-24VAC).

The wall-wart, however, will be easier and cheaper. :wsmile:
 

Pop

New User
Pop Ryan
Rather than go to the trouble of designing your own power supply, you can simply purchase a 12VDC wall-wart adapter, snip off the [connector] end and wire it direct to your lamp (with a switch, of course).

There's no real reason to reinvent the wheel for such a simple job. :wink_smil

Though, if you really want to design your own power supply, a 15-24VAC transformer, a 1A or 2A bridge rectifier, a pair of filter capacitors, a small (0.1uF ceramic) filter capacitor, and a 7812 voltage regulator with a heatsink. and you will have a nice, simple, linear regulator that can provide up to 1-1.5A at 12VDC (provided the transformer is rated atleast 1-1.5A @ 15-24VAC).

The wall-wart, however, will be easier and cheaper. :wsmile:

The high intensity white led's I'm using draw too much current for an off the wall power supply. If I series them I need at least 50vdc / 2amp to handle all 12 of them (current is the same in all parts of a series circuit but voltage is the sum of the drop across each component). If I parallel them I need less voltage (6vdc) but much more current. I'll probably do a series/parallel set up to get the best of both worlds and a cheaper supply. I currently have a circuit I just need to up the output of the bridge I have in it now. OR I could just go get a stupid LED indoor 60 watt replacement spot bulb and put a regular socket in the lamp part... I can never do anything simple...ask my wife. LOL
 

Pop

New User
Pop Ryan
Here ya go! This site has a set of plans that actually use an LED screw in bulb instead of the hot high intensity bulb in the earlier plans I found. Looks almost exactly like the older set of plansI have. Can't say I like the shape of the lamp head though. I'm thinking something that may resemble a 'Transformer' for the grandkids. Have to watch the weight though or get stronger counter weight springs.

http://www.instructables.com/id/Woodpunk-LED-Desk-Lamp/

Pop
 

ehpoole

Moderator
Ethan
The high intensity white led's I'm using draw too much current for an off the wall power supply. If I series them I need at least 50vdc / 2amp to handle all 12 of them (current is the same in all parts of a series circuit but voltage is the sum of the drop across each component). If I parallel them I need less voltage (6vdc) but much more current. I'll probably do a series/parallel set up to get the best of both worlds and a cheaper supply. I currently have a circuit I just need to up the output of the bridge I have in it now. OR I could just go get a stupid LED indoor 60 watt replacement spot bulb and put a regular socket in the lamp part... I can never do anything simple...ask my wife. LOL

Good God Man! That's 100-Watts of LED lighting!:rotflm: Depending on the efficiency of your LEDs, that should compare with a 300-1,000W incandescent light bulb!

If you really need that much light (and power) some ready-made power supply options:

Table Top Supplies (essentially laptop style supplies)

12V @ 8.4A (100W)
http://www.jameco.com/webapp/wcs/stores/servlet/Product_10001_10001_1940846_-1

24V @ 5A (120W)
http://www.jameco.com/webapp/wcs/stores/servlet/Product_10001_10001_1940871_-1

48V @ 2.5A (120W)
http://www.jameco.com/webapp/wcs/stores/servlet/Product_10001_10001_1940889_-1

An Open Frame Supplies (enclose in a box of your choice)

12V @ 8.5A (102W)
http://www.jameco.com/webapp/wcs/stores/servlet/Product_10001_10001_374089_-1

12V @ 12.5A (150W)
http://www.jameco.com/webapp/wcs/stores/servlet/Product_10001_10001_213681_-1

48V @ 2.1A (100.8W)
http://www.jameco.com/webapp/wcs/stores/servlet/Product_10001_10001_216710_-1

48V @ 2.1A (100.8W)
http://www.jameco.com/webapp/wcs/stores/servlet/Product_10001_10001_301479_-1

However, if you can work with a 19V regulated power supply, my suggestion is to pick up a used (or new) laptop power supply. Many of the large 17" laptops use a single-voltage switched power supply rated at 19-20VDC typically, with outputs of 100-Watts or greater (mine use a mix of 100W and 120W power supplies). Some of the latest 17" laptops use power supplies with outputs of as much as 140+ Watts. If you need to knock off 1V off the 19V for an output of 18VDC, simply place two power rectifiers (diodes, 6A @ 50VDC should work nicely) in series, their combined forward voltage drop should result in an output very close to 18VDC.

I very much look forward to the photos of your completed project. I too saw that project online awhile back and it intrigued me as well.

Good luck!
 

ehpoole

Moderator
Ethan
Here ya go! This site has a set of plans that actually use an LED screw in bulb instead of the hot high intensity bulb in the earlier plans I found. Looks almost exactly like the older set of plansI have. Can't say I like the shape of the lamp head though. I'm thinking something that may resemble a 'Transformer' for the grandkids. Have to watch the weight though or get stronger counter weight springs.

http://www.instructables.com/id/Woodpunk-LED-Desk-Lamp/

Pop

For reference, that looks like a PAR20 lamp with an E26/27 base, likely 3W. I use the same style bulb in my drill press and bench grinder lamps. A decent amount of light for spotlighting a small work area, but comes up a little short for a desk lamp.

Now if I could just find some comparable LED bulbs with an E17 base for my bandsaw and scrollsaw lamps.
 

Pop

New User
Pop Ryan
Good God Man! That's 100-Watts of LED lighting!:rotflm: Depending on the efficiency of your LEDs, that should compare with a 300-1,000W incandescent light bulb!

If you really need that much light (and power) some ready-made power supply options:

Table Top Supplies (essentially laptop style supplies)

12V @ 8.4A (100W)
http://www.jameco.com/webapp/wcs/stores/servlet/Product_10001_10001_1940846_-1

24V @ 5A (120W)
http://www.jameco.com/webapp/wcs/stores/servlet/Product_10001_10001_1940871_-1

48V @ 2.5A (120W)
http://www.jameco.com/webapp/wcs/stores/servlet/Product_10001_10001_1940889_-1

An Open Frame Supplies (enclose in a box of your choice)

12V @ 8.5A (102W)
http://www.jameco.com/webapp/wcs/stores/servlet/Product_10001_10001_374089_-1

12V @ 12.5A (150W)
http://www.jameco.com/webapp/wcs/stores/servlet/Product_10001_10001_213681_-1

48V @ 2.1A (100.8W)
http://www.jameco.com/webapp/wcs/stores/servlet/Product_10001_10001_216710_-1

48V @ 2.1A (100.8W)
http://www.jameco.com/webapp/wcs/stores/servlet/Product_10001_10001_301479_-1

However, if you can work with a 19V regulated power supply, my suggestion is to pick up a used (or new) laptop power supply. Many of the large 17" laptops use a single-voltage switched power supply rated at 19-20VDC typically, with outputs of 100-Watts or greater (mine use a mix of 100W and 120W power supplies). Some of the latest 17" laptops use power supplies with outputs of as much as 140+ Watts. If you need to knock off 1V off the 19V for an output of 18VDC, simply place two power rectifiers (diodes, 6A @ 50VDC should work nicely) in series, their combined forward voltage drop should result in an output very close to 18VDC.

I very much look forward to the photos of your completed project. I too saw that project online awhile back and it intrigued me as well.

Good luck!

Yeah...sat and figured that out after I got the specs out for the LED's I used. Don't want to make a sunlamp out of it. They were quite bright when I used them as bulb replacements for the tail-lights in my Model A..and very directional.

After seeing the second set of plans I opted for a 3.5w LED replacement for a track light/recessed bulb. Not sure if I like the spot it throws but will hold judgement until I finish the socket assembly. It was only $12 so even if it doesn't throw the light like I hope I can stick it in one of the spots over my wife's kitchen island to try. I wish they would show a replacement wattage value on these like they do the CFL's. Supposedly it's 201 lumens which I think converts over to 3.3 watts but it's probably the frequency of the light that makes it seem brighter...right? Been a l-o-n-g time since I messed with this stuff.
 

cemkage

New User
Coleman
Hey, Good work with the LED lightings! A newbie here enjoyed reading the comments. It helped, thanks!
 
Last edited by a moderator:

Pop

New User
Pop Ryan
Put that particular bulb in my drill press light to try the pattern and it in fact works great for that! Probably look for one that spreads the light a little more once it's done. I've put most of it together and dry fit the works while I work on the lamp head. Transformer style lamp head was a little heavy so I'm opting for the design shown and adding a set of digger jaws for the construction effect. Made wire looms/stand-offs for the wiring so i can run it exposed instead of using a piece of zip cord the whole way to the lamp head. Also wound up with about a pound of ball bearings to weight down the base.

3-24-11B.jpg


3-27-11Asmall.jpg


3-27-11Bsmall.jpg
 
Last edited:

Pop

New User
Pop Ryan
For reference, that looks like a PAR20 lamp with an E26/27 base, likely 3W. I use the same style bulb in my drill press and bench grinder lamps. A decent amount of light for spotlighting a small work area, but comes up a little short for a desk lamp.

Now if I could just find some comparable LED bulbs with an E17 base for my bandsaw and scrollsaw lamps.

Ethan...do you have any trouble with vibration using those lamps in your equipment? I think it would work well for my scrollsaw too but worried about the vibration. The tail lamps I had made using led's for my Model A Ford eventually quit after hitting a few potholes while standing on the brakes.
 

bitbight

New User
Ray
I put an instruct-ible design on this light that I found on the web into our library last year. If anyone is interested go download it and show us the results. It is a step-by-step instruction with graphics and plans.

Ray
 

Pop

New User
Pop Ryan
OK..gettin' there. Slow but sure I guess. Drew up and cutout the claws for the lamp head yesterday. Did the wiring after adding a few more standoffs and then made a cover for the electrica area where the cord enters the bottom of the lamp.

3-31-11Asmall.jpg


3-31-11Bsmall.jpg


3-31-11Csmall.jpg


I covered the oval holes in the side of the foot too using picture frame matting. It'll keep fingers away from the electric connections. Lemme know what you think. Now all I have to do is finish sanding, steel wooling and finishing.
 

ehpoole

Moderator
Ethan
Ethan...do you have any trouble with vibration using those lamps in your equipment? I think it would work well for my scrollsaw too but worried about the vibration. The tail lamps I had made using led's for my Model A Ford eventually quit after hitting a few potholes while standing on the brakes.

Sorry, I've not been well lately so I'm a few days late getting to your question.

I've only been using the bulbs for about 6 months now, and most of that has been down time since my health has taken a bit of a turn for the worse as of late. Hopefully I'll feel up to spending more time in the shop as things begin to warm up (I have heat in my shop, but it takes awhile to bring it up to a comfortable temperature for me).

Generally the vibration problems in modern electronics are a direct result of a combination of two causes: 1) The switch to lead-free solder for compliance with RoHS (Reduction of Hazardous Substances, a European act to reduct hazardous materials in landfills) -- lead-free solder is much more brittle than the traditional leaded solder and 2) poor soldering habits in typically rushed Asian assembly lines resulting in poor solder joints (e.g. cold joints). Typically, if you have an electronic device that has failed due to vibration or a drop, you can open it up and reheat and/or resolder all the joints. For ordinary joints I would simply reheat the joint to eliminate the cold joints. If there is a specific joint (or joints) which tends to receive alot of mechanical stress (including thermal-induced stress) then I would go ahead and desolder it (e.g. remove all the original lead-free solder) and resolder it with traditional leaded solder which is considerably more tolerant of those stresses due to the softer and more pliable nature of lead.

So, if you encounter a bulb failure, simply disassemble it and repair the circuit board. Very seldom will the actual components fail due to vibration (it's just about impossible to destroy an LED from vibration as their semicondictor is typically encapsulated in acrylic.

HTH
 

Pop

New User
Pop Ryan
Sorry, I've not been well lately so I'm a few days late getting to your question.

I've only been using the bulbs for about 6 months now, and most of that has been down time since my health has taken a bit of a turn for the worse as of late. Hopefully I'll feel up to spending more time in the shop as things begin to warm up (I have heat in my shop, but it takes awhile to bring it up to a comfortable temperature for me).

Generally the vibration problems in modern electronics are a direct result of a combination of two causes: 1) The switch to lead-free solder for compliance with RoHS (Reduction of Hazardous Substances, a European act to reduct hazardous materials in landfills) -- lead-free solder is much more brittle than the traditional leaded solder and 2) poor soldering habits in typically rushed Asian assembly lines resulting in poor solder joints (e.g. cold joints). Typically, if you have an electronic device that has failed due to vibration or a drop, you can open it up and reheat and/or resolder all the joints. For ordinary joints I would simply reheat the joint to eliminate the cold joints. If there is a specific joint (or joints) which tends to receive alot of mechanical stress (including thermal-induced stress) then I would go ahead and desolder it (e.g. remove all the original lead-free solder) and resolder it with traditional leaded solder which is considerably more tolerant of those stresses due to the softer and more pliable nature of lead.

So, if you encounter a bulb failure, simply disassemble it and repair the circuit board. Very seldom will the actual components fail due to vibration (it's just about impossible to destroy an LED from vibration as their semicondictor is typically encapsulated in acrylic.

HTH

Thanks for the info. Sorry to hear about your health. I understand about getting out into the shop when you're not feeling up to it. Since my teens I've had problems with arthritis and deterioration of joints. Got the best of both worlds from my parents. Now I understand why some days my dad would crawl around on his hands and knees in the house just to get from room to room. By the time he was 40 he had the VA do 4 back operations to help with the pain. I've only had 2 but they tell me they can't do any more because of the deterioration. It would be like gluing or putting screws into plaster-of-paris. Loving wood working like you, the days I think I should be in the shop to complete or finish a project and can't, are the worst days ever. BUT as long as the shop is there...the projects aren't going anywhere. Hope you get to feeling better soon.
 
Status
Not open for further replies.

Premier Sponsor

Our Sponsors

Top