
You are using an out of date browser. It may not display this or other websites correctly.
You should upgrade or use an alternative browser.
You should upgrade or use an alternative browser.
1" Foam
- Thread starter patlaw
- Start date
- Status
- Not open for further replies.
Check w/ a true building supply place. I know Styrofoam comes in thickness up to 2" for general construction.
I don't know why I didn't think of that. It's partially because I don't know even who the local building suppliers are.Check w/ a true building supply place. I know Styrofoam comes in thickness up to 2" for general construction.
How would you keep them together?I have not tried the technique myself, but your post made me wonder if two thin sheets could be placed together. Then you could just replace the top sheet as it gets worn out.
No, 2" would be fine, but I've never found it in the store. However, I did just find it on their website.Mike- I have always used the 2" (on centipede supports) which is usually available at blue and orange. The saw tracks don't weaken the 2" and the 2" is pretty light. Next size down I've encountered at these stores (not specialty) is 3/4". Are you opposed to the 2"?
2" Foam Insulation
It's over $39 per sheet. I thought it was less expensive than that.
I bought a 2" thick 4 X 8 sheet from Lowe's about the same time I got a tracksaw. I had them cut it into 4 ea. 2 X 4 pieces. It's been about 5 years now and they are holding up just fine. The 2 X 4 pieces store easily and I can use just the number of pieces I need for each job.
I've always used 3/4" foam insulation (blue, pink, or green) with no problems. You just have to be careful about your depth of cut.
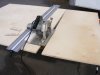
To be sure, the first thing I do is put my foam down, they lay the stock to be cut on top of the foam with an edge aligned with one edge of the foam. Then I lay my guide on top of the stock with the cutting edge barely overhanging the edge of the stock. Then set the saw on top and adjust the depth so the teeth hang below the bottom face of the stock, around 1/8" - 1/4".
To be sure, the first thing I do is put my foam down, they lay the stock to be cut on top of the foam with an edge aligned with one edge of the foam. Then I lay my guide on top of the stock with the cutting edge barely overhanging the edge of the stock. Then set the saw on top and adjust the depth so the teeth hang below the bottom face of the stock, around 1/8" - 1/4".
That works for me! Send me your email or phone number. Thanks.Mike I can get you a piece for free. Need to come to Durham and get it
Mike,
If you are just going to use this foam board to break down sheets of plywood or other materials with your circular saw, I went a different way because I can no longer get down on my knees when working. It's actually easier than using the foam, but you could still use the foam if you wanted to. Since my shop is small, I always break down my sheet stock out in my driveway, then carry the pieces into my shop to finish cutting them on my Unisaw.
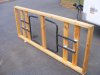
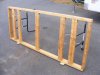
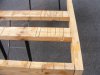
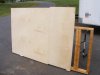
I built a cutting table so I can stand up while doing this work. It's just a banquet table sized wood frame made from 1 X 4 pine with 2 X 4 cross pieces laid flat and level with the top edge of the 1 X 4 frame. There are five of these cross pieces, one across the center, and two near each end where the metal banquet table legs get attached. The frame and cross pieces are all assembled with glue and biscuits. The only metal are the legs and the short screws that attach them. You can get a set of these legs from Northern or from Harbor Freight for about $20. To use it I set it up and lay the material to be cut on top of it, then set my saw depth to cut through the material plus about 1/4". Set and clamp my saw guide to the material and make the cut. None of the pieces fall as the cuts are completed and there are never any broken corners, so common when trying to use saw horses. When the work is complete I fold the table and store it against the other sheet stock in my wood rack. The legs fold up inside the frame so when folded the table is the thickness of the 1 X 4 frame.
Attached are photos of my first cutting table. It was made completely of 2 X 4's, and as I got older I decided to remake the top frame from 1 X 4 material to reduce it's weight (no pictures of the new lighter version). It's also slightly smaller at about 30" wide and 70" long. This also reduced the weight. I always cut over the center of the table, so the pieces don't fall when the cut is complete.
I added two small pieces of plywood (shown in the pictures), attached off center with one screw through each to one side of the table frame. I can turn these pieces so they are above the table frame and lay the table with these pieces down against the ground. Then place the sheet-to-be-cut on these, and then tilt both the sheet-to-be-cut and the table back up onto it's legs. When the table is upright, I then rotate these two pieces so they are blow the table surface and then center the sheet on the table. Doing this is easier than trying to lift the full sheets to place them onto the table.
Charley
If you are just going to use this foam board to break down sheets of plywood or other materials with your circular saw, I went a different way because I can no longer get down on my knees when working. It's actually easier than using the foam, but you could still use the foam if you wanted to. Since my shop is small, I always break down my sheet stock out in my driveway, then carry the pieces into my shop to finish cutting them on my Unisaw.
I built a cutting table so I can stand up while doing this work. It's just a banquet table sized wood frame made from 1 X 4 pine with 2 X 4 cross pieces laid flat and level with the top edge of the 1 X 4 frame. There are five of these cross pieces, one across the center, and two near each end where the metal banquet table legs get attached. The frame and cross pieces are all assembled with glue and biscuits. The only metal are the legs and the short screws that attach them. You can get a set of these legs from Northern or from Harbor Freight for about $20. To use it I set it up and lay the material to be cut on top of it, then set my saw depth to cut through the material plus about 1/4". Set and clamp my saw guide to the material and make the cut. None of the pieces fall as the cuts are completed and there are never any broken corners, so common when trying to use saw horses. When the work is complete I fold the table and store it against the other sheet stock in my wood rack. The legs fold up inside the frame so when folded the table is the thickness of the 1 X 4 frame.
Attached are photos of my first cutting table. It was made completely of 2 X 4's, and as I got older I decided to remake the top frame from 1 X 4 material to reduce it's weight (no pictures of the new lighter version). It's also slightly smaller at about 30" wide and 70" long. This also reduced the weight. I always cut over the center of the table, so the pieces don't fall when the cut is complete.
I added two small pieces of plywood (shown in the pictures), attached off center with one screw through each to one side of the table frame. I can turn these pieces so they are above the table frame and lay the table with these pieces down against the ground. Then place the sheet-to-be-cut on these, and then tilt both the sheet-to-be-cut and the table back up onto it's legs. When the table is upright, I then rotate these two pieces so they are blow the table surface and then center the sheet on the table. Doing this is easier than trying to lift the full sheets to place them onto the table.
Charley
Attachments
Last edited:
I too used the foam idea -
I set-up saw horses, with 2X4's between them, the foam on top and then as Charles (CPW) points out, set the blade so it only slightly pierces the foam.
everything breaks down and is stored compactly. Oh, I forgot to mention, as Charles (Lent) points out, with my foam I cut it off-center at the end of the job to store it more easily, but nearly every time, I have simply gone out and bought a new sheet of foam... (where is the foam again??? I know it was around here...
- Status
- Not open for further replies.
Premier Sponsor
Our Sponsors
LATEST FOR SALE LISTINGS
-
-
-
 SOLD -- $75: Gast moa v113 Vacuum Pump Veneer, 60" bag and board
- Started by peterdnight
- Replies: 1
-
GONE: Gladiator 5 cleats, 10 hangers, Paper Towel and Shelf
- Started by peterdnight
- Replies: 3
-
SOLD -- $100 Makita mac700 portable air + grex pin nailer + 2 others + 50' hose
- Started by peterdnight
- Replies: 1