
homemade
-

Turner's Slide-Rest, Homemade in Wood
There are times when I wished I had a cross-slide rest for my wood-lathe, for those special cuts where precise repeatability is wanted, such as cutting an identical, angular groove in several pieces (it is this feature that I need to be able to put "dish" into model wagon-wheels, for example)...- johnpipe108
- Thread
- homemade turner wood
- Replies: 5
- Forum: Power Tools and Their Use
-

Homemade sysport (Festool Dock)
Until recently my miter saw has resided on an old kitchen cart, At the same time I had a Festool MFT (Multi-function table) resting on its side when not in use and the systainers (containers that the Festool tools come in) sitting on the floor with the Festool vacuum. I got the idea to...- Douglas Robinson
- Thread
- dock festool homemade sysport
- Replies: 37
- Forum: Workshop Discussion
-
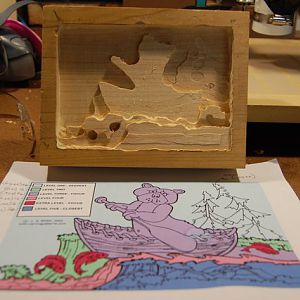
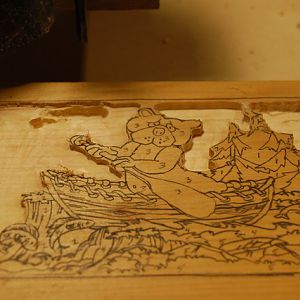
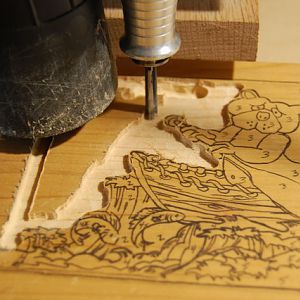
PIC 48 - Routing Done
Ready to hand carve the details now.- MT native
- Media item
- carving drill foredom homemade press relief
- Comments: 0
- Album: Homemade Relief Carving Jig
-
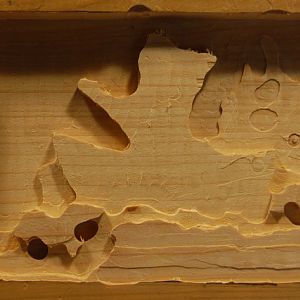
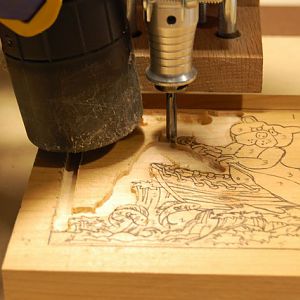
PIC 47
Here you can see the levels I identifed in the drawing before actually doing any cutting. I removed the deepest background (level 1) first then removed each subsequent (shallower) level until all levels were hogged out.- MT native
- Media item
- carving drill foredom homemade press relief
- Comments: 0
- Album: Homemade Relief Carving Jig
-
PIC 45 - start carving
- MT native
- Media item
- carving drill foredom homemade press relief
- Comments: 0
- Album: Homemade Relief Carving Jig
-
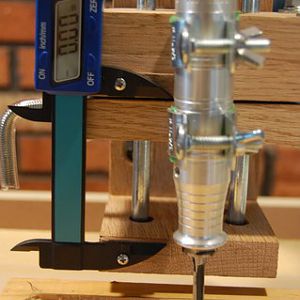
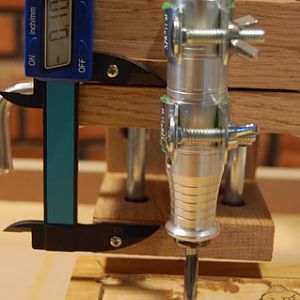
PIC 44 - Hog out a carving
The bit is set on the surface of the wood block and depth is set to zero- MT native
- Media item
- carving drill foredom homemade jig press relief
- Comments: 0
- Album: Homemade Relief Carving Jig
-
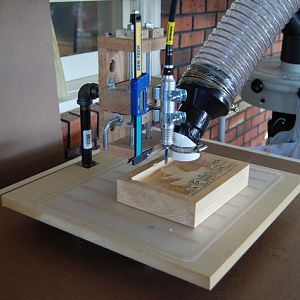
PIC 43 - Construction Finished!!
The 2" PVC Elbow (clamped to the jig) is taped to the 4" x 2" Reducer, which is hooked up to the Delta 50-760 via Flex Hose- MT native
- Media item
- carving drill foredom homemade jig press relief
- Comments: 0
- Album: Homemade Relief Carving Jig
-
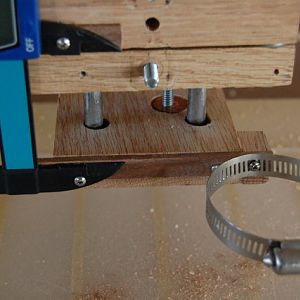
PIC 42 - Step 11c
I had to add a span so there was space between the Foredom Handpiece and the clamp SEE Followup Comments on Step 5. Pre-drill the holes on the clamp and the wood.- MT native
- Media item
- carving drill foredom homemade jig press relief
- Comments: 0
- Album: Homemade Relief Carving Jig
-

PIC 41 - Step 10b&c
Pre-drill holes in the wood with a 1/16in bit to prevent splitting. The clamp helps to hold the Gauge parallel for pre-drilling the wood. Use #6 x 1/2in screws to attach the gauge to the jig.- MT native
- Media item
- carving drill foredom homemade jig press relief
- Comments: 0
- Album: Homemade Relief Carving Jig
-
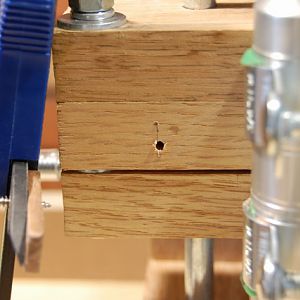
PIC 40 - Step 10a
The backs of the Gauge are not even so a spacer was added behind the end piece so it would be flush with the front of the jig.- MT native
- Media item
- carving drill foredom homemade jig press relief
- Comments: 0
- Album: Homemade Relief Carving Jig
-
S
home-made overhead blade guard
.- Sully
- Thread
- blade guard homemade overhead
- Replies: 9
- Forum: Workshop Discussion
-

WIP - Homemade Foredom Relief Carving Jig
INTRODUCTION I carve in-the-round. Now I want to do relief carving, with power tools. All of my web-based research repeatedly mentions the use of a router to ‘hog out’ the background wood in relief carvings. I do not own a router. I do not own a Dremel nor its plunge router base. The Foredom...- MT native
- Thread
- carving foredom homemade jig relief wip
- Replies: 31
- Forum: Woodcarving
-
PIC 39 - Step 9
Run Test - IT WORKS!! I never doubted it would (haha) - NEXT STEP add a depth gauge and hose adaptor to dust collector- MT native
- Media item
- carving drill foredom homemade jig press relief
- Comments: 0
- Album: Homemade Relief Carving Jig
-
PIC 38 - Step 9
Run Test - I tried various depth cuts (back-left corner) before routing out an area at one depth- MT native
- Media item
- carving drill foredom homemade jig press relief
- Comments: 0
- Album: Homemade Relief Carving Jig
-
PIC 37 - Step 9
Run Test - I have no idea how deep the bit is but the wet-vac is working great- MT native
- Media item
- carving drill foredom homemade jig press relief
- Comments: 0
- Album: Homemade Relief Carving Jig
-
PIC 36 - Step 9
Run Test - It's ALIVE!! Dr. Frankenstein- MT native
- Media item
- carving drill foredom homemade jig press relief
- Comments: 0
- Album: Homemade Relief Carving Jig
-

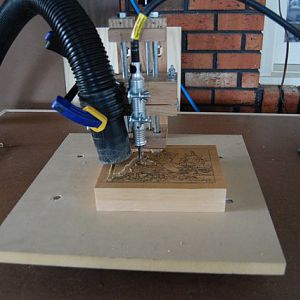
PIC 35 - Step 9
Side View - Homemade Foredom Relief Carving Jig- MT native
- Media item
- carving drill foredom homemade jig press relief
- Comments: 0
- Album: Homemade Relief Carving Jig
-
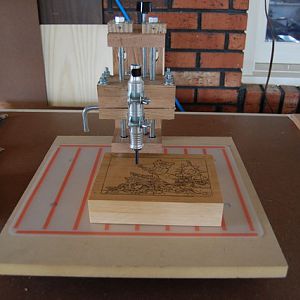
PIC 34 - Step 9
Front View - Homemade Foredom Relief Carving Jig. Depth Gauge and Dust Collector Hose still to be added.- MT native
- Media item
- carving drill foredom homemade jig press relief
- Comments: 0
- Album: Homemade Relief Carving Jig
-
PIC 33 - Step 8
Jig Assembly - penny on bottom of Z-axis Support acts as a stop for the Depth Adjustment Rod- MT native
- Media item
- carving drill foredom homemade jig press relief
- Comments: 0
- Album: Homemade Relief Carving Jig
Premier Sponsor
Our Sponsors
LATEST FOR SALE LISTINGS
-
-
-
 SOLD -- $75: Gast moa v113 Vacuum Pump Veneer, 60" bag and board
- Started by peterdnight
- Replies: 1
-
GONE: Gladiator 5 cleats, 10 hangers, Paper Towel and Shelf
- Started by peterdnight
- Replies: 3
-
SOLD -- $100 Makita mac700 portable air + grex pin nailer + 2 others + 50' hose
- Started by peterdnight
- Replies: 1