Currently I just finished a buffet for the kitchen for additional storage and something unusual for the room. The walnut cabinet basic overall dimensions are H 38” W 51” D 25” which fit perfectly for the kitchen. The soft closing pull out drawers in the lower cabinet and the 3 top drawers have been a real hit with the wife. The top is a walnut veneer with a rolled front edge with the ends and front panels all matching the top veneer. I used a vacuum press to get the veneer to bend around the front edge and used the iron on process of attaching the veneer on the sides of the top. The matching front panels of the doors was veneered in a vacuum press and cut down to exact size after veneering. The big challenge was getting the top veneer to line up and to stay in place as it was slid into the vacuum press and as the vacuum was being increased to make sure the front edge bent evenly. I got the veneer from Certainly Wood of New York. They provide great pictures of what their veneer looks like on their web site for easy selection and what they have in stock. Every time I get to veneer something I call that a great day in paradise. Yes, I hear every one of you saying where are the step-by-step pictures and description of how you did the project. I promise to be a better NCWW member on my next project and take some pictures as I go.

You are using an out of date browser. It may not display this or other websites correctly.
You should upgrade or use an alternative browser.
You should upgrade or use an alternative browser.
Walnut buffet project completed.
- Thread starter Roger45
- Start date
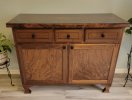
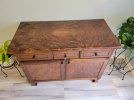

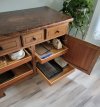
Nnnaaawww. Just me. And, now you have committed! Thanks in advance. It's gonna be great!Currently I just finished a buffet for the kitchen for additional storage and something unusual for the room. ... Yes, I hear every one of you saying where are the step-by-step pictures and description of how you did the project. I promise to be a better NCWW member on my next project and take some pictures as I go.
OBTW, I need a console for a TV stand.
Beautiful work! Excellent wood selection.
That top is spectacular!
So fine. Is the substrate for the top MDF?
Darl: I did use MDF because of course it's stable but if I would have tried with plywood the round over would not have been as smooth.
Wilson: Yes, only way to work with veneer is to use a flattening and conditioning product that will make the veneer bend just like a piece of leather. I used Scott Grove formula on this project but have used Joe Woodworker spray on another project. Scott's formula takes longer and more steps but stays flexible longer than Joe's version. Joe's version is quicker, but you must glue it down the same day from my testing.
Wilson: Yes, only way to work with veneer is to use a flattening and conditioning product that will make the veneer bend just like a piece of leather. I used Scott Grove formula on this project but have used Joe Woodworker spray on another project. Scott's formula takes longer and more steps but stays flexible longer than Joe's version. Joe's version is quicker, but you must glue it down the same day from my testing.
Premier Sponsor
Our Sponsors
LATEST FOR SALE LISTINGS
-
-
-
 SOLD -- $75: Gast moa v113 Vacuum Pump Veneer, 60" bag and board
- Started by peterdnight
- Replies: 1
-
GONE: Gladiator 5 cleats, 10 hangers, Paper Towel and Shelf
- Started by peterdnight
- Replies: 3
-
SOLD -- $100 Makita mac700 portable air + grex pin nailer + 2 others + 50' hose
- Started by peterdnight
- Replies: 1