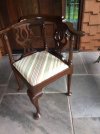
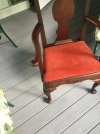
My wife wants a desk that will match another table she has. The table is in the Queen Anne style with turned, Dutch foot legs. These are sometimes referred to as pad feet or spoon feet. They're turned on a lathe with the spindle off-center. Essentially, there are two axes through the turning. There is the true center that is chucked when turning the foot and an off-center axis that is the center of the leg. The transition between these two turnings at the bottom is what gives the leg its foot.
I can't remember ever doing any offset turning (maybe once), so I wanted to practice first to get the feel. Also, I wanted to turn a couple of different styles to see which one she liked best. We're going with the one on the right in the photo. Dutch feet are not a very common style. I thought others might be interested in the process of creating them.

The first task is calculating the offset to use on each end of the leg. The math is based on the geometry of similar triangles formed by the two axes which run through the leg and intersect somewhere in the middle (where depends on how you style the leg). In my case the point of intersection is at the transition from pommel to turning.
If two triangles are similar then the ratio of their corresponding sides are the same (i.e., they are in proportion). The full equation is: (pommel length / pommel offset) = (turned length / foot offset). As soon as you have three of these measures, the fourth can be calculated. Presumably, you know the length of the pommel and turning. I wanted the ankle of my foot to be half the diameter of the top of the leg. The leg is 1-3/4" at the top, so the ankle is 7/8". The ankle sits about 1-3/4" above the foot. For this reason I chose to make the foot offset equal to 1/2". Doing the math gave me a pommel offset of 3/4". Refer to this article if you want more details.
That's a lot of words, so here are a couple of pictures, top and bottom offsets. It's critical that these two points (top and bottom) be placed on opposite sides of the same diagonal, and that the leg be its finished length.


Turning begins with the off-center axis. Get ready for some wobble while you do this part! I have a vintage 1929 Sears lathe -- perhaps not as well suited as one of these massive iron beasts many folks have, but it gets the job done. My lathe base is weighted so it keeps the vibration manageable. The first step is to mark and turn the end of the pommel. I used a skew chisel held point-side down to cut a V. You can see I slipped once (this is why I practice), but it was on the leg side so all mistakes were removed in a later step.
In the second photo you can see the extra blocks glued onto the foot. This is because the foot's ring is a larger diameter than the leg. It would have been a waste to use a 2-1/2" blank when I only need the extra width at the foot. I glued on these blocks to gain the diameter needed, instead.


Reduce the front of the foot and mark the height of the toe. I continued to use the same 3/4" spindle gouge to cut a large cove, staying just above the toe and working towards the ankle (marked in second photo) as the bottom of the cove. With the cove almost to depth I used the skew to create a crisp toe at the right height. Register a 1/2" spindle gouge in this groove and finish the foot and ankle.


This shows the leg roughed out with a 3/4" spindle gouge just before I use the skew to plane it smooth and straight. Sand this section of the leg and foot before moving on. This is the last opportunity you have to work on the leg portion.

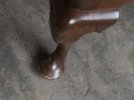
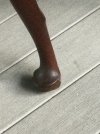
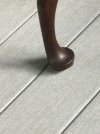
As we say where I'm from, "You're on the short rows now". Re-chuck the leg on it's true center to turn the foot. This part is relatively easy, although you need to be careful at the transition. You will turn the foot down to the point where the back of the ankle and top of the foot form a single, straight line. Stop there. Make the ring and the foot is done after a bit more sanding.


Now, on to the real ones in cherry. Hope you enjoyed the show!
I can't remember ever doing any offset turning (maybe once), so I wanted to practice first to get the feel. Also, I wanted to turn a couple of different styles to see which one she liked best. We're going with the one on the right in the photo. Dutch feet are not a very common style. I thought others might be interested in the process of creating them.
The first task is calculating the offset to use on each end of the leg. The math is based on the geometry of similar triangles formed by the two axes which run through the leg and intersect somewhere in the middle (where depends on how you style the leg). In my case the point of intersection is at the transition from pommel to turning.
If two triangles are similar then the ratio of their corresponding sides are the same (i.e., they are in proportion). The full equation is: (pommel length / pommel offset) = (turned length / foot offset). As soon as you have three of these measures, the fourth can be calculated. Presumably, you know the length of the pommel and turning. I wanted the ankle of my foot to be half the diameter of the top of the leg. The leg is 1-3/4" at the top, so the ankle is 7/8". The ankle sits about 1-3/4" above the foot. For this reason I chose to make the foot offset equal to 1/2". Doing the math gave me a pommel offset of 3/4". Refer to this article if you want more details.
That's a lot of words, so here are a couple of pictures, top and bottom offsets. It's critical that these two points (top and bottom) be placed on opposite sides of the same diagonal, and that the leg be its finished length.
Turning begins with the off-center axis. Get ready for some wobble while you do this part! I have a vintage 1929 Sears lathe -- perhaps not as well suited as one of these massive iron beasts many folks have, but it gets the job done. My lathe base is weighted so it keeps the vibration manageable. The first step is to mark and turn the end of the pommel. I used a skew chisel held point-side down to cut a V. You can see I slipped once (this is why I practice), but it was on the leg side so all mistakes were removed in a later step.
In the second photo you can see the extra blocks glued onto the foot. This is because the foot's ring is a larger diameter than the leg. It would have been a waste to use a 2-1/2" blank when I only need the extra width at the foot. I glued on these blocks to gain the diameter needed, instead.
Reduce the front of the foot and mark the height of the toe. I continued to use the same 3/4" spindle gouge to cut a large cove, staying just above the toe and working towards the ankle (marked in second photo) as the bottom of the cove. With the cove almost to depth I used the skew to create a crisp toe at the right height. Register a 1/2" spindle gouge in this groove and finish the foot and ankle.
This shows the leg roughed out with a 3/4" spindle gouge just before I use the skew to plane it smooth and straight. Sand this section of the leg and foot before moving on. This is the last opportunity you have to work on the leg portion.
As we say where I'm from, "You're on the short rows now". Re-chuck the leg on it's true center to turn the foot. This part is relatively easy, although you need to be careful at the transition. You will turn the foot down to the point where the back of the ankle and top of the foot form a single, straight line. Stop there. Make the ring and the foot is done after a bit more sanding.
Now, on to the real ones in cherry. Hope you enjoyed the show!