Tidy up an axe

Status
Not open for further replies.

Mike Davis

Mike
Corporate Member
Froglips asked about reworking an ax. I asked my friend in England if I can borrow his extremely well written post on a board over there on the subject. A good friend he is, so here is his post.
There is also one on sharpening I will try to find.

British Red said:
Tidying up an axe

Well I decided to re-dress an axe today (found a cheap one) and I thought it might be useful to publish a step-by-step guide given theres been a few threads on axes that have been "Munzed"

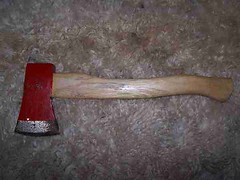
Heres an old hatchet thats a good candidate for some TLC
3617893224_3e81ba622f_m.jpg


Whats wrong with it? Well the blade is covered in rust and the blade edge is nicked and doesnt cut evenly.

3617892510_9ecdb06f87_m.jpg


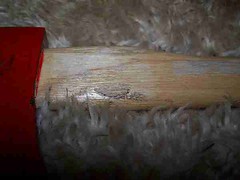
Worse though is the fact that there is some severe haft damage.
3617892868_14323727be_m.jpg


A dent and crack this bad could cause the haft to snap in use and the head to fly off. Not the safest thing.


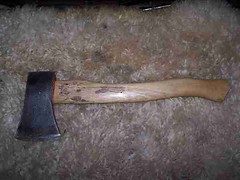
So, first job is to get all that paint and rust off and see what we have. Now on a quality old head, I'd hand rub back. This though is a cheap “user" of a hatchet, so we'll give it a quick clean with an electric sander. I like to do this with the old haft in or to the bare head. Any slips could damage the new haft.
This is what we end up with..a nice 11/4 lb hatchet head.
3617892068_8c45e1f157_m.jpg


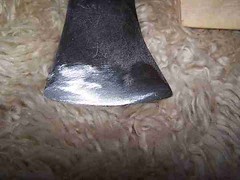
Now that I can see what we have, I need to re-profile the blade. There are a few nasty dings and the profile is too thick. So I clamp the blade upright in a vice (between a couple of sheets of leather to stop marking the blade). I hold a file haft in my right hand and the top of the file between my middle finger and palm of my left hand. I then file off one side of the blade dropping my left wrist whilst filing to create a slightly convex profile. Turning the axe frequently I sight along the blade edge to make sure its straight and in line with the “eye".
We end up with this
3617893796_a8676f25b2_m.jpg


Okay, tricky time. We need to get that old haft out. Not normally a problem, but these days they often fill the eye with some sort of acrylic gunk. The problem with this is that you can see whats underneath it.
So, is the head loose? Yes haha, I'll just tap it out. Nope, not a chance. Its not that loose. So, saw the haft off flush to the head and turn over. Try to tap out from the haft side. You know what the inside of an eye is shaped like right? Its like a funnel with the spout end where the haft comes out (wider at the top than the bottom). So trying to pull a haft out rarely works. The haft is wider below the head so the head can't drop down the haft. Its straight when you put the new haft in, but then you drive wedges in to widen the top of the haft so it fills the funnel shape. So the head can't fly off the top because of the funnel shape or slip down because of the widening haft. However cut off the haft and you can often drive the stump out the wide mouth of the head (the top).
Not in this case though. So, goggles and gloves and I drill through the haft half a dozen times going VERY carefully in case there is a metal wedge. There isn't and the haft drops out.

Fantastic. Now we are getting somewhere. Right, next job. Fit the haft. I'm using a store bought hickory haft and its too big to go through the eye at the bottom of the head. This is a good thing. Using a sharp knife I SHAVE sliver of wood off the haft until it will just pass through the narrow eye. I measured the depth of the head before I started and added ½" as I want the haft to project a little. A quick rub of sandpaper (easier now than later) and the haft is ready for the next stage. I'm going to need a wooden wedge next. Out to the woodpile and find a nice bit or dry oak (your wedge must be seasoned or it will split). Now I have measured the length of the eye and reckon for a little head like this a wedge about ¾" wide will do. I make it much longer than I need, you'll see why later. I measure the width of the eye and select and iron hammer wedge the right size (No 2 in this case). Okay, I have all my parts assembled.
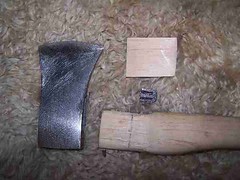
3617074277_e2210eb118_m.jpg


Next stage is to saw a slot for the wedge. Clamp the haft vertically and using a tenon saw, cut a slot into the haft for 2/3 of the depth of the head. It should look something like this.
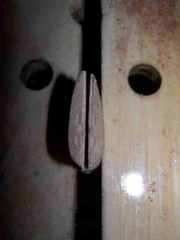
3617893518_056655a998_m.jpg


You'll notice the line is just off straight. I find this helps stop splitting later.


Next, fit the head snugly and, using a block of wood flat to the top of the wooden wedge, drive the wedge gently but firmly in place.

3617894714_6de94316f0_m.jpg


Using your saw, cut the wedge off parallel to the haft. Then take your soft iron wedge and tap it in at 45 degrees to the wooden wedge in the centre of the haft. Make sure your head doesn't move whilst wedging.
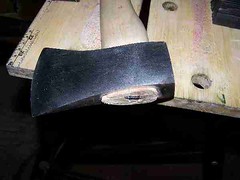
3617071047_a92eafec10_m.jpg


Well, we are nearly there now. A final sand of the handle, then an oil soak. Lay a piece of cling film twice the length of the axe down. Cover in a double layer of kitchen towel. Soak the towel in linseed oil (or whatever you use). Put the axe on top, wrap the towel around the haft and cling film round the lot. Leave for 24 hours or better yet longer. The oil will penetrate the wood, swelling the grain for a tight fit and protecting from drying out.
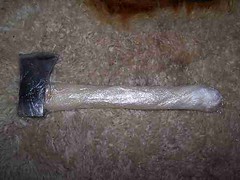
3617073901_c210d26025_m.jpg


Remove all the cloth, wipe down well and sharpen and that's it, a nice little camp hatchet.
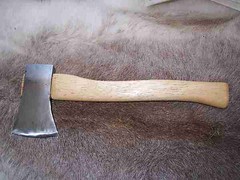
3617071553_f728c1392a_m.jpg


Given that we have left a quarter of an inch of the haft “proud" from the head, next time we need to re-haft it, all that's needed is to hook the metal wedge out with a flat head screwdriver, saw off and tap out the loose haft . no glue, no resin. The nice part of this job is that a haft costs just over a quid and a soft iron wedge a few pence. A rough hatchet can be picked up for 50p in a car boot sale. Buy 2 or 3 hafts and a box of mixed wedges and you'll be out £5. You also can have a few tries at re-hafting and I'm fairly sure by the third go you'll get the knack of it. If you get it sooner, you have some spare hafts!

Hope thats useful -

British Red
 

froglips

New User
Jim Campbell
Wow! Thanks Mike! Thats a fantastic write up.

Its funny how simple something is after you learn how to do it.

I've re-hafted a few hammers and spent a lot of time pushing the haft through. Opps, who knew about the funnel shape of the head. Now I do :icon_cheers

Thanks again!
Jim
 

Mike Davis

Mike
Corporate Member
Well, I've done the re-hanging thing, so this one is about choosing


These few notes are intended to help the newcomer to picking out an axe that is suitable for their purposes. They aren’t a complete guide to axemanship or intended to be such, just more of a “bluffers guide” to selecting an axe suitable for your purpose.

Parts of the Axe

Before we get into anything involved, its probably helpful to define the terms we will use.

axepartssu2.jpg


A: Heel of Head
B: Bit
C: Toe of Head
D: Cheek or Ramp
E: Poll
F: Neck
G: Belly
H: Shoulder
I: Toe of Haft
J: Heel of Haft
K: Eye
L: Wooden Wedge
M: Metal Wedge

Right there are several things we should consider in selecting an axe. The most important of all of these though is purpose

Purpose

Axes serve three major purposes, cutting, splitting and shaping.

Profile

Lets understand first how to differentiate between a cutting axe and a splitting axe. In effect, this is determined by the “profile” of the axe

Lets look at a cutting profile first

gbprofilegz8.jpg


See how thin this is? This is to penetrate “across grain”. The thinness means that it presents the maximum force on a low surface area (think razor blade) and “severs” what it cuts across. Its great for cutting as a result. It is less good at splitting as, when cutting into a log, it will tend to slide in between the fibres of the wood with minimal interruption, This is like shaving a feather stick and is unlikely to cause a split to “run” through the log.

So what does a splitting profile look like?

See how wide the angle is? Imagine this slammed end on into a log! It has a wedge like action and forces the log apart. It expends all its energy in this way causing a deep split that forces the grain apart. It is optimised for this task though. If used to cut “across grain”, it will not penetrate deeply as it will be trying to sever far more fibres that a narrower profile “cutting” bit has to. It will therefore stop in a more shallow cut.

roselliprofilexl3.jpg


Bit Shape

So we understand that a wider profile helps to split, a narrower to cut. So what about a shaping axe? Well, this is more in the shape of the bit than the profile. Lets look at the bit shape of an axe that will cut or split

sfaheadpz8.jpg


See how pronounced the curve of the bit is? This means that only a small part makes contact with the wood at a time and so, like a knife point, it aids wood penetration (with or across the grain)

A shaping axe bit looks like this

carpentersheadvn8.jpg


See how flat it is? This is to give an even cut rather than a deep cut. There are varieties on this theme. The broad axe has a completely flat bit and ramp on one (or rarely both) sides. This allows the axe to be laid on a flat section and chop out a very flat section of wood. According to the side that is flattened you get a right or left handed broad axe.

For general woods purposes, a rounded bit is more versatile.

Having considered the head shape, perhaps we should think about type of head. Here we have two main considerations – single or double bit

Single bit

The single bit axe is more common and offers some advantages. Its design is optimised to put all the torque (rotational power caused by swinging around a pivot point- the shoulder) behind the one bit it possesses. The poll is hardened in some axes (notably Wetterlings) and can therefore be used for hammering. A single bit axe can also be battoned and, when combined with hard wood wedges, even a small hatchet can split an entire hardwood tree when in the hands of a skilled user.

wetterlingsheadpd3.jpg


Double bit

A double bit axe offer different advantages. It is generally symmetrical around a centre line. This offer a balance not found in a single bit axe. Whilst it can’t be battoned. The two blades are often ground differently to offer splitting and cutting profiled offering a large degree of versatility in a single tool. When applied to a hatchet sized axe this is known as a Nessmuk grind after the famous author of that name.

doublebitvv1.jpg
[/size]


Haft Length

Axes come in a bewildering variety of lengths. Clearly each length can be combined with any of the head types above, but, ignoring the shaping part, each length is generally used for a specific purpose. A few choices are shown below.

Pocket (12" 1 lb weight)

Pocket axes are often underrated. A small pocket axe (12” long) will split a short 6” log one handed and can be pressed to much harder use when battoned. The model illustrated is the “Marbles pocket safety axe”. It has the advantage of an integrated metal cover that cover the bit and also folds away into the handle. It easily fits into a coat pocket and is perfect for a light wander through the woods when you don’t want to be too encumbered.

marblespocketgr7.jpg


If you doubt what can be achieved with a small hatchet, checkout this picture of a Vaughan mini hatchet punching above its weight!

14splittoend.jpg


(Picture courtesy of master axeman Old Jimbo)


Hatchet (18" 1 1/2 lb)

Possibly the most versatile and best loved all round bushcraft axe. The best length for one handed use. The model illustrated is the Wetterlings Large Hunters axe, but I would also consider a Gransfors Bruks Small Forest Axe or Roselli Large Allround in this category (the Roselli has a more splitting oriented profile)

wetterlingsnf6.jpg


Limbing (24" 2lb)

A limbing axe evolved for a specific purpose – standing on one side of a tree trunk and cutting the limbs for the other. It is usually a cutting profiled axe. The unusual (not quite one handed, not quite two) length makes for a very versatile compromise axe for general use – light enough for one handed use – long enough for two handed

scandinavianjm7.jpg


Felling / working (36" 3 - 4 lb)

This of course is the “full size axe”. My personal favourite in this area is a double bit working axe. Beautifully balanced, with a broader profiled bit for working near the ground on limbs and where the bit might be damaged and a narrower one for power of cut.

workingyl2.jpg


That said, there is certainly a place for the every day felling axe. This one is a simple, grp handled 3lb felling axe that I’m happy to lend, use and do tough tasks with.

fellingit6.jpg


Maul / splitting ( up to 8lb 40")

This of course is the heavy artillery of the axe world! A huge pointed sledge hammer designed to split wood rounds and never used for cutting. A specialised tool that is devastatingly effective when used with wedges and wood grenades (we can cover that separately if anyone is interested)


maulwx2.jpg


maulprofilehx1.jpg
 

Mike Davis

Mike
Corporate Member
Re: Tidy up an axe Part 2

Haft materials
A simple choice here – wood, metal or grp. There are advantages to each

Wood.

Simple, acts well as a shock absorber and can be replaced if damaged. More easily damaged than the other two materials though

GRP
Glass reinforced plastic. More robust than wood although subject to damage by chemicals if left in sheds etc. As light as wood but cannot be replaced

Metal.
Too heavy for a large axe but popular is some hatchets (especially Estwing). Heavy for the size and cannot be replaced if bent (possible but unlikely). Avoid hollow metal hafts found on cheap axes and go for a solid bar if this is your preference.[/size]

Selecting an axe

Size is important!

There is much talked about axe selection that is nonsense. One piece of advice I do like for an all round camping axe is to match the axe to your arm. Grasp the head of the axe, bit forward and try to tuck the axe into your armpit. The toe of the haft should sit comfortably inside your armpit. This particular technique in an adult male will usually result in a limbing axe selection – don’t be worried to select something smaller if that is your taste and need.

fitsf1.jpg

Head alignment

The alignment of the head with the haft will do more than anything to improve cutting efficiency. This varies even with the same model in the best make. Ask to see the whole stock before you buy. Hold the head in your hand and sight down the bit. It should perfectly align along the haft and point to the toe of the haft…like this

headalignsp9.jpg


Balance

Rest the axe across your hand with the shoulder to the neck hanging just off your finger and thumb. The axe should balance perfectly level from the head to the haft toe being level. Neither the poll nor the bit should touch your hand. An axe with this sort of balance is a joy to use

balanceys1.jpg


Haft grain

A could quality haft should have the grain running straight from the haft toe to the neck and the haft shoulder to the haft heel. A small “wander” is okay, trees are rarely straight but a diagonal grain should be avoided as the haft is likely to split

grainci5.jpg


I hope this is useful – far be it from me to tell anyone what axe to buy – this write up was more intended to help illustrate how to make a choice for those that haven’t spent quite s much time playing with toys as I have

British Red
 

Mike Davis

Mike
Corporate Member
OK, that's about it.

Sorry, I didn't know there is a 10,000 word limit to the posts.

Hope there are not too many pictures.

British Red is an old friend and a very well respected outdoorsman in England. Not as famous as Ray Mears but I'd rather have him along on a hike anytime. :icon_thum
 

nelsone

New User
Ed
Excellent writeup Mike! Thanks. That is a lot of info that many people don't know about. Although I knew a lot, there were several things that I learned.

This write up should be added to the library!
 

froglips

New User
Jim Campbell
And it keeps getting better! Another wow.

Now I got saw and axe fever! Trees better run and hide.

Jim
 

CrealBilly

New User
Jeff
Now I got saw and axe fever! Trees better run and hide.

Jim

They can't run... But I've had more than one log sprout legs and walk out of the yard. This always seems to happen when no one is around to actually witness what really happened to the mysterious disappearing log :eek:
 
Status
Not open for further replies.

Premier Sponsor

Our Sponsors

Top