Dust boards and Drawers
Been a busy month, but I'm finally getting back to the desk. Nothing too fancy this time, just dust boards to cover the bottom of each side section and the drawers (minus the fronts). I thought I'd use this opportunity to highlight a couple of special fixtures I've made for my bench during past projects. These come in handy from time to time.
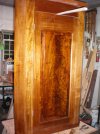
The dust boards are nothing more than a frame with a panel insert. This is how they look once installed, first from the bottom and then looking in through the drawer opening. They are held in place with screws only.


I used a bridle joint for each corner. That gives it sufficient strength and the panel is never seen. I mostly cut these on the table saw, but then tuned the fit using a special insert that fits into the hole for a bench dog in my bench. It effectively turns the workbench into a router plane, only you move the wood instead of the plane. Raise the blade to shave a little off the middle spline and dial in a snug fit.


The panels were made slightly oversized so I could plane them to fit. To hold the panel while planing I pulled out the bench puppies. I'm not sure where I first saw these, but they're great for this sort of holding. If your bench has dog holes, then these replace two of the bench dogs as shown. It's impressive how tightly they grip the piece. The faces of mine are covered in leather. Here they are holding the panel (left) and a drawer (right).


There are three drawers. I cut through dovetails for these and used a Stanley 45 to cut the bottom grooves. You can find plans for my Moxon vise in the resources section if you're interested in making one of these. It is a very useful vise when cutting dovetails.


That's all for now. I'm currently deciding how the desk top and drawer fronts will look, making some samples to run by the client.
Been a busy month, but I'm finally getting back to the desk. Nothing too fancy this time, just dust boards to cover the bottom of each side section and the drawers (minus the fronts). I thought I'd use this opportunity to highlight a couple of special fixtures I've made for my bench during past projects. These come in handy from time to time.
The dust boards are nothing more than a frame with a panel insert. This is how they look once installed, first from the bottom and then looking in through the drawer opening. They are held in place with screws only.
I used a bridle joint for each corner. That gives it sufficient strength and the panel is never seen. I mostly cut these on the table saw, but then tuned the fit using a special insert that fits into the hole for a bench dog in my bench. It effectively turns the workbench into a router plane, only you move the wood instead of the plane. Raise the blade to shave a little off the middle spline and dial in a snug fit.
The panels were made slightly oversized so I could plane them to fit. To hold the panel while planing I pulled out the bench puppies. I'm not sure where I first saw these, but they're great for this sort of holding. If your bench has dog holes, then these replace two of the bench dogs as shown. It's impressive how tightly they grip the piece. The faces of mine are covered in leather. Here they are holding the panel (left) and a drawer (right).
There are three drawers. I cut through dovetails for these and used a Stanley 45 to cut the bottom grooves. You can find plans for my Moxon vise in the resources section if you're interested in making one of these. It is a very useful vise when cutting dovetails.
That's all for now. I'm currently deciding how the desk top and drawer fronts will look, making some samples to run by the client.