New finishing question

Status
Not open for further replies.

lottathought

New User
Michael
As the heat stroke weather is passing, I am now getting back to restoring my grandparents antiques.

I do want to thank John (NewtonNC) for his advice on the end table.
I have now corrected the errors I made earlier on. :BangHead:
John and I had a long talk and he gave me some really good direction on the process and what to do.
The table is now properly drying with it's 2nd coat of Tung Oil and it is showing real promise.

On a different piece of furniture from their house......I finally decided that one piece of wood in the bookcase was simply too damaged to save.
I have now cut a replica to the board.
I am now about to start finishing the new board.
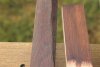
I tested my finish on a scrap of the board..(Red Oak)
I believe that I can VERY close to the color of the rest of the bookcase.
The problem that I am having though is that the black grain lines in the original board is not showing up in the scrap wood.
Can anybody give me any ideas on how to duplicate the grain lines?


I uploaded a full size picture and linked the URL to make seeing what I am talking about easier.
 

Attachments

  • PICT2825.jpg
    PICT2825.jpg
    94.6 KB · Views: 158

lottathought

New User
Michael
I should throw in that, even if nobody has any ideas for adding grain lines, any ideas to help age the look will also be appreciated.

Thanks again
 

Travis Porter

Travis
Corporate Member
For the two boards you have there, the one on the left looks flat sawn and the one on the right looks quartersawn so you are not going to have as pronounced a grain.

From the picture it looks like the board on the right has more red tint to it and the one on the left more brown. I am guessing Minwax Early American or dark walnut would be a decent color match.

Still, I can't say how to get the darkness to come into it and I am by no means a finishing expert and don't consider myself good at it. Hopefully, Howard Acheson or one of the other "guru's" will chime in.
 

DaveO

New User
DaveO
I agree with Travis, the grain orientation of the two boards is not the same. If you tried your staining method on a flat-sawn board more stain would be deposited in the open pores of the early wood and help to give you the darker grain lines. Also you could start with a much blacker stain let that get into the pores, sand slightly to remove some of the stain from the more "raised" areas of the late wood and then give everything a coat of another lighter brown stain like you've used.
Also a dark wax like Black Bison wax in a Walnut color will help to highlight the porus grain too. http://www.thefurnitureconnoisseur.com/store/cart.php?m=product_detail&p=569

HTH, Dave:)
 

Gofor

Mark
Corporate Member
You could try dissolving a little steel in water and wiping it on the oak to get the black color. If you hand sharpen any tools (ie chisels, etc) and use water as a lubricant, the runoff water when you clean the stones or wet-dry paper will turn oak black very quickly. The tannic acid in the oak will rapidly convert the iron in the water to ferrous oxide, which is black. Alternatives are steeping some steel wool in water, or you can just use a file and file a nail into a class of water.
Might give a more natural look than a dye. The iron/water solution needs to applied to the bare wood before any stains, etc.

Go
 

Howard Acheson

New User
Howard
The following was written to deal with sand-thru on plywood but the part about graining is applicable to this question.

Do apply your stain just as though there were no problem. Then, when the stain is dry, "draw" the damaged grain back on the spot where you have exposed the plywood core. This is done by using a selection of soft artist color pencils selected to match your stained oak. Here, briefly, is the process:

Select a pencil that will match the lightest color that you can see in your table. Begin by "scribbling" this pencil over the damaged area. Follow this by then "smudging" the pencil with your finger tip to blend the color over the area. Then, "seal" this color with a bit of clear aerosol shellac.

The shellac will dry very quickly; 25-minutes or so. When it is dry lightly sand to smooth the area and reach for the next pencil—one the color of the stain as it appears in the dense latewood of your oak table. Using a bit more care, draw the grain lines in such a way as to connect them across the damaged area. Again, smudge the drawing, this time a bit less than before. You want to still see the lines; you just don't want them to appear "sharp". When you are satisfied with your work, seal this drawing as well.

Lightly sand again when dry and reach for the last pencil—this one chosen to match the color of the stain in the open grain of the earlywood (the darker areas of stain). Repeat the smudging process and the sealing step. Your "glitch" should now be nearly invisible.

At any stage in the process, if you don't like what you see, erase and begin again. When the grain is drawn in to your satisfaction and sealed with the last aerosol coat of shellac, proceed with your topcoat. Semi-gloss or satin will be most effective in masking any lingering problems with your artwork.

I find the "pencil technique" much easier to apply and reverse, if necessary, than using oil or acrylic paints. The process also goes much faster...
 

NCPete

New User
Pete Davio
Thank you Howard for the lesson. I often find that I have to 'recondition' merchandise that is returned to my store. I can apply that lesson quite easily, and have plenty of furniture to practice on!
 
Status
Not open for further replies.

Premier Sponsor

Our Sponsors

Top