Has anyone ever figured out how to make the long side of a 1x4 convex in an elliptical fashion? not just roundover bits on the corners. Convex is easy enough, but figuring out how to do it without a shaper is more challenging. All I have come up with so far is roughing it out on a table saw, followed by handplanes and sanding

You are using an out of date browser. It may not display this or other websites correctly.
You should upgrade or use an alternative browser.
You should upgrade or use an alternative browser.
elliptical shape on 1x4
- Thread starter Charles in Richmond
- Start date
I like hand tools, but not when it comes to roughing out when I have a choice. RAS woul be like a table saw but you could see the work. I could see that being easier. Still not touching an RAS!
This may be the method you are trying to avoid, but if I had to do it I would scribe the desired profile on the end of the board.
Then I would set the fence and blade height on the TS to take a series of rip cuts to just hit the profile. The break of the “fins” of wood left between cuts and spoke shave/plane/sand to the finished surface.
Then I would set the fence and blade height on the TS to take a series of rip cuts to just hit the profile. The break of the “fins” of wood left between cuts and spoke shave/plane/sand to the finished surface.
Home Depot is pretty good at making odd shaped 2 X 4's, but I've never seen one that they offered like this.
Charley
Charley
Interesting problem...
If you want a reasonably accurate shape and are willing to build a jig, I can envision a pretty accurate way to rough cut it on the table saw that would then be smoothed as others have indicated.
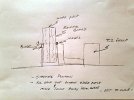
The attached shows a very simplified concept. The jig consists of a rotating hinged board onto which the workpiece is attached maybe via double sided tape or screws. The holding knob/mechanism that locks the angle is not shown. The start position is with the workpiece vertical and just against the saw blade. The fence is moved away from the blade a defined distance and the workpiece is rotated a defined angle - this might best be done with an electronic angle finder. To be clear, this is done with the saw stopped. The piece is ripped and the process repeated until the piece is 90 degrees. The other (upper) half of the board is done by flipping the workpiece over and repeating the process.
Since both the shape and tangent of an ellipse are defined by simple equations, the angles and offsets are easily calculated in a spreadsheet. Dont forget that the origin of the workpiece is offset in the x dimension by the thickness of the backer board and, depending on hinge type, the hinge thickness. This affects both x and y movement as the piece is rotated.
PM if you want to discuss any of this.
If you want a reasonably accurate shape and are willing to build a jig, I can envision a pretty accurate way to rough cut it on the table saw that would then be smoothed as others have indicated.
The attached shows a very simplified concept. The jig consists of a rotating hinged board onto which the workpiece is attached maybe via double sided tape or screws. The holding knob/mechanism that locks the angle is not shown. The start position is with the workpiece vertical and just against the saw blade. The fence is moved away from the blade a defined distance and the workpiece is rotated a defined angle - this might best be done with an electronic angle finder. To be clear, this is done with the saw stopped. The piece is ripped and the process repeated until the piece is 90 degrees. The other (upper) half of the board is done by flipping the workpiece over and repeating the process.
Since both the shape and tangent of an ellipse are defined by simple equations, the angles and offsets are easily calculated in a spreadsheet. Dont forget that the origin of the workpiece is offset in the x dimension by the thickness of the backer board and, depending on hinge type, the hinge thickness. This affects both x and y movement as the piece is rotated.
PM if you want to discuss any of this.
Attachments

maybe I misunderstood the question.
If you want a convex symmetrical profile shape running the length of your 1x4 you ought to be able to do this on the TS with 6 set ups, end for ending between cuts to get the matching cut on the other side and you’re done with the saw work in 12 passes. I don’t think I could build a jig to get me the result I want with less work than that.
Draw the profile on a piece of scrap and use that to set the fence and depth for each step and you don’t even have to measure anything.
Of course you still have to remove the waste and smooth it out, but then I enjoy that kind of work.
I’m the guy who used a draw knife to round over a 4x6 to match my fence posts when I couldn’t find a replacement.
yeah, that is what I'm trying to avoid. I also doubt my ability to make a number of them the same with that method.This may be the method you are trying to avoid, but if I had to do it I would scribe the desired profile on the end of the board.
Then I would set the fence and blade height on the TS to take a series of rip cuts to just hit the profile. The break of the “fins” of wood left between cuts and spoke shave/plane/sand to the finished surface.
wow, that's a neat thought. I'm going to have to ponder that, though I'm still looking for something simpler. Current thought is a really big router bit and using an arc from it, followed by planes etcInteresting problem...
If you want a reasonably accurate shape and are willing to build a jig, I can envision a pretty accurate way to rough cut it on the table saw that would then be smoothed as others have indicated.
The attached shows a very simplified concept. The jig consists of a rotating hinged board onto which the workpiece is attached maybe via double sided tape or screws. The holding knob/mechanism that locks the angle is not shown. The start position is with the workpiece vertical and just against the saw blade. The fence is moved away from the blade a defined distance and the workpiece is rotated a defined angle - this might best be done with an electronic angle finder. To be clear, this is done with the saw stopped. The piece is ripped and the process repeated until the piece is 90 degrees. The other (upper) half of the board is done by flipping the workpiece over and repeating the process.
Since both the shape and tangent of an ellipse are defined by simple equations, the angles and offsets are easily calculated in a spreadsheet. Dont forget that the origin of the workpiece is offset in the x dimension by the thickness of the backer board and, depending on hinge type, the hinge thickness. This affects both x and y movement as the piece is rotated.
PM if you want to discuss any of this.
you think 6 would do? I thought of that approach but figured on more. Though even 6 would be a fair number, and I am far from certain of my ability to keep all the profiles the same - when I use a spokeshave it tends to wandermaybe I misunderstood the question.
If you want a convex symmetrical profile shape running the length of your 1x4 you ought to be able to do this on the TS with 6 set ups, end for ending between cuts to get the matching cut on the other side and you’re done with the saw work in 12 passes. I don’t think I could build a jig to get me the result I want with less work than that.
Draw the profile on a piece of scrap and use that to set the fence and depth for each step and you don’t even have to measure anything.
Of course you still have to remove the waste and smooth it out, but then I enjoy that kind of work.
I’m the guy who used a draw knife to round over a 4x6 to match my fence posts when I couldn’t find a replacement.
That was just a quick calculation based on the 1x4 being 3 1/2” wide. Since the shape is symmetrical you can think of it two mirrored sections, each 1 3/4” wide. 1 3/4 is 14 x 1/8”. If your TS blade takes a 1/8” kerf you can remove almost half that material in 6 passes.
The material left between the saw kerfs can be broken out by hand or with a mallet or chisel. That leaves little ridges you can pare down with a plane, spokeshave, or sanding block. (I hate sanding)
If you are doing a bunch, do all the cuts at each setting, swap ends to do the other side. Then slide the fence 1/4” and set the blade depth for the next cut. rinse and repeat. Since I haven’t mentioned it, a feather board and push stick will help keep you safe.
Thinking more about the top of the curve being tangent to the top of the board at the center, you could probably get by with fewer cuts.
I suppose you can do the same operation on a router table and make the clean up step a bit easier.
To clarify, I’m imagining the 1x4 laying flat on the table in a horizontal orientation. I would start with the shallow cuts toward the center and work outwards. The “ribs” remaining between the saw kerfs will serve to keep the work from rocking.
If you run the 1x on edge, I don’t know how you can keep it pressed up against the fence once the cutting starts.
If you run the 1x on edge, I don’t know how you can keep it pressed up against the fence once the cutting starts.
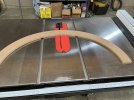
I sort of used this method to make an oval table and an ellipse for a hall mirror. The problem with the router jig is that you need a larger base for the cut so I cut templates from MDF and used 2 sided tape and the router to cut the shape. the picture shows one but have some that are more elliptical. You are welcome top borrow them if they help and you are near Chapel Hill. Or maybe I am misunderstanding the problem...I guess I misunderstood your question. Are you saying that you want to make a depression in the face of a 2x4 that is oval shaped in the outline? What size and how deep?
Maybe a router jig would do that. Make 2 three sided boxes that swivel on a center axis. Use a cove bit in the router. Swing the router through the jig to cut the long center line the adjust the jig to left and right raising the router on each pas until you cut the short shallow last cut on each side.
A bit sketchy I know but maybe enough to get you thinking.
Attachments
How about this?
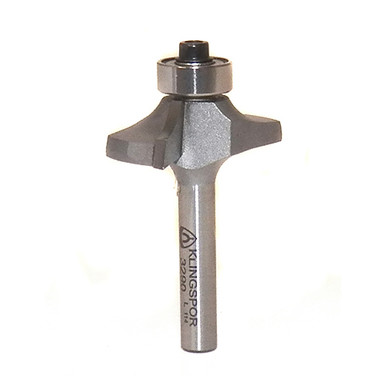
If you have a router table, just get a thumbnail table edge bit:
 www.woodworkingshop.com
Klingspor Thumbnail Table Edge Bits
Klingspor's Woodworking Shop is full line distributor of woodworking tools and supplies from respected companies like Klingspor Abrasives.
www.woodworkingshop.com
I believe the OP is looking for a convex profile. The set up shown here would create a concaveHow about this?
Use the method described in the video to make a sanding block for the finish sanding. That will give you a consistent profile for the entire board length.
Depth controlled by blade height; width controlled by the angle. If its fairly deep, you can raise the blade in increments to nibble away to the final depth.
If you start sanding with a rough grit, you may want to shim the thinner final grit sandpaper by adding a piece of paper, etc behind it to keep the exact same profile. The thicker coarse sandpaper will give a slightly narrower diameter than the thin paper.
Last edited:
It would help tremendously if the OP would post a picture or drawing of exactly what he wants to make.