Vari_Slo Rebuild
The Vari-Slo unit is a relatively rare accessory for the older Craftsman drill presses. For those of you who are from up north, the unit functions similarly to a snowmobile drive, but using a lever rather than centrifugal weights to change the drive ratio.
This one has been assembled for quite some time based on the accumulated grime, and the difficulty in getting the pulleys off.
One thing I was concerned with was removing the self-locking fasteners holding the speed adjustment levers in place. Thankfully, they have a good bit of flexibility and came off without breaking.
The next step was removing the upper shaft connector. It's not held on by any fasteners, so theoretically, it should come off "easily". Not this one. I soaked the bores in penetrating oil to see if that might help.
I was able to finally get the upper shaft connector off by wedging a flat blade screwdriver between the connector and the pulley boss. I gently rocked the screwdriver up and down on each end to drive the "wedge" of the screwdriver in a little bit at a time. I hated doing it this way, but it was a last resort and ended up successfully removing the connector without leaving any marks on the pulley. This connector must come off to change the belts, so I'm guessing these belts have some miles on them.
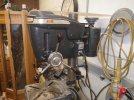
Here's a photo of the unit after removing the lever linkage and shaft connector. You can see it's pretty dirty.
Taking the lower linkages off is very straightforward. The only thing to be aware of is the pivot pins are staked on one end, so they need to be driven out from the opposite end of the pin. I drilled a hole in a doubled up 2x4 as the backer for diving the pin into the hole.
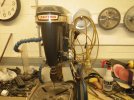
After removing the set screws, the shafts came out of the top of the upper bracket with a little coaxing. The most difficult part of the process was getting the shafts out of the pulley bearings. I have a hydraulic press, so I set up a socket that put all the force on the bearing, rather than the pully, and pressed it out. It came out without a bunch of force, but I could hear it complaining as it moved.
I finished it off with a hammer and punch, then knocked the bearings out using the hammer and punch as well. The pulley looks clean because I did this step after soaking everything in Simple Green.
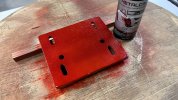
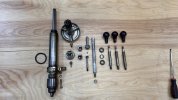
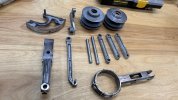
Here are all the parts after soaking. Note: the red speed indicator panel in the background DID NOT go into the Simple Green. I assume it would have taken the paint off if I made that mistake.
I chucked the pulley shafts in my small drill press and used some oil and wet/dry sandpaper to clean them up.
I took them down to the point where the bearing slid onto the shaft easily, but not enough to slide back off.
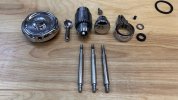
Here's a shot of one of the shafts unfinished next to a finished one. You can see how buggered up they were. I thought I'd have to make new shafts, but they turned out fine.
I cleaned up the indicator using a very light rubbing of Flitz, then a coating of wax and it came out well. A 3lb. coffee can has a the perfect curvature to support the indicator.
I polished the indicator lever mount and assembled it. You can see there are a few gouges in the clamping area, but it still looks good. The tiny little drive screws are a pain to work with, but at least I didn't lose any. That's it sitting on the 2x4.
The moveable center pulleys were very stiff, so I cleaned them up with brake cleaner and lubed them with Super Slick Stuff. I need to do a little more research to see if there's any special lubricant for them. The bores of the pulleys were packed with grease, so I thought there might be a way for that grease to get to the sliding surface, but there are no passageways in the bore. I'm not sure why they were so packed. I can't imagine it's to lubricate the shielded bearings. Especially since the upper bearing would never see any of that grease due to gravity.
The rest of the parts went together quickly & easily. I'm still waiting on the pulley bearings, so the last step will be to press those in and slide the pulleys onto the shafts. I'll also purchase new belts and install them.
Everything moves smoothly and freely now. It should be easier to adjust now compared to the effort it took before to change speeds.


 Thanks.