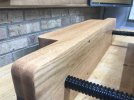
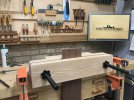
Yet another dumbbell screw Moxon vise

pop-pop

Man with many vises
Corporate Member
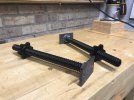
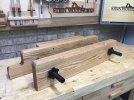
Ask Dr. Google about Moxon vises made using dumbbell screws and he will find many. Here is my variation using a Gold’s Gym dumbbell handle from Walmart for less than $7. First you need to cut off the rubber grip, saw it into 2 halves, and drill a 5/16” cross hole near the cut end.
185835


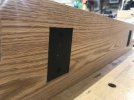
This back view shows a handwheel and the clamp-down lug:
185836


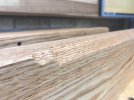
The jaw liner is 1/16” “crubber” from an auto store for around $8:
185840


To test the vise, I made four storage drawers out of PWW (prime white wood aka resawn SPF 2x4):
185837


Being of tails first persuasion, here is gang-sawing a pair of tail boards:
185838


This vise has a clamping ledge to hold a tail board for transfer:
185839


Using F-clamps for this was awkward. I plan on making a clamping bar and will post it later.

Anyhow, with some wood scraps and less than $20, one can build a useful dovetailing vise.
 

TENdriver

New User
TENdriver
Pop-pop,

Had no idea there was anything posted about using the threaded dumbbells to make a Moxon.

I built a couple of Moxons with a few different dumbbells, and also settled on the exact same type as the most practical.

I didn’t put it to extended use. I was a bit concerned about the durability of the threaded nuts and I never tracked down any replacement nuts to keep the vise going if an original set were to wear out.

Thanks for posting about yours.
 

mdbuntyn

Matt
Staff member
Corporate Member
I used the same Gold's dumbbells for my mine. I left my dumbells full-length because all I have is a hacksaw, and ain't nobody got time for that. I also bought a third dumbbell so that I could use the extra nuts as locking nuts on the back side of the rear jaw.
 

pop-pop

Man with many vises
Corporate Member
You may need an “adult” hacksaw. These high tension hack saws are fairly new on the market. There are other brands too. I didn’t pay heed but I’m sure it was well under a minute to hack that mild steel screw in two. Need a quality blade too.
D808B659-1888-4CFA-8588-AC4FA64E6A5D.jpeg
 

pop-pop

Man with many vises
Corporate Member
Mentioning one more detail. The screw is attached to the chop via a 1/4” brass rod in a blind hole through the 5/16” hole drilled in the screw. I tapped each rod’s end 10-24 so that it could be removed for repairs. The washer is HDPE machined from a cheap cutting board.
6F36B218-8D6C-499A-849D-51E559910B38.jpeg
 

mdbuntyn

Matt
Staff member
Corporate Member
but I’m sure it was well under a minute to hack that mild steel screw in two.
I didn't realize that they were mild steel, though in hindsight, I should have known based on the price. I guess I'll give it a try
 

cmboggs

Chris
User
Is there any chance you could take a few more photos of the 'cut' end, with the cross hole, of the dum bell? I think I understand how it attaches to the other side of the vise, but just like to be sure.

Great set-up!
 

pop-pop

Man with many vises
Corporate Member
Here are some more pix:
Chop and screw assembly:
5D712BF7-EAE6-4E08-8528-5B3DAD1C64C1.jpeg


I used a 1” Forstner for the holes.
20ABE01E-B813-46F7-BBB7-2032DB62CC09.jpeg


I added the steel washers before I found that I needed the HDPE spacers to make the nuts unscrew more easily. The clamping lugs should have been a bit longer.
8466E7FC-8EE4-46AC-9757-949A639F802A.jpeg


18E73ECF-CF68-43B9-BD28-1C55CDD0DA86.jpeg


1/4” brass rod 2-1/2” to 3” long with outside end tapped 10-24:
E0603073-3803-41EB-967F-72928F19DF6F.jpeg


The screw has a 5/16” cross hole like 1/2” from the cut end.
1705A2CE-AF4C-4BC4-AB23-593BEB7B7FAC.jpeg
 
Last edited:

DavidK

New User
David
Thanks for sharing! Using dumbell screws is a great idea that I had not seen before. Your version looks great!
 

cmboggs

Chris
User
I understand the purpose of the brass rod inserted through the cut end of the dumb bell, however I am not sure I get the point of the outside end being tapped 10-24. Is that just to help with assembly/disassembly?

Sorry to trouble you with so many questions.
 

pop-pop

Man with many vises
Corporate Member
I understand the purpose of the brass rod inserted through the cut end of the dumb bell, however I am not sure I get the point of the outside end being tapped 10-24. Is that just to help with assembly/disassembly?

Sorry to trouble you with so many questions.
I try to make my vises repairable. The brass rod is in a blind hole thus inserting a screw into the tapped hole enables one to get purchase to pull the rod out. BTW, I had to pull one of the rods to drill the screw hole a bit deeper.

Questions in a forum like this are necessary, not trouble.
 

cmboggs

Chris
User
Thanks again.

I like your 'repairable' approach towards design. This sounds a lot better then my 'epoxy it and hope...' approach.
 

Hmerkle

Board of Directors, Development Director
Hank
Staff member
Corporate Member
pop-pop - have you considered (or have you seen) a version where the ends of the screw does not stick out?
(in other words, the screw turns and the "nut" is the driver" having been "pinned" in place, much like the rear chop in your version...)
 

pop-pop

Man with many vises
Corporate Member
pop-pop - have you considered (or have you seen) a version where the ends of the screw does not stick out?
(in other words, the screw turns and the "nut" is the driver" having been "pinned" in place, much like the rear chop in your version...)
First, the ends of the screw have to stick out either in the front or in the back. I prefer the screw sticking out in the back. Here is a larger and more complicated Moxon of my design where the screws turn that I posted a few years ago.
87365FE8-F2A1-40BB-BCEA-B6C22D4CAE5D.jpeg
 

Hmerkle

Board of Directors, Development Director
Hank
Staff member
Corporate Member
First, the ends of the screw have to stick out either in the front or in the back. I prefer the screw sticking out in the back. Here is a larger and more complicated Moxon of my design where the screws turn that I posted a few years ago.
View attachment 186125
That is EXACTLY what I was thinking - forgot you did that.
So you are saying this was more complicated... why?
Because the screws stick out the back, or was it the hardware or???
 

pop-pop

Man with many vises
Corporate Member
That is EXACTLY what I was thinking - forgot you did that.
So you are saying this was more complicated... why?
Because the screws stick out the back, or was it the hardware or???
Here is a link to that thread:
That vise has over $75 worth of wood, Acme screws, nuts, bearings, handles, etc. and will hold a 24” carcase side. Super smooth action though.
 

Hmerkle

Board of Directors, Development Director
Hank
Staff member
Corporate Member
Thanks for the link - I remember reading your post about that!
 

ste6168

New User
Mike
I made one of those a while back also. I like that your screws stick on the back, rather than the front. I had a welder friend weld plates onto the back of my screws, and I countersunk holes to secure them into the vice. It works fine, though the long screws can be cumbersome.

IMG_9607.jpegIMG_9809.jpegIMG_9923.jpegIMG_9924.jpegIMG_9927.jpegIMG_9897.jpeg
 

Premier Sponsor

Our Sponsors

LATEST FOR SALE LISTINGS

Top