I have edge glued 3/4" red oak with Titebond III to make 14" wide boards for a bench 10 feet long. The bench will be ~1.25" thick, so next I will glue the faces together and plane/sand to final thickness. That is a lot of surfaces on which to spread glue and clamp before it begins to dry. Should I continue using Titebond? Any recommendations for pitfalls to avoid as I have never glued such width and length before. The benches will be used indoors.

You are using an out of date browser. It may not display this or other websites correctly.
You should upgrade or use an alternative browser.
You should upgrade or use an alternative browser.
Wide face gluing
- Thread starter kelLOGg
- Start date
- Status
- Not open for further replies.
When I have to spread glue on large surfaces, I put the glue in a paint tray and use a roller. Stick the tray in a plastic bag for easy clean up.
Titebond III is fine to continue using even for such glue ups. I have done much larger face glue ups (such as an area up to 24x30", or multiple 4-6" wide boards by 10ft long, etc.) without any issues -- and I am quite slow by most standards due to my health. Just use either an application roller (you can get glue bottles with 3-4" wide rollers that allow you to lay down and spread glue quickly) or lay down a couple heavy beads and use a stiff card (cardboard or plastic) to quickly spread an even layer of glue over the entire surface, then clamp together and either scrape the excess glue off when it begins to congeal, or use wet paper towels to remove most of the excess glue while it is still wet and then sand smooth after the glue has set (whichever works better for you) -- just remove the excess before it hardens.
If for some reason you need to extend the open time further, you can moisten the face of the board you apply the glue to so as to increase the open time a bit by preventing the glue from drying prematurely, just allow extra time for the glue to set if you do so, but Titebond III often has an extended open time versus I/II as-is and I have not found such to be necessary if you just lay down a more than adequate layer of glue to begin with and accept that there will be squeeze out to clean up once you clamp everything tightly.
Good luck and just take a little time to setup your work area and initial clamps ahead of time and plan through the motions prior to glue application and execution and you will do just fine.
When I have to spread glue on large surfaces, I put the glue in a paint tray and use a roller. Stick the tray in a plastic bag for easy clean up.
+1 for the paint roller. I use a 4" roller, rather than the longer ones. I've done a 12' glue up like you're describing w/ regular yellow glue (PVA) and had no problems.
14" is not too wide but if it were any wider having a good set of bowed cauls such as those made by bow-clamp would help you get clamping pressure to the center of the glue-up.
You can make your own but these work extremely well.
http://www.leevalley.com/US/wood/page.aspx?p=67309&cat=1,43838
Don't need them often but when I do they are invaluable.
You can make your own but these work extremely well.
http://www.leevalley.com/US/wood/page.aspx?p=67309&cat=1,43838
Don't need them often but when I do they are invaluable.
Try and keep the boards flat when face gluing like this. If there is some curvature (for any reason) and you glue the boards together in that position they will mostly stay that way. You don't want a bent lamination here.
To "clamp" the board, you can space short screws primarily down the center and drive them in from what will be the bottom face. Tighten the screws starting in the center and working out to the ends/edges. Edges and ends can be clamped using regular clamps. TRemove the screws after the glue sets. This will eliminate any voids in the glue up. I recommend drilling pilot holes in the bottom board before applying the glue so the screws tighten the two together firmly. No need to over tighten, just firm enough to remove any air pockets.
I normally just use 1 1/4" deck screws for a double 3/4" lamination which work fine for this purpose. I don't drive them in so far the head is fully flush, though, because it risks poking out the other side. 1" dry wall screws also work, but are more prone to snap the head off, leaving the shank hard to remove before planing.
Go
To "clamp" the board, you can space short screws primarily down the center and drive them in from what will be the bottom face. Tighten the screws starting in the center and working out to the ends/edges. Edges and ends can be clamped using regular clamps. TRemove the screws after the glue sets. This will eliminate any voids in the glue up. I recommend drilling pilot holes in the bottom board before applying the glue so the screws tighten the two together firmly. No need to over tighten, just firm enough to remove any air pockets.
I normally just use 1 1/4" deck screws for a double 3/4" lamination which work fine for this purpose. I don't drive them in so far the head is fully flush, though, because it risks poking out the other side. 1" dry wall screws also work, but are more prone to snap the head off, leaving the shank hard to remove before planing.
Go
I have often used screws as well if there is a hidden face as they are very effective at providing even clamping over large areas if you install the screws in a grid spaced a few inches apart from one another (the thicker the board the more widely they can be spaced, the thinner the closer they should be spaced). In fact, if one wishes they may even elect to use 100% screws if there is a shortage of suitable clamps provided there is an adequate hidden face for the screws to be installed from.
However, if you do much of this sort of glue up then it can be worth taking a little time to create clamping cauls for future use as well. It is easy to create cauls simply by cutting a caul blank to length and thickness, then place a 1/8-1/4" drill bit or spacer in the center of the caul and then situating a clamp at each end and tightening the clamp until an adequate amount of deflection and clamping force is achieved at each end (aim for an identical amount of deflection and use a rigid table to clamp to such that the table does not deflect much). Then scribe a level line across the length of the caul (e.g. at 1/4" or 1/2" above the table). Then when you release the clamps you will find the line you scribed now has a curve to it that will ensure an even clamping pressure over the width of the caul. Then use a bandsaw or jigsaw to carefully cut along your scribe line and then smooth the cut by sanding it to a smooth curve. Once you have made the first caul you can then duplicate however many you require using a router and piloted template or flush trim bit to duplicate the origanal caul (setup either freehand or in a router table). Seal the cauls with either wax or a polyurethane/acrylic clear coat so as to prevent glue squeeze out from adhering to your cauls (or you can protect the edge with masking tape if you prefer).
Thanks for the replies. It is good to know my general gluing approach is OK. I didn't know about cauls but I was on the verge of making one in the form of a 1 x 2 the width of the bench with a 1/8" shim between it and the bench. Then clamp it down until the bench is flat. The caul would be a better idea because it would apply even pressure. Screws are possibility too. There will be a support beam under the bench which would cover the screw holes. Thanks.
For big surface glue ups I have found a notched trowel to be easier and much faster than the paint roller. The one I use is just a plastic spatula that you can pick up for nothing. I took a 3 sided file and cut notches in to make a fairly uniform film. Easy clean up and fast action. I just pour a line of glue end to end then spread it out with the trowel.
Kind of like doing thin-sette on a backer board only its glue going down. Both ways should work.
Dan
Kind of like doing thin-sette on a backer board only its glue going down. Both ways should work.
Dan
TB II Extend gives you exterior specs for moisture and lots of time for assembly:
http://www.titebond.com/product.aspx?id=21051713-5cce-4925-a653-3bff0a0f71ab
Open Assembly Time15 minutes (70°F./50% RH)
Total assembly time20-25 minutes (70°F./50%RH)
http://www.titebond.com/product.aspx?id=21051713-5cce-4925-a653-3bff0a0f71ab
Open Assembly Time15 minutes (70°F./50% RH)
Total assembly time20-25 minutes (70°F./50%RH)
TB II Extend gives you exterior specs for moisture and lots of time for assembly:
http://www.titebond.com/product.aspx?id=21051713-5cce-4925-a653-3bff0a0f71ab
Open Assembly Time15 minutes (70°F./50% RH)
Total assembly time20-25 minutes (70°F./50%RH)
Building on that info:
Regular Titebond II = 3 - 5 minutes open time
Titebond III (outdoor etc. glue) = 8 - 10 minutes open time.
For that reason alone I use Titebond III for almost all my 'regular' gluing. The older I get, the slower I get...
K
DrBob,
That's interesting. I did not think to do it that way. I figured that I would get a better (stronger) joint if I have overlapping face grain as part of the glue joint (sort of like a glued shiplap joint) in addition to the edge joint.
I haven't glued it yet but will show my setup when I do.
Bob
That's interesting. I did not think to do it that way. I figured that I would get a better (stronger) joint if I have overlapping face grain as part of the glue joint (sort of like a glued shiplap joint) in addition to the edge joint.
I haven't glued it yet but will show my setup when I do.
Bob
I have edge glued 3/4" red oak with Titebond III to make 14" wide boards for a bench 10 feet long. The bench will be ~1.25" thick, so next I will glue the faces together and plane/sand to final thickness. That is a lot of surfaces on which to spread glue and clamp before it begins to dry. Should I continue using Titebond? Any recommendations for pitfalls to avoid as I have never glued such width and length before. The benches will be used indoors.
Is there a reason you didnt just use 6/4 lumber to start with?
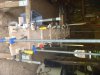
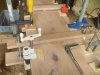
I glued the 1st bench seat today. I think I used 42 clamps. Take a look. I'll get to the 2nd bench next week. I decided not to make a caul, instead I clamped the middle of the seat against the supporting beam which will run under the bench.
Bob
Bob
Attachments
Many good ideas here, many of which I've tried in one form or another. For a bench top, I agree with Dr. Bob above that getting the individual boards to thickness would be my first step. Then, these could be jointed and remilled to be perfectly straight and flat. Final step would be and edge-to-edge glue up, which I would do in stages so that I could use my planer or drum sander to help in the process.
- Status
- Not open for further replies.
Premier Sponsor
Our Sponsors
LATEST FOR SALE LISTINGS
-
-
-
 SOLD -- $75: Gast moa v113 Vacuum Pump Veneer, 60" bag and board
- Started by peterdnight
- Replies: 1
-
GONE: Gladiator 5 cleats, 10 hangers, Paper Towel and Shelf
- Started by peterdnight
- Replies: 3
-
SOLD -- $100 Makita mac700 portable air + grex pin nailer + 2 others + 50' hose
- Started by peterdnight
- Replies: 1