
You are using an out of date browser. It may not display this or other websites correctly.
You should upgrade or use an alternative browser.
You should upgrade or use an alternative browser.
Tenoning fixture query
- Thread starter pop-pop
- Start date
I have used two shop built jigs, plus a Delta and a Grizzly. Right now I am using the Grizzly.
I did spend a few hours, filing, fine tuning, and adding some wood parts to make it work better. But of course it’s still the same jig that’s been around for more than 75 years.
What exactly do you like about this one?
I did spend a few hours, filing, fine tuning, and adding some wood parts to make it work better. But of course it’s still the same jig that’s been around for more than 75 years.
What exactly do you like about this one?
What exactly do you like about this one?
On the Delta, the base is in the way when tenoning thicker stock. This one supports the stock all the way to the table up to maximum thickness.
The Delta vertical support is wimpy compared to this one.
I made the Steve Latta jig & I quit doing them like that.
I get much better results with a dado. You establish one cheek, then dial in the height for the other side. You just can’t do that as accurately with a vertical jig. Also a cleaner cut.
Now, if you’re adjusting the mortise to the tenon (but why??) it doesn’t matter.
I get much better results with a dado. You establish one cheek, then dial in the height for the other side. You just can’t do that as accurately with a vertical jig. Also a cleaner cut.
Now, if you’re adjusting the mortise to the tenon (but why??) it doesn’t matter.
@Rwe2156 That looks like a great way to do it. Did you use any plans or did you just make it based on the video? It looks like you could make it to whatever dimensions you wanted or need for your fence?I made the Steve Latta jig & I quit doing them like that.
I get much better results with a dado. You establish one cheek, then dial in the height for the other side. You just can’t do that as accurately with a vertical jig. Also a cleaner cut.
Now, if you’re adjusting the mortise to the tenon (but why??) it doesn’t matter.
That Woodsmith design looks to be a plywood substitute for the Delta 1172 (34-170) tenoning jig. That's a good design.
The later Asian-made tenoning jig substitutes were cheap and not much as people are finding. I've had several from shop buy-outs.
If you can find an 1172 tenoning jig, grab it. They are heavy, stable, versatile and very accurate. I have two. I keep one set up for a repeatable operation and another for general use.


 `
`

The later Asian-made tenoning jig substitutes were cheap and not much as people are finding. I've had several from shop buy-outs.
If you can find an 1172 tenoning jig, grab it. They are heavy, stable, versatile and very accurate. I have two. I keep one set up for a repeatable operation and another for general use.
`What if you reposition the guide bar that runs in the slot to be closer to the edge. That would move the base away from the blade. Pretty sure the one I have has multiple sets of holes. I'd assumed these were to accommodate different saws, but likely for this reason as well.On the Delta, the base is in the way when tenoning thicker stock.
I more or less just followed the design. What separates his jig from others is the spline that guides it and keeps it from racking. With wax it slides like silk.@Rwe2156 That looks like a great way to do it. Did you use any plans or did you just make it based on the video? It looks like you could make it to whatever dimensions you wanted or need for your fence?
It it also more robust and heavier than other jigs. I recommend a clamp. BTW the tall fence is a handy thing to have by itself.
But as I said, I found with that jig I had to “get it close” and dial in the tenon by hand, which is quite laborious and not as accurate.
Re: a dado think it boils down to which is more accurate, adjust the blade height or the fence? Might depend on the saw.
There are many who advocate doing them on the bandsaw. Again, like the jig, I’m wondering how accurately you can dial them in. People use spacers and that appears the way to go, but seems like you‘d have to fiddle around a lot. Maybe not - I need to try that one day.
That was my first thought but I got distracted by the Woodsmith design.What if you reposition the guide bar that runs in the slot to be closer to the edge. That would move the base away from the blade. Pretty sure the one I have has multiple sets of holes. I'd assumed these were to accommodate different saws, but likely for this reason as well.
I have a mid-1990s tenoning fixture and it only has the extra holes for left-tilt saws. I’ll open it up soon to figure out if the bar can be moved and the ramifications of that.
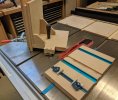
I'm currently in the process of making this tenoning jig that rides over the fence, as demonstrated in a YouTube build video by Tom McLaughlin (link below). I like the simplicity of the over the fence design and the flexibility of being able to take off the rear block to use the base jig for other applications.

The vertical spacer between the workpiece and the jig's fence is exactly the width of the tenon he's making. After making the first cheek cut, he removes it, flips the workpiece and makes the second cheek cut. Easy peasy.

As the backing block gets cut up, just add a new zero clearance face panel of 1/4" plywood.
The vertical spacer between the workpiece and the jig's fence is exactly the width of the tenon he's making. After making the first cheek cut, he removes it, flips the workpiece and makes the second cheek cut. Easy peasy.
As the backing block gets cut up, just add a new zero clearance face panel of 1/4" plywood.
Dug into this further. When the fixture is adjusted fully out the vertical plate just kisses the blade. Thus, no overtravel to use.What if you reposition the guide bar that runs in the slot to be closer to the edge. That would move the base away from the blade. Pretty sure the one I have has multiple sets of holes. I'd assumed these were to accommodate different saws, but likely for this reason as well.
Disassembled, the top of the base plate is flat with 7mm holes for the guide bar so new holes could be drilled anywhere.
Another idea would be to trim the base plate.
For now, I plan to make a scratch line in the red dye each time the base plate gets in the way. Then figure out whether to move the bar or cut the base plate.
Drilling a couple more holes and moving the bar seems like the easier option. You'll just have to make these as accurate as possible in order to keep the work moving parallel to the blade. Certainly doable if you take your time marking the location. I'd use a center punch and maybe a center drill to ensure accuracy.
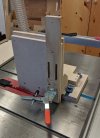
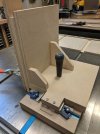
Here's a simple variant that is indifferent to minor variations in stock thickness (or intentional thickness differences). You just have to decide whether the face side or backside is toward the jig and cut them all the same. Once the two stops are dialed in, it's very repeatable. It usually takes about 3 test cuts to get it dead on. Toggle clamp low, close to the blade and your left hand way high away. Right hand ushes the handle. Originally you would twist the handle to lock the position, but I found it was not needed.
Attachments
I like that design and it would satisfy my needs. Is the toggle clamp above the maximum blade height?Here's a simple variant that is indifferent to minor variations in stock thickness (or intentional thickness differences). You just have to decide whether the face side or backside is toward the jig and cut them all the same. Once the two stops are dialed in, it's very repeatable. It usually takes about 3 test cuts to get it dead on. Toggle clamp low, close to the blade and your left hand way high away. Right hand ushes the handle. Originally you would twist the handle to lock the position, but I found it was not needed.
Yes - above the cut. You can see a line indicator that I intended to use with a stick-on rule. During the trial runs I decided it wasnt really necessary.I like that design and it would satisfy my needs. Is the toggle clamp above the maximum blade height?
As with most of my jigs, this was made with scraps and off-cuts, so it can definitely be "prettied up".
Just moving the bar will not get the base out of the way which is the primary problem. Let’s name the parts from bottom up as guide bar, base, and head.Drilling a couple more holes and moving the bar seems like the easier option. You'll just have to make these as accurate as possible in order to keep the work moving parallel to the blade. Certainly doable if you take your time marking the location. I'd use a center punch and maybe a center drill to ensure accuracy.
The head travel toward the blade is limited by this adjustable stop which prevents head/blade contact. If one just moves the guide bar, this stop restricts the head travel by the amount that the bar was moved.
Imagine the guide bar and head staying put and the base sliding just under the head out of the way. This is the objective.
Getting there requires modifying the base with two new through holes for the guide bar and a new tapped hole (moved same distance) for the lock stud (top center above) to restore the original head travel.
Doable with care.
Premier Sponsor
Our Sponsors
LATEST FOR SALE LISTINGS
-
-
-
 SOLD -- $75: Gast moa v113 Vacuum Pump Veneer, 60" bag and board
- Started by peterdnight
- Replies: 1
-
GONE: Gladiator 5 cleats, 10 hangers, Paper Towel and Shelf
- Started by peterdnight
- Replies: 3
-
SOLD -- $100 Makita mac700 portable air + grex pin nailer + 2 others + 50' hose
- Started by peterdnight
- Replies: 1