Tapered Recessed Drawer Face ?

jfynyson

Jeremy
User
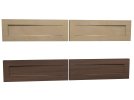
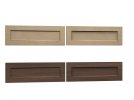
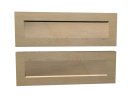
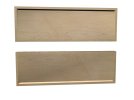
I'm trying to come up with a unique accent / look to a pair of drawer fronts for my hanging walnut tea cabinet. Ideally this would become my "signature design feature". I really like the look of the Greene & Greene tapered indent detail typically reserved for legs and want to try and see if I can incorporate that idea into a drawer face but go all around the drawer face to add visual interest. I've looked and looked and have never seen anyone do this. Think of the Shaker style drawer face or door but that look made from the tapered indent instead of a frame & panel. I'll probably use a chisel to square up the corners though....I prefer straighter lines rather than rounded edges/profiles like Greene & Greene uses (i.e. I like chamfers better than roundovers).

Even better I think, would be (again I've never seen this either) to have the tapered profile blend back into the original drawer face thickness plane as it goes towards the middle of the drawer face. This would again look similar to a raised panel door/drawer front but from solid wood rather than a frame & panel.

Am I missing something here ? Have folks seen this ? If so, could you please share a photo and ideally a jig design to make said tapered recess profile ? I did find a couple of videos for the G&G tapered detail jig....just need to widen it for my drawer front.

Thanks !
 
Jeremy:

From a design perspective, to my eye part of the charm of the G&G taper is that it draws the eye from the top to the bottom in a subtle way. For drawer faces, I would think that if you have two drawer faces side by side, a mirrored G&G taper would be asthecally pleasing, one on each drawer face, assuming that the taper increases from left to right/right to left, instead of from top to bottom. If you have one face, I think that if you have two tapers, then the middle of the face should have an area (perhaps an inch or so) that is flush to the outer plane of the drawer face, otherwise it would leave a peak where the upper portion of the tapers meet, and it might look odd, or at least not in keeping with I would perceive as the design intent of the G&G taper. Perhaps for one drawer face the taper can go from top to bottom, like the G&G legs.

The other thing about the G&G taper is that generally it is narrow and thus subtle, and works well on the legs but perhaps not elsewhere. If it is for relatively narrow drawer faces, it might look nice. If it is for a file-size drawer face, maybe not so much. Just my opinion.

Of course, as they used to say in the shop "Opinions are like (insert something that everyone has), everbody has one." In mixed company I would say that "Opinions are like chins, everbody has one. Some people have two."

Hope this helps.
Tone
 
Last edited:

BKHam

Bradley
User
I'm not imagining what you are doing perfectly but generally get it.

as far as "your signature feature"....what do you mean by that? apply to all pieces you do?

I follow Darrell Peart who does the G&G furniture. from a technique and design perspective, he is a great follow. his catalog is impressive. he does this for a living so I get it. G&G all day every day. but it always occurred to me that it would be overly repetitive and boring if this was a hobby.
 

jfynyson

Jeremy
User
Thanks for the feedback and I also thought last night about having the taper go from left to right & right to left on opposing drawers rather than just all around each drawer face and also thought about just having them in each top opposing drawer face corner. However, in my mind the taper going from top down looks good. In the end I first tried to make these tapers in SketchUp but I couldn't figure it out / didn't want to waste hours trying as opposed to making a jig and seeing how each option looks on some scrap pieces of wood.

As far as my "signature feature", my aim would be to incorporate this small design feature into most but maybe not all pieces of furniture but certainly only used as an accent where it adds a touch but not to the extent this would be too repetitive or a bore to create.
 

Mike Davis

Mike
Corporate Member
I had no idea what this is so I used the google feature imbedded in my computer.

This is what I found. Is this in some way connected to your idea?


jfynyson

Jeremy
User
I had no idea what this is so I used the google feature imbedded in my computer.

This is what I found. Is this in some way connected to your idea?

It sure is. I have this video saved and another from Darrell Peart (who this video got his idea for the jig from). I want to modify this for drawer fronts for example
 

jfynyson

Jeremy
User
Would the whole front have the tapered recess going all the way across face?
I wanted to make several iterations to see what looks best (which is why I wish I could quickly get it to work in SketchUp instead). One would be all around each drawer face, one would have just top of each drawer face would have a taper down and another would have the taper just on the other side of each drawer face (i.e. left to right for the left drawer & right to left for the right drawer) but not on the adjacent drawer sides (if that makes sense).
 

jfynyson

Jeremy
User
And you want to build an adjustable jig that could fit any drawer front (within reason).
Correct....similar to a dado jig but able to account for various draw or door face sizes.....maybe it's best to a separate jigs per the size of the piece though.
 

JNCarr

Joe
Corporate Member
I think this is what you're looking for. The "Full Taper" image has two styles - 1/8" recess plus 1/8" chamfer on the right and just 1/8 chamfer on the left. The "Opposing Tapers" starts at no taper and goes to 1/8" chamfer (no recess).
While the latter looks good, in practice it might be tough to go to exactly the surface, so you might want to start at a very shallow recess even on that side and go deeper on the other.
 

Attachments

  • Greene and Green Opposing tapers.jpg
    Greene and Green Opposing tapers.jpg
    236.2 KB · Views: 50
  • Greene and Greene Full Tapers.jpg
    Greene and Greene Full Tapers.jpg
    206.1 KB · Views: 46

jfynyson

Jeremy
User
I think this is what you're looking for. The "Full Taper" image has two styles - 1/8" recess plus 1/8" chamfer on the right and just 1/8 chamfer on the left. The "Opposing Tapers" starts at no taper and goes to 1/8" chamfer (no recess).
While the latter looks good, in practice it might be tough to go to exactly the surface, so you might want to start at a very shallow recess even on that side and go deeper on the other.
Wow ! How'd you do that ? Could I see one of having the taper only from top down on each piece ? Also the tapers would start around a 1/4" from the edges of the board.

Many thanks !
 

JNCarr

Joe
Corporate Member
Here are the narrow perimeter versions -
 

Attachments

  • Narrow Left Right Tapers.jpg
    Narrow Left Right Tapers.jpg
    136.8 KB · Views: 34
  • Narrow Perimeter Top and bottom tapers.jpg
    Narrow Perimeter Top and bottom tapers.jpg
    295.9 KB · Views: 35

Premier Sponsor

Our Sponsors

LATEST FOR SALE LISTINGS

Top