Thanks, Dan. Next bad weather day I'll go over and look this one up. The photo in reply 3 came from a Krause desk -only which I also need to look at.

You are using an out of date browser. It may not display this or other websites correctly.
You should upgrade or use an alternative browser.
You should upgrade or use an alternative browser.
Starting desk/bookcase project
- Thread starter Charlie Buchanan
- Start date
- Status
- Not open for further replies.
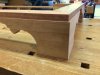
Great day for spreading glue. After dry fitting everything, fitting the sliding dovetailed writing top and (I hope) plowing all the dados that need plowing before glue-up I glued up the case today. The drawer rails are glued since they are mortised into the sides but the writing top will slide into the dado later. It's beginning to look like a desk. I was working alone and used Old Brown Glue to give me working time. Even so I felt like the one armed paper hanger buttering dovetails and holding parts until I got the clamps on.

Attachments
Looking great! Can you explain whats happening bottom right? Dovetail shaped cauls?
right, but they are just square dentils to press on each dovetail to equalize the clamping pressure. Cut from a piece of framing 2x4.
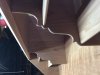
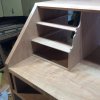
Glued in the writing top in sliding dovetail dado. It fit pretty well and pulled up tight in the last inch so I am happy about that. Last few days have been making and fitting the dividers for the small drawers. Edges are rounded. The small drawer runners are dry mortised into the drawer rails and center glued in the center to minimize cross grain problems as the case sides move.

Side drawers are stepped back.

Partitions have decorative curves that appear on lots of desks made by Krause in Salem.
Side drawers are stepped back.
Partitions have decorative curves that appear on lots of desks made by Krause in Salem.
Attachments
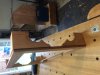
First joints on this project were the bracket feet. Now that I've got the case to final size it was time to make the frame and attach the feet to frame. Not going to mount the frame until later, however. Still trying to keep the weight down since it has to be moved around. small shop space.

 Right shows frame and feet assembly standing upright on its back side with the case in the background.
Top photo shows Frame and front right foot assembled on the bench.
Top photo shows Frame and front right foot assembled on the bench.
Attachments

Charlie one of the things I noticed on some of the German drawers was the lip on the top and bottom of the drawer faces. I like this as it makes the drawers look a little bigger and it hides the fat 7/8 dividers. They just look too bulky to me and this is an easy fix.
If you look at the first picture below, you will see there is NO lip on the top drawer. Reason: lid would not lay down flat on the pulls.

When you have fancy drawers like the desk below, you want to show off the crotch figured wood. Larger faced drawer fronts give you that opportunity.

Fitting out and then the thumbnail edge.

I fit all my drawers in the case then adjust the faces for a nice grain match and it makes it easier to get all the drawer edges in plane.


The good news Charlie is the desk you are building only has 3 drawers. I do like the big one on the bottom.
Dan, thanks for the suggestions. I am planning to use the thumbnail profile lip. Also on the lopers. Buried deep in the Lynch text is a tip not to lip the top drawer for the reason you cite. Since you fit your boxes first I assume you laminate the face wood onto the drawers. That seems like a good way to go especially if you have some good figured wood. Do you put an overhanging lip on the bottom edge? Seems like it would be fragile if someone removed the drawers and set them down carelessly. I've seen many drawers that had the profile on the bottom but not the overhang.
Again thanks. Your tips are always the useful
Again thanks. Your tips are always the useful
That seems like a good way to go especially if you have some good figured wood.
It is a great way to build up laminated faces. I also make the faces larger than final when working a solid face. Its no extra work and it gives you the wiggle room to get drawers in near perfect alignment.
Do you put an overhanging lip on the bottom edge?
Yes most of the time. The trick to good drawer longevity with top and bottom lips is to make the dividers very slightly concave. This is a trick I picked up a long time ago while viewing some 200 year old drawers. The drawer stops when the end grain over hang of the face(ends) contacts the side pieces of the case. No contact at all on the top and bottom extended lip of the drawer face. This does not protect the drawer from stupidity. If a person takes a drawer out and drops it on the floor.... its like Forrest Gump's mother said about stupidity.
Seems like it would be fragile if someone removed the drawers and set them down carelessly.
True. People put expensive antique furniture in open pickup trucks. Again, I'm thinkin' of Gump's mother.
I've seen many drawers that had the profile on the bottom but not the overhang.
Just depends really. In the photo below you see moulding applied to a bottom case board. The board is 7/8 and the moulding is the same. You would not have a lip.

The case below had extended lips on all of the drawers. As you can see on the top and bottom of all the drawers there is an overhanging lip. The bottom divider is wider than the moulding so there is room for the extra on the face. In this case I was trying to get some crotch walnut to work with mirror matched sections. I could only get a board 16" long that was 8/4.
If you note here, the stiles hide the hidden drawers on the both sides of each drawer.


drawer with finger hole

It is a great way to build up laminated faces. I also make the faces larger than final when working a solid face. Its no extra work and it gives you the wiggle room to get drawers in near perfect alignment.
Do you put an overhanging lip on the bottom edge?
Yes most of the time. The trick to good drawer longevity with top and bottom lips is to make the dividers very slightly concave. This is a trick I picked up a long time ago while viewing some 200 year old drawers. The drawer stops when the end grain over hang of the face(ends) contacts the side pieces of the case. No contact at all on the top and bottom extended lip of the drawer face. This does not protect the drawer from stupidity. If a person takes a drawer out and drops it on the floor.... its like Forrest Gump's mother said about stupidity.
Seems like it would be fragile if someone removed the drawers and set them down carelessly.
True. People put expensive antique furniture in open pickup trucks. Again, I'm thinkin' of Gump's mother.
I've seen many drawers that had the profile on the bottom but not the overhang.
Just depends really. In the photo below you see moulding applied to a bottom case board. The board is 7/8 and the moulding is the same. You would not have a lip.
The case below had extended lips on all of the drawers. As you can see on the top and bottom of all the drawers there is an overhanging lip. The bottom divider is wider than the moulding so there is room for the extra on the face. In this case I was trying to get some crotch walnut to work with mirror matched sections. I could only get a board 16" long that was 8/4.
If you note here, the stiles hide the hidden drawers on the both sides of each drawer.
drawer with finger hole
"Yes most of the time. The trick to good drawer longevity with top and bottom lips is to make the dividers very slightly concave. This is a trick I picked up a long time ago while viewing some 200 year old drawers. The drawer stops when the end grain over hang of the face(ends) contacts the side pieces of the case. No contact at all on the top and bottom extended lip of the drawer face.
Dan,
That's a great idea. I'll use that. The end grain is much sturdier than the long grain top and bottom.
I am in the situation you show with the 7/8 molding applied to a 7/8 case bottom so I can't have bottom lip on the lowest drawer.
Dan,
That's a great idea. I'll use that. The end grain is much sturdier than the long grain top and bottom.
I am in the situation you show with the 7/8 molding applied to a 7/8 case bottom so I can't have bottom lip on the lowest drawer.
Just so I can follow the conversation more accurately, are you all talking about the profile extending beyond the drawer box itself and resting against the face frame itself, acting as a drawer stop almost [or completely]?
As opposed to inernal drawer stops and a drawer front profile landing flush in the face frame of the desk/dresser?
As opposed to inernal drawer stops and a drawer front profile landing flush in the face frame of the desk/dresser?
Just so I can follow the conversation more accurately, are you all talking about the profile extending beyond the drawer box itself and resting against the face frame itself, acting as a drawer stop almost [or completely]?
As opposed to internal drawer stops and a drawer front profile landing flush in the face frame of the desk/dresser?
Yes we are talking about the thumbnail edge that goes around the drawer front. This drawer front is usually made so that it extends beyond the width of the opening of the drawer. Some builders extend the lip or overhang on the top of the drawer and some extend the overhang on the top and bottom.
For the top drawer on a fall front desk like the one built in Old Salem, the drawer has no overhang on the top of the drawer to allow the lid to open and sit flat.
Like I mentioned above, I make sure the overhang on the top and bottom of the drawer face do not contact the dividers before the sides.
These drawers do not use internal stops.
Here is a drawer with a thumbnail edge all the way around. This example has an overhang on the top and sides but not the bottom

This drawer is a "cockbeaded" drawer. It has no lip on any of the edges. This drawer requires an internal stop of some sort


Hopefully these photos will make the point a little less confusing. Making well fitting drawers is a lost art. With the advent of metal glides, plywood sides and faces, and other time saving means the demand for well built drawers has become less important and the skill demand has gone down.
Charlie
From our discussion at your house yesterday, we touched on the Krause desk built with cherry and cherry veneer. Its a stunning desk and bookcase but unfortunately for us home owners living with 8' ceilings, this piece would not work.
I do love the upper bookcase with its bonnet curve. You feature a four drawer stair-step gallery with a prospect box and pilaster cases in a photo in reply #3. I think this photo is taken from the cherry desk shown here below.
This piece was on display for years in the Single Brothers House. Not sure where it is these days but it is worth seeing. I called ahead and asked if the doors and the lid could be opened by one of the curators and they were very obliging with my request and invited me to come back on a quiet time if I wanted to measure the piece. Unfortunately, time and availability did not work out. Wish I had the measurements for this one.
Hey Charlie here are some pieces of walnut I cut to make the desk/bookcase in walnut. The commission fell thru but I still have 13 pieces of thick walnut veneer on hand. I could use it on several things but I really wanted to make this one for a historic home owner in New Bern. It was a great fit as his home had 10' plus ceilings and this looked small in his big house.


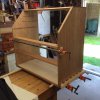
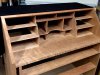
I had originally planned to depart from the original Krause piece in the details of the gallery arrangement. My wife wanted letter slots so I worked out a design that looked right to me in fitting with the other shapes in the original desk. Here's what I came up with.

Still have to cut out the 1/8 thick dividers for the letter slots.

There will be 6 vertical letter slots. The 1/8 inch slots for the dividers are cut.
Time to start on the drawers.
Still have to cut out the 1/8 thick dividers for the letter slots.
There will be 6 vertical letter slots. The 1/8 inch slots for the dividers are cut.
Time to start on the drawers.
Attachments
Charlie the design fits right in with the style of the plan. I like the concave bottom shelf and the matching desk board. It looks nice.
I can't tell if the fronts of the dividers are rounded like the vertical dividers? I think this would make it look somewhat uniform. When the dados came all the way thru in the 18th century, the reveal end was usually a "V" groove.
I like the additional pigeon holes you have more than the 2 shelf set up I have. And brother I fill it up with ... stuff.
Post a few more photos as you make progress. Looks nice.


I built my drawers like an Englishman(small pins and sliding bottom panel). The German joinery on the original drawers was just a little to bulky for my taste. Just me.

I can't tell if the fronts of the dividers are rounded like the vertical dividers? I think this would make it look somewhat uniform. When the dados came all the way thru in the 18th century, the reveal end was usually a "V" groove.
I like the additional pigeon holes you have more than the 2 shelf set up I have. And brother I fill it up with ... stuff.
Post a few more photos as you make progress. Looks nice.
I built my drawers like an Englishman(small pins and sliding bottom panel). The German joinery on the original drawers was just a little to bulky for my taste. Just me.
Thanks, Dan
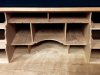
The dividers will definitely be rounded to match. This is a dry assembly to check fit. The 1/8 verticals will have an ogee front profile as the top is set back from the bottom. They will be rounded too. Had to butt join 1/8 in stock to get the depth and let the glue set overnight before shaping. So that needs to be done today. Would probably have done the v grooves if I had researched a little more.
Going to take your advice on the big drawers and do boxes first.
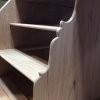
 Here's an updated photo with the letter slot dividers and the fronts rounded over.
The dividers will definitely be rounded to match. This is a dry assembly to check fit. The 1/8 verticals will have an ogee front profile as the top is set back from the bottom. They will be rounded too. Had to butt join 1/8 in stock to get the depth and let the glue set overnight before shaping. So that needs to be done today. Would probably have done the v grooves if I had researched a little more.
Going to take your advice on the big drawers and do boxes first.
Attachments

Last edited:
- Status
- Not open for further replies.
Premier Sponsor
Our Sponsors
LATEST FOR SALE LISTINGS
-
-
-
 SOLD -- $75: Gast moa v113 Vacuum Pump Veneer, 60" bag and board
- Started by peterdnight
- Replies: 1
-
GONE: Gladiator 5 cleats, 10 hangers, Paper Towel and Shelf
- Started by peterdnight
- Replies: 3
-
SOLD -- $100 Makita mac700 portable air + grex pin nailer + 2 others + 50' hose
- Started by peterdnight
- Replies: 1