We recently moved into my wifes original home, and I have been experiencing both the blessing and curse of taking your entire workshop apart and setting it up again in a new space (more space, but also more disjointed - really excited to have a dedicated space though).
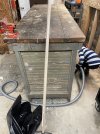
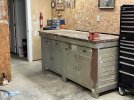
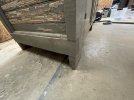
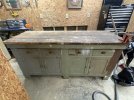
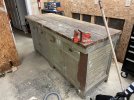
Attached are some photographs of a workbench that has been in her family for at least 3 generations. I will be incorporating it into my new layout. It will not be my primary "woodworking" bench where I will be using handplanes etc., but I envision it seeing a lot of use as a secondary bench for the myriad of general things that pop up, as a secondary bench to keep the woodworking bench clear and perhaps as a sharpening station.
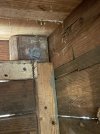
The bench is constructed of 2x4 and 2x6 lumber, and the top is made out of 2x8's . Some 3/8 slat material is used on the backs and sides The bench appears to be nailed together, with some carriage bolts utilized where the corners of the bench structure meet. The top is supported by 2x4's running perpendicular about every 2 feet. Again, the top is nailed down.
I am looking to solve a few problems:
1. The bench is quite sturdy in the long direction, but very wobbly in the short direction. I imagine the nails have loosened up over years of use, and the lack of any proper joinery obviously doesn't help. Not sure how to stiffen it up without some fairly major surgery. A sheet of pywood along the back would help in the long direction, but I dont really want to just screw a sheet of ply to both sides of it.
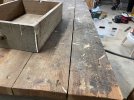
2. There are large gaps between the 2x8s on top which are frustrating, and the boards are cupped some such that it is not anywhere near flat. I was planning to remove the top, remove any metal/nails stuck in there, joint the edges (via handplane) then glue up the top and get it a bit flatter, again by hand. Not aiming for perfection, just more usability.
Any thoughts or ideas on these approaches are much appreciated. I will submit some progress photos as I go.
Attached are some photographs of a workbench that has been in her family for at least 3 generations. I will be incorporating it into my new layout. It will not be my primary "woodworking" bench where I will be using handplanes etc., but I envision it seeing a lot of use as a secondary bench for the myriad of general things that pop up, as a secondary bench to keep the woodworking bench clear and perhaps as a sharpening station.
The bench is constructed of 2x4 and 2x6 lumber, and the top is made out of 2x8's . Some 3/8 slat material is used on the backs and sides The bench appears to be nailed together, with some carriage bolts utilized where the corners of the bench structure meet. The top is supported by 2x4's running perpendicular about every 2 feet. Again, the top is nailed down.
I am looking to solve a few problems:
1. The bench is quite sturdy in the long direction, but very wobbly in the short direction. I imagine the nails have loosened up over years of use, and the lack of any proper joinery obviously doesn't help. Not sure how to stiffen it up without some fairly major surgery. A sheet of pywood along the back would help in the long direction, but I dont really want to just screw a sheet of ply to both sides of it.
2. There are large gaps between the 2x8s on top which are frustrating, and the boards are cupped some such that it is not anywhere near flat. I was planning to remove the top, remove any metal/nails stuck in there, joint the edges (via handplane) then glue up the top and get it a bit flatter, again by hand. Not aiming for perfection, just more usability.
Any thoughts or ideas on these approaches are much appreciated. I will submit some progress photos as I go.