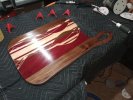
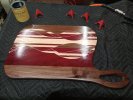
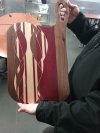
Here's a serving tray made for a friend at work for him and his wife's anniversary. It's walnut, hard maple and purple heart. Have about 7 actual cutting boards making right now with this kind of design just with different species and sizes.

Serving tray/ charcuterie board...
- Thread starter Trey1984
- Start date

Premier Sponsor
Our Sponsors
LATEST FOR SALE LISTINGS
-
-
-
 SOLD -- $75: Gast moa v113 Vacuum Pump Veneer, 60" bag and board
- Started by peterdnight
- Replies: 1
-
GONE: Gladiator 5 cleats, 10 hangers, Paper Towel and Shelf
- Started by peterdnight
- Replies: 3
-
SOLD -- $100 Makita mac700 portable air + grex pin nailer + 2 others + 50' hose
- Started by peterdnight
- Replies: 1