Restoring Globe-Wernicke barrister bookcase

Yelverton

Mitch
Corporate Member
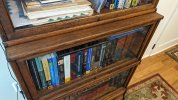
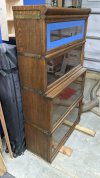
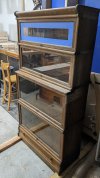
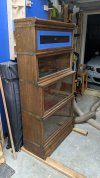
This week I got my hands on a Globe-Wernicke barrister bookcase that was originally bought (used) by my grandparents in the 50s. Based on the information I've been able to find about it, it appears to have been made sometime prior to 1920. Beyond the sentimental value it's something I'd love to have in my office, so I'm motivated to restore it the right way.

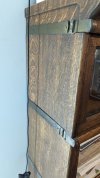
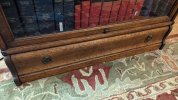
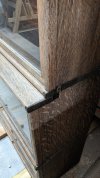
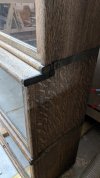
I make some furniture, but I don't have any experience doing restoration like this. My father said that he and my mother refinished it about 40 years ago, and he thinks it was some kind of oil/varnish mixture, possibly a tung oil-based product. As you can see from the pictures, there's one very faded spot on the right side where it was intermittently exposed to direct sun in my parents' house.

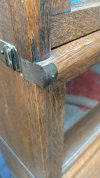
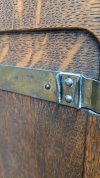
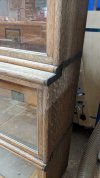
I'm hoping that folks here can give me some guidance on making it turn out great. Some pictures are attached. I'm looking for thoughts on what product(s) to use and best practices for removing the brass banding around each section. Each of the shelves can be separated from the others and all of the brass banding is held on with small nails. There are a few missing, so I also need to figure out where to buy similar replacements and put a patina on them to match the others. I think I want to avoid using a typical nail puller so I don't mar the nails or the banding, but again, I don't know how the experts do it.

All thoughts are appreciated.
 

Attachments

  • PXL_20220206_230912927.jpg
    PXL_20220206_230912927.jpg
    1.7 MB · Views: 276
  • PXL_20220206_230853130.jpg
    PXL_20220206_230853130.jpg
    2 MB · Views: 289
  • PXL_20220206_230518998.jpg
    PXL_20220206_230518998.jpg
    2.2 MB · Views: 285
  • PXL_20220206_230544821.jpg
    PXL_20220206_230544821.jpg
    1.8 MB · Views: 274
  • PXL_20220206_231130432.jpg
    PXL_20220206_231130432.jpg
    2.2 MB · Views: 272
  • PXL_20220206_230536670.jpg
    PXL_20220206_230536670.jpg
    1.7 MB · Views: 284
  • PXL_20220212_001820095.jpg
    PXL_20220212_001820095.jpg
    1.8 MB · Views: 332
  • PXL_20220212_001759370.jpg
    PXL_20220212_001759370.jpg
    1.9 MB · Views: 281
Last edited:

Craptastic

Matt
Corporate Member
Whoa. That looks cool.

Tung oil fits for being faded where it sat in a lot of sun. If it's not seeing water exposure I would move on to a more modern method of finish (yeah don't jump on me folks, tung oil is still a modern finish but for this it doesn't seem applicable and there's better ways to do moisture exposed wood now). Others should jump in on the finish question.

To remove the small brass nails I've had good luck in the past using a drill bit the same size as the nail it's self (not the head, the shank) or one even slightly smaller to drill it out. You will need to use a point punch on the head right in the center of the nail head and then slowly drill the head off, and then you can go after the rest of the shank afterwards. Takes some patience but it's worth it.

Personally I won't go the chemical stripping method for the old finish, especially on stuff more than 50 years or so old. Just seems like it makes so many glue joints brittle and what you have is a solid looking piece. Lots of sanding in your future is what I see.

Would love to see pictures of progress and how it turns out.
 

woodworker2000

Christopher
Corporate Member
Not what you are asking but I think those old pieces look better with their aged patina. It just reminds you how well made it was to still look good and function after 100 years. All I would do is clean it up. If the faded spot will be visible, I would try using tung oil to that spot to get the color close to the rest of the piece.
 

Yelverton

Mitch
Corporate Member
Not what you are asking but I think those old pieces look better with their aged patina. It just reminds you how well made it was to still look good and function after 100 years. All I would do is clean it up. If the faded spot will be visible, I would try using tung oil to that spot to get the color close to the rest of the piece.
Thanks, I agree and don't think that I want to refinish it completely, just clean and revitalize it.
 

Yelverton

Mitch
Corporate Member
Whoa. That looks cool.

Tung oil fits for being faded where it sat in a lot of sun. If it's not seeing water exposure I would move on to a more modern method of finish (yeah don't jump on me folks, tung oil is still a modern finish but for this it doesn't seem applicable and there's better ways to do moisture exposed wood now). Others should jump in on the finish question.

To remove the small brass nails I've had good luck in the past using a drill bit the same size as the nail it's self (not the head, the shank) or one even slightly smaller to drill it out. You will need to use a point punch on the head right in the center of the nail head and then slowly drill the head off, and then you can go after the rest of the shank afterwards. Takes some patience but it's worth it.

Personally I won't go the chemical stripping method for the old finish, especially on stuff more than 50 years or so old. Just seems like it makes so many glue joints brittle and what you have is a solid looking piece. Lots of sanding in your future is what I see.

Would love to see pictures of progress and how it turns out.
Thanks for the feedback. The nails are fairly loose, I should be able to pull most of them out pretty easily so I'm hopeful that drilling won't be necessary. There is no water exposure (and never has been) so that's not a concern with respect to the finish.

I'd really like to bring it back and retain the patina as much as possible while addressing the faded spot.
 

Wiley's Woodworks

Wiley
Corporate Member
To remove the nails get a 6" nail puller; it looks like a mini crowbar with a beveled notch in both ends. File it to a chisel edge. Working the straight part of the working end under the nail head, raise it until you can get the nail head into the notch. Pry up; you may need to put a small scrap board under the puller to avoid curving the nail shank. When you replace the nails coat them in wood glue before you drive them in.
 

Craptastic

Matt
Corporate Member
Ok. I saw restore and immediately went to full restoration. My bad.

Not sure who can fabricate brass end caps in you area. But find someone that does and give them a physical example for the cross piece (They should be symmetrical enough to work as a copy) and then you are golden there. Patina is pretty much giving a soft scrub with vinegar and then a bath in ammonia with some non iodized salt thrown in. Let it sit till it's as patinaed as you want.

You can reapply tung oil on the problem areas where it washed out but it probably won't match well for now. You can try treating the wood in that area with some tea to stain it but I wouldn't suggest doing so since that's not what the rest of the wood was like when it was finished. The UV affects over the years may have left their marks but the good news is if you refinish with with real tung oil the questionable finish should catch up within a 5 or ten years or so of application as long as it not back in direct sunlight. It should be better right off the bat after application and should only mellow better and fit with what is already there over the years.

Still want to see pics when it's done.
 

Wiley's Woodworks

Wiley
Corporate Member
To make the end caps work together with a jewelry maker. One who does hammered work would be ideal. You may need to make a buck--a combination of wood working and carving--and then the jeweler can just form stock sheet brass around it. Either of you can do the patina work.
 

Yelverton

Mitch
Corporate Member
To remove the nails get a 6" nail puller; it looks like a mini crowbar with a beveled notch in both ends. File it to a chisel edge. Working the straight part of the working end under the nail head, raise it until you can get the nail head into the notch. Pry up; you may need to put a small scrap board under the puller to avoid curving the nail shank. When you replace the nails coat them in wood glue before you drive them in.
This is great, thanks Wiley.
 

Coastalkate

New User
Kate
I have also inherited these from my grandparents and would really love to know what you ended up doing, and maybe see the end result? Thanks for any tips!
 

Yelverton

Mitch
Corporate Member
I have also inherited these from my grandparents and would really love to know what you ended up doing, and maybe see the end result? Thanks for any tips!
Sure thing. Mine turned out well with minimal removal of the patina. Here's what I did:

Metal parts:

First, I removed all of the brass parts from each section, carefully. Most of the nails were loose enough that I could use something thin like a card scraper or razor blade to pry them out without risking bending or scratching anything. I cleaned all of them with nylon brushes to get any loose grime out and then wiped them down with paste wax to give a little shine. For the door guide hardware, I removed it all and since it's not visible, cleaned with rust remover and then waxed everything to make it slide easily when reinstalled.

Wood parts:

I reset all of the nails holding the pieces together, replacing as necessary with new nails. I was able to use new brass nails on the back panel (that won't be seen) and repurpose the nice patina'd old ones as necessary where they'd be visible on the front and sides. One tip - be careful not to lift the sections with the board on top that mates to the section above, sometimes those nails are loose and you could easily drop a section and break the glass. I didn't break anything but I grabbed a loose one one time and realized what a dumb move that was.

I brushed all of the wood with nylon brushes and rags, and blew things off with compressed air. I can't remember if I used any kind of solvent, but if so it was a very gentle one. I didn't sand the wood at all, but did use a "very fine" nonwoven pad to get some of the grime off. Steel wool would work just as well. For the faded panel on mine, I did as suggested above and slowly rubbed in a few coats of real tung oil (thinned 50/50 with mineral spirits) until it matched the rest of the piece. Once I had a nice even look, I used a few coats of Restor-a-finish on the whole thing, including inside the boxes. I think I used a walnut tinted one as that was the closest to the factory stain on my bookcase. Once that was done I waxed the whole thing with paste wax before reinstalling the brass hardware.

Some pics are attached.
 

Attachments

  • PXL_20230922_142711855.jpg
    PXL_20230922_142711855.jpg
    2.7 MB · Views: 146
  • PXL_20230922_142724981.jpg
    PXL_20230922_142724981.jpg
    2.5 MB · Views: 153
  • PXL_20230922_142736484.jpg
    PXL_20230922_142736484.jpg
    2.4 MB · Views: 140
  • PXL_20230922_142750264.jpg
    PXL_20230922_142750264.jpg
    3.2 MB · Views: 139

Coastalkate

New User
Kate
This is amazing! I’m feeling much more optimistic about this project now! Thanks for the detailed explanation and the photos of the after.
 

Premier Sponsor

Our Sponsors

LATEST FOR SALE LISTINGS

Top