
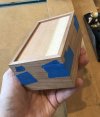
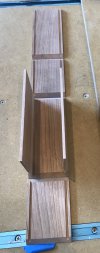
Working on a small cherry box with mitered sides and a top/bottom that sit in grooves. I thought I would double check some stuff before I started gluing anything together. The box is 5-1/4 long x 3-1/4" wide and will be about 2-1/8" tall, with surface mount hinges, and thinking maybe putting a tiny magnet in the top to make a magnetic catch. Planning on a shellac finish. I'm planning to glue it up as a single unit, using tape as the "clamps", and saw the top off to separate it when the glue has cured. The purpose of the box is to hold a friend's tarot card deck so it is not probably going to be getting super rough use.
Some of the things I'm trying to sort out, I suspect this is all really basic boxmaking stuff...
Some of the things I'm trying to sort out, I suspect this is all really basic boxmaking stuff...
- For a box this size would you leave the top/bottom floating or would you glue it? The top/bottom stock is 1/8" thick quartersawn if it helps, about 3" wide across the grain.
- I'm worried about getting glue squeeze out that interferes with the finish or unintentionally locks the top/bottom in place. Also, I'm worried since shellac is a film finish, if I finish it after assembly the shellac would weakly lock the top/bottom in place and make an unsightly finish crack or gap if it does move. Can anyone suggest order of operations and any tips for glue up and finishing? In the past I have just mummified the project in blue tape to avoid squeeze out problems but I don't think it will work well here, especially if I do a floating top.
- Do you think titebond 3 with sizing applied to the miters first is enough or should I do feathered miters to reinforce the sides? I could do feathered miters decently well I think, just trying to keep this from getting unnecessarily complex. The sides are 1/4" thick if that matters.
") ) they are flexible balls that keep the panel centered in the groove yet allow it to move. I haven't used them, but will probably try them on my next box.
) they are flexible balls that keep the panel centered in the groove yet allow it to move. I haven't used them, but will probably try them on my next box.