Miter Saw Workbench Cabinets Advice

Status
Not open for further replies.

jovol

New User
John V
Howdy all,

I've recently moved to NC (Lake Lure) and am getting my shop in order. This'll be my first time making built in cabinets and a workbench like this, so advice is appreciated.

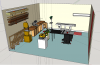
Here are a couple screenshots of what I've designed:
attachment.php

attachment.php

Attached is the sketchup file for more details.

A couple design criteria I chose, which I'm wondering if they're good/bad/worthwhile:
1. The drawers will run on 5/16 x 3/8 runners, with a 7/16 wide x 1/4 deep dados in each drawer. I designed this to allow 1/16 of slop on each side of the drawer.
2. The drawers have 1/16 spacing between the front frame and between each drawer, to allow for play.
3. The cabinets with 2 drawers will use 22" full extension slides. They're designed to hold 2x sys-2 tainers in the front of each shelf, and then a divider leaving misc space in the back.
4. The smaller drawers are sized as multiples of 1.5", so they can be rearranged in the future if need be. (Except for the bottom drawer, which needed to take up some extra space)
5. The height of the workbench is 38", the same as my laguna bandsaw. I hope to use it as an outfeed surface, which is why I added an extension table on hinges. The bandsaw and extension table need to move, however, if I'm to take out plywood from my rack.
6. The top surfaces will be 3/4" MDF.

The questions I have regard the construction. I've never built cabinets before, so I'm wondering:
1. Do I need a back? If so, how thick? 3/4, 1/2, 3/8?
2. Is the base I built adequate? Should there be other structural framing in the cabinet to keep it from sagging?
3. Do the 2-drawer cabinets need something more for the shelves on slides, or is it fine to just have them floating like that? Mind you I'm planning on installing 100lb slides.
4. The current drawers I have planned are: 6x 1 1/4", 10x 3 3/4", 2x 5 1/4", and 2x 7 3/4". Does this sound good, or should I go for more bigger ones?
5. Suggestions on door hinges?
6. Suggestions on what to do with vertical space on wall above workbench?

In terms of joinery, I plan on using Dominos wherever possible.

Thanks for your help, and sorry for the boatload of info. Any advice appreciated, and I hope my ideas can help out others in the future! Feel free to use the sketchup model to your liking. Included in there is also a plywood rack I designed, which uses less than one sheet of plywood (and a lot of screws :)).

John
 

Attachments

  • B4MzZ0h.png
    B4MzZ0h.png
    167.7 KB · Views: 375
  • G7xuJxm.png
    G7xuJxm.png
    1.2 MB · Views: 374
  • Lake Lure Shop.skp
    19.6 MB · Views: 150

JohnnyR

John
Corporate Member
Welcome to the forum. Nice looking bench.
1. Do I need a back? If so, how thick? 3/4, 1/2, 3/8?
a back will help keep it from racking, especially when you move it around while building, need only be 1/4" It will also keep dust out of which you will generate plenty.
2. Is the base I built adequate? Should there be other structural framing in the cabinet to keep it from sagging?
Looks good to me as drawn.
3. Do the 2-drawer cabinets need something more for the shelves on slides, or is it fine to just have them floating like that? Mind you I'm planning on installing 100lb slides.
Looks good as is, just make sure when you screw in the slides on the middle panel that the screws don't hit each other.
4. The current drawers I have planned are: 6x 1 1/4", 10x 3 3/4", 2x 5 1/4", and 2x 7 3/4". Does this sound good, or should I go for more bigger ones?
All depends on what you put in them
5. Suggestions on door hinges?
check on hinge specs to make sure there is as little space between the cabinet and face frame to avoid sawdust build-up inside. The cheap blum european hinges for example leave a 5mm gap. Also, space them away from the roll-outs.
6. Suggestions on what to do with vertical space on wall above workbench?
Hard to reach because of depth of lower cabinets but you could put more cabinets or lumber storage.

I would suggest that you make the top a little higher than the miter saw and shim the saw up level. This gives you some leeway if it wasn't sized quite right and for when (if) you have to replace the saw.
John
 

KenOfCary

Ken
Staff member
Corporate Member
Nice looking work space. Thanks for sharing the SKP file. I agree with John's comment about shimming the saw to bring it to the level of the uppers.
 

nn4jw

New User
Jim
I do like this design.

One question; what's the measurement from the right side of the CMS blade to the wall? For me that would have to be at least 8 feet. Maybe a little more.
 

jovol

New User
John V
It's currently at 75". There's a bit of a balance about where I place it. If I moved it further from the wall, then 3-4' cuts would require moving the band saw. If this turns out not to work, it hopefully won't be too much trouble to adjust the position of the top work surface and miter saw.
 

JohnnyR

John
Corporate Member
John,
Thanks a ton for your feedback! Definitely feels reassuring having others validate the majority of the design.

Regarding the hinges, are you referring to ones like these? https://www.amazon.com/Blum-38N355B...F8&qid=1500819971&sr=1-2&refinements=p_4:Blum
Is a 5mm gap considered small or large?

Already ahead of you on the miter saw shims ;) Planned on the surface being 1/2" proud of the miter saw, then planing shims to fit!
Cheers,
John

That's what I was referring to. Their other hinges have only 1mm clearance. You could also go with plain old fashioned and cheaper pin hinges and mortice them in for a no gap solution. Wouldn't be an issue cept for all the sawdust created. Blum has very good documentation on their website.
 

Hmerkle

Board of Directors, Development Director
Hank
Staff member
Corporate Member
Jovol,
First welcome to the site, we are glad you found us.

I agree with Johnny R's replies.
I think lumber storage is the best option, especially if this is your "Material break-down" station.
I think euro-hinges are a lot more forgiving (read: adjustable) than other styles.

My biggest suggestion here is to develop some kind of dust collection - a simple google or you tube search will yield a TON of ideas.
In my experience none are perfect, but something is better than nothing!
I know a few NCWWers were in search of solutions, maybe someone else will chime in.
(my quick and dirty solutions were not worth noting)
 

AllanD

Allan
Corporate Member
Hank just beat me to it. I think you will be glad in the future to at least have some of that space beneath to house a vacuum. If you think you will add a dust collector one day then leave some room behind the saw for ducting.
 

Jeff

New User
Jeff
Jovol, welcome to NC and NCWW. Tell us a bit more about your prior life and woodworking experiences. What kind of furniture do you want to make (have made)?

Here's a few different thoughts to consider...

This'll be my first time making built in cabinets and a workbench like this, so advice is appreciated.

1. Why start with such an immensely complicated project for a simple work shop area jammed against one wall with little wiggle room? Designing it in SU and building it are different beasts.

2. What are the dimensions of your shop area and what are your plans for the other 3 walls? I don't understand the purpose/function of the floor level folding rack behind the bandsaw in the SU model. Is that the plywood rack and do you use a lot of plywood such that you need a rack to store several sheets? Maybe that can be put on the other walls or made mobile with wheels?

Critique is free and often helpful. :eek:ccasion1
 

redknife

New User
Chris
Re:'I plan on using Dominos wherever possible'
I like and use Dominos selectively. For more complex cabinetry, if one of the Dominos is off just a bit, you can really get stuck in the middle of a glue up. Yes, you can do dry fits, particularly with sanded Dominos so that it is easy to test and disassemble. I'd recommend you do the sanded Domino tenons as test fit technique if all of that joinery is Dominos. I've found the usual dado and rabbet techniques to be faster and more reliable. If nothing else, just a note of caution that if you wind up with tons of Domino joinery at glue up watch out for a stray misalignment.
 

jovol

New User
John V
Thanks for all the input and attention folks! Let me get to thinking about some of the advice...

Hank-- Dust collection is definitely a must for me. For now, I plan on using my CT26 with the miter saw, as I've had good experience with that in the past. The second section from the right will house the vacuum, and there's a 3in hole in the back of the bench to run the hose to it. I may end up plugging the miter saw into the central dust collection system later... but we'll see!

Jeff-- I've recently moved from San Francisco, CA, where I was doing software engineering making Access Points and routers. I picked up woodworking as a hobby about 3 years ago, and have been running with it since then. I've built a desk, side table, footstool, chisel cabinet, roubo workbench, a handful of picture/art frames, /*and a handful of other smaller home projects. I will be trying my hand at home furniture -- beds, desks, tables, chairs, etc.
I'm currently in a bit of a honeymoon post quitting my software job, where I want to devote energy to building up the workspace, and develop skills along the way. Cabinetry isn't what I want to do, but I enjoy the design challenge and ultimately making them.
You're right that it's a pretty big project. I'm not sure why I latched on to this piece of shop furniture, but I know I needed a miter saw bench so I figured why not build one.
The entire shop is about 20'x20', with an upstairs part of the garage that I plan on using for finishing. I'll also put the dust collector upstairs and run a duct through the ceiling.

The SKP has the dimensions and everything in the shop (for the most part), although the components might be hidden. I've updated it and taken a screenshot to show how I've thought of organizing, but this definitely isn't close to final.
attachment.php

The red area on the right is a door to the rest of the house.
All the tools I already own and brought them with me from CA.

Regarding the plywood rack... not sure if I'll need it or not yet. I loaded up the other day with 5 sheets of plywood, and of course I felt the need to store it somewhere... so I built that. It's not the strongest but it gets the job done.

Regarding my other plans... I imagined a tool hanging wall on the rear wall above the workbench and behind the drill press. The right wall could have another big long workbench/cabinet on it for things like a bench grinder, I'm not sure. I would also like a dedicated router table (probably mobile), but I haven't thought about that yet.

Redknife-- II might heed that advice, especially for the cabinet carcass. I can see lining up dominos in the middle of a sheet being a PITA. I'm looking forward to playing with dominos for the drawers... perhaps rabbets, brad nails, and glue would be easier?


As you can see... there are many ideas and possibilities. This is what my mind jumped to as a solution, but perhaps I hopped on the wrong track.

John
 

Attachments

  • whole shop.PNG
    whole shop.PNG
    163.5 KB · Views: 304

Michael Mathews

Michael
Corporate Member
Welcom to the site Jovol! Glad to have you aboard...

Looking at your overall shop sketchup image, to solve your problem of the bandsaw in the way, why not put in on a mobile base so you could roll it out of the way for a longer board. Also, if the plywood storage unit is hinged to the wall near the garage door (assuming the view is looking through the garage door from the outside), then you could roll the bandsaw out of the way and pivot the storage unit out into the room, then you'd have more length for boards left of the chop saw. Just thinking.....

Nice plan though!
 

Rwe2156

DrBob
Senior User
IMO you picked the most efficient way to build cabs (32mm frameless, system 32, european, etc). IME they are the most straightforward, quickest way to build cabs. For those interested I highly recommend Danny Proulx's book on frameless cabinets. Virtually every cabinet I build now is frameless.

There is no need for Dominoes, just screw them together. I would definitely install backs this will keep your cabs aligned which is important when you are doing drawers. I recommend full thickness backs on base units.

There would be nothing wrong with using particle board (I hear the gasps....). Not the crappy stuff at HD or Lowes, the stuff you get from a commercial supplier (the stuff the countertop guys use). Use screws specific to particle board. I use Confirmat screws.

When edge banded (iron on) you will never know the diff and use the money saved on some nice solid wood drawer fronts. Glue 1/4" plywood on end panels.

I would rethink the slide outs in the door units and just do deep drawers. I did that in my shop and find its a hassle.

I store short cutoffs in bins above the MS. Plan on some task lighting above your bench, too.

I recommend a tilt out scrap bin right under or next to the saw.
 

jovol

New User
John V
Regarding the cabinets' back, should each section have it's own back, or would one (or two, since the cabinet is longer than 96") long sheet spanning the sections work?
 

CDPeters

Master of None
Chris
It shouldn't really matter, as long as the seam lands on a partition. Having said that, I would consider breaking it up into 3 discrete 2 section cabinets with a monolithic top. The advantage is if you ever decided to move it (or re-configure, like "I wish that drawer unit was over here") - it will be much easier to accomplish.
 

Rwe2156

DrBob
Senior User
Regarding the cabinets' back, should each section have it's own back, or would one (or two, since the cabinet is longer than 96") long sheet spanning the sections work?
Sure you could but cabs get real heavy real quick. Since you won't be transporting, it's certainly an option.

I find things just work better if I build them individually. Euro style overlay hinges can be a bit tricky if there is only one thickness to the side. You may need to use thick mounting plates.
 

jovol

New User
John V
Really good suggestion Peter, thank you.

I've updated the skp with pieces of input, and I'm feeling really confident about getting started on this. I added lots of detail, such as the grooves for the panel doors, backing strips to prevent dust/things falling behind the cabinet, and for cost efficiency I made all the carcass panels 23 3/4" wide so I can always rip the sheets in half. Using the cutlist sketchup extension, I'm estimating about:
5x 3/4" baltic birch $200
1x 3/4" MDF $30
3x 1/2" baltic birch $100
1x 3/8" baltic birch $20
3x 1/4" baltic birch $45

6x 22" full extension drawer slide pairs @ $9.30/pair = $56 (https://www.amazon.com/gp/product/B00B854SMC/ref=oh_aui_detailpage_o00_s00?ie=UTF8&psc=1)
6x 1/2" overlay soft close blum hinges @ $2.70/each = $16 (https://www.amazon.com/gp/product/B00WH1XSCC/ref=oh_aui_detailpage_o01_s00?ie=UTF8&psc=1)

~20bf wood for trim @ ~$3/bf = $60

rough total: $527

edit: here's a google drive link to the skp so I don't have to keep uploading it: https://drive.google.com/file/d/0Bwc4ACD8Mou9NzdROW9TUEJYWEU/view?usp=sharing
 

CDPeters

Master of None
Chris
The new drawing looks great, I think that will work well for you. I only have 2 suggestions:

1. For your top and bottom face frame rails, make them full width of the cabinet and let the stiles butt to them (cleaner look).
2. Consider making your top 28" to 30" deep and pulling the base cabinets off the wall 4 to 6". This will give you space to run dust collector ducting behind the cabinets in the future. Below is a picture of my shop "cabinet wall" during construction:

080126_003.jpg


The white pipe is 6" S&D PVC for the dust system. The first port (closest) is for the miter saw, the second is a spare which terminates at a blast gate sitting on the countertop (currently used for a oscillating spindle sander) and not visible at the far end, pulls from below the down-draft sanding station at the far end.

Hope that helps,
Chris
 

TENdriver

New User
TENdriver
Welcome John V,

Perhaps you've already done this, but visiting some other already built out shops could be of value.
 
Status
Not open for further replies.

Premier Sponsor

Our Sponsors

LATEST FOR SALE LISTINGS

Top