Making a moving fillister plane nicker from scratch (was: Nicker re-grind advice)

Scott H

Scott
User
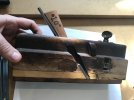
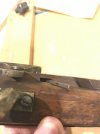
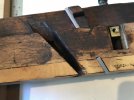
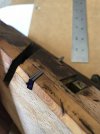
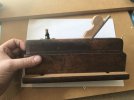
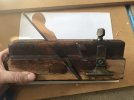
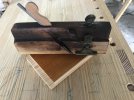
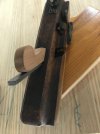
I got a moving fillister plane off eBay originally just because I thought it would be nice to take dimensions off of for a far future project. Once I got it I decided it was in decent enough shape to restore. It actually more or less works after de-rusting the hardware, re-gluing the boxing, flattening the sole and truing up the side a little, sharpening the iron, etc. It needs a new wedge which I will be working on soon.

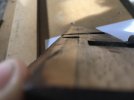
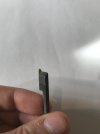
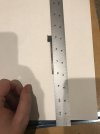
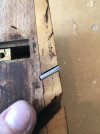
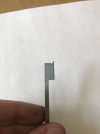
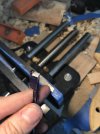
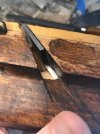
However one issue I have noticed is the nicker's side seems to be at an angle to the plane's side, and not in the convenient direction. I am not sure how it got this way, maybe the nicker was originally for a plane with leaning wedge slot and got into this body later. It was like this even before I did the light truing to the side of the plane. It can't be moved in its pocket enough to correct this.

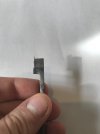
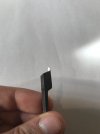
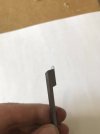
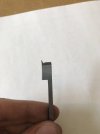
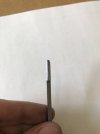
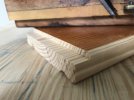
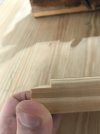
Anyway, because the nicker side is not square to the sole it seems to interfere with making a vertical rabbet wall. I can make vertical walls with the grain just fine without the nicker. Is it reasonable to gently grind it until it is more or less protruding parallel to the side of the plane? Any advice on doing so? It is very small so heat and control seem like they will be tricky and the outer edge is radiused so I'm not sure how to mark it. It seems too hard to file unfortunately. I am thinking maybe I will attach it to a larger piece of material and check with calipers frequently during grinding.

Also, is the radius on the outside worth keeping or should I aim for a flat outside edge (ie just a flat plane parallel to the plane's side?)

Edit: I've also considered just making a new nicker because I have enough scrap O1 to do this but I am still interested in recommendations for the right geometry for these things.

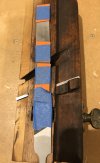
PS The plane does have a depth stop, it is just removed for clarity.
 

Attachments

  • IMG-2770.jpg
    IMG-2770.jpg
    1.3 MB · Views: 143
  • IMG-2773.jpg
    IMG-2773.jpg
    930.6 KB · Views: 139
  • IMG-2774.jpg
    IMG-2774.jpg
    979.2 KB · Views: 134
  • IMG-2777.jpg
    IMG-2777.jpg
    860.3 KB · Views: 145
  • IMG-2778.jpg
    IMG-2778.jpg
    858.8 KB · Views: 152
  • nicker1.jpg
    nicker1.jpg
    128.8 KB · Views: 125
  • nicker2.jpg
    nicker2.jpg
    98.6 KB · Views: 145

mdbuntyn

Matt
Staff member
Corporate Member
Is it safe to assume that you checked to see if the arm is bent, or if there's some junk in the mortise? It's also possible that that nicker came from a different plane.
 

Scott H

Scott
User
@mdbuntyn I just double checked in case... it seems it is not bent and it is bedding flat against the inside of the mortise on the top and the bottom, although it's hard to photograph.

The plane body was a little warped but I'm not sure it is warped enough to cause this. You can definitely see the nicker blade is narrower towards the end than up near the tang end of the "bit."
 

Attachments

  • IMG-2785.jpg
    IMG-2785.jpg
    824.9 KB · Views: 91
  • IMG-2784.jpg
    IMG-2784.jpg
    1.2 MB · Views: 94
  • IMG-2781.jpg
    IMG-2781.jpg
    1.2 MB · Views: 98

marinosr

Richard
Corporate Member
I've never understood why some planemakers used this style of nicker instead of the way-less-fussy slotted knife style. Do you have thoughts?

It would seem to me that refining the mortise with a planemakers float would be much easier than messing with the steel, but then you'd need a tiny planemakers float. Or you could make a thin shim to go under the iron, refining its shape until the iron is perfectly aligned and then glueing it in place with the iron and wedge to clamp it.
 

Scott H

Scott
User
I've never understood why some planemakers used this style of nicker instead of the way-less-fussy slotted knife style. Do you have thoughts?

The only discussion I have read on the subject is on this site in the Fillisters section. It seems to suggest the kind with a wooden wedge in a mortise is a more 'premium' option because you can retract it without having to separate the nicker from the plane entirely. At least, you could adjust the depth a little, compared to the kind that's dovetailed in where it is probably only secure at one depth. However this nicker blade on this plane is so long I can't really retract it that way regardless, so I don't know for sure. Maybe another argument that it's a mismatched nicker.

It would seem to me that refining the mortise with a planemakers float would be much easier than messing with the steel, but then you'd need a tiny planemakers float. Or you could make a thin shim to go under the iron, refining its shape until the iron is perfectly aligned and then glueing it in place with the iron and wedge to clamp it.

I will have to check if there is enough room to adjust the mortise. The nicker tang is already pretty close to the side wall of the plane grip but there is probably enough room. I have two Iwasaki floats that are probably capable of it. Definitely an option to consider.
 

Scott H

Scott
User
Just wanted to update that I found a discussion of nicker geometry in "Restoring, Tuning & Using Classic Woodworking Tools" by Michael Dunbar, around p. 108 where it is referred to as a 'scribe' rather than a 'nicker'. It is normal to have a radiused outside and inside to the cutting spur, the inside is usually more rounded than the outside. I am not sure if it is proper to reproduce the page on the forum but I will share pictures if I do decide to re grind mine.
 

Scott H

Scott
User
After looking at it for a while I decided to use this as an opportunity to learn how to make a nicker, so I have hacksawed and filed a blank out of 1/8" O1 scrap and I am working on shaping it. The scrap was too small to make any kind of plane blade out of so this seems like a good use for it.

The original nicker had a very slight taper, but an untapered nicker blank seems to fit securely as well, I think because the mortise is so short and possibly the nicker wasn't original anyway. The shoulder of the nicker already keeps it from retracting into the plane.

I also found out that the radiused side of the original nicker also fits a rounded scallop taken out of the back of the depth stop that helps it ride over the nicker, so I will be preserving the exterior radius for that reason too.

The mortise is not totally square and I need all the filing help I can get, so I figured out a way to file the side of the nicker square to the plane, but still proud, without hurting the plane. I taped plastic shims to a file (macguyvered file is shown upside down to how I used it) and used that on the nicker. I eventually went down using thinner shims to where the nicker is about 0.019" off the side of the plane, which gives me a little wiggle room to still be able to take it down to 1/64" if I manage to goof a later operation up. At this point I am measuring the proudness of the nicker using feeler gauges.

I still have to radius the outside edge and then form the spur. My plan for the radius is to mark the side of the nicker with layout fluid and maintain a little strip of the fluid all in the center all the way down the side so I know it is still flat and square.
 

Attachments

  • IMG-2814.jpg
    IMG-2814.jpg
    1.6 MB · Views: 91
  • IMG-2810.jpg
    IMG-2810.jpg
    292.8 KB · Views: 106
  • IMG-2808.jpg
    IMG-2808.jpg
    1.4 MB · Views: 104

Scott H

Scott
User
I think I have the nicker ready to heat treat.

Steps in this post:
  1. Radius outside edge by draw filing, leave a high spot down the middle as the reference that is parallel to the plane side. I aimed for the radius to start just below the side of the plane when the nicker is in place.
  2. Rough hacksaw out the "bevel" (it is not a functional bevel, except as a relief, but it existed on the original nicker; either way since the nicker is held at an angle it is less material to remove than a square end.) It is about 45 degrees.
  3. File the bevel flat using an auger file.
  4. File the interior of the spur using an auger file, so it is approximately a 30 degree wedge (flat interior bevel, not rounded yet). File until it's roughly the right size. The original nicker was even more acute angle but I had trouble filing it and this seemed more robust to heat treat.
  5. Start rounding your strokes on the inside of the spur to create the spur's cutting edge. The radius on the inside should be larger than the radius on the outside. The meeting of the radiusing on the inside and outside creates a circular or thumbnail shape to the nicker when viewed from the side. The entire part of the nicker that protrudes should come to an edge this way.
  6. Bed the nicker in the plane and measure how much it protrudes. I felt mine was protruding too much when fully retracted (1/16"), so I filed back the shoulder of the nicker until it protrudes about 1/32" when fully bedded. I have read 1/64" is recommended for hardwoods but I figure I can always grind the shoulder back if necessary, 1/32" has worked fine for me in testing with the other nicker.
I don't think I could have done this without my auger file. Any small-ish safe edge file will probably do though.

I bedded the nicker in the plane and rubbed it on SYP and it cut like butter, didn't want to dull it too much because it's still annealed, but I think the geometry is basically OK.
 

Attachments

  • IMG-2822.jpg
    IMG-2822.jpg
    1.2 MB · Views: 100
  • image008.jpg
    image008.jpg
    40.7 KB · Views: 88
  • image007.jpg
    image007.jpg
    42.9 KB · Views: 98
  • image006.jpg
    image006.jpg
    47.8 KB · Views: 104
  • image005.jpg
    image005.jpg
    45 KB · Views: 101
  • image004.jpg
    image004.jpg
    45.5 KB · Views: 92
  • image003.jpg
    image003.jpg
    60.2 KB · Views: 92
  • image002.jpg
    image002.jpg
    124.8 KB · Views: 85
  • image001.jpg
    image001.jpg
    125 KB · Views: 92

Scott H

Scott
User
Semi-related -- today I made a proper wedge for the plane out of quartersawn cherry. The wedge is 3/8" thick. The tip ends sooner than it normally would (3rd picture), because the back of the iron is not really in plane with the tang, and it would take an enormous amount of grinding to fix. It seems to hold fine and not chatter that much, though, which I am writing up to the iron being decently thick. This is the first time I've made a wedge for a skewed mortise and honestly it was not as bad as I thought it was going to be.

Still need to heat treat the nicker and tweak the skew angle on the iron, and then it's functionally done.
 

Attachments

  • IMG_2855.jpg
    IMG_2855.jpg
    1.3 MB · Views: 78
  • IMG_2853.jpg
    IMG_2853.jpg
    979 KB · Views: 69
  • IMG_2852.jpg
    IMG_2852.jpg
    925.2 KB · Views: 67

Scott H

Scott
User
I hardened the nicker (I tempered it at 400 F in a toaster oven at the same time as a rabbet plane blade so it is pretty hard, not fileable) and now this moving fillister restoration is complete!

It sinks a very nice square cross-grain rabbet now. I am officially calling the restore done.
 

Attachments

  • IMG-2893.jpg
    IMG-2893.jpg
    1.8 MB · Views: 87
  • IMG-2894.jpg
    IMG-2894.jpg
    1.8 MB · Views: 84
  • IMG-2895.jpg
    IMG-2895.jpg
    1.1 MB · Views: 91
  • IMG-2896.jpg
    IMG-2896.jpg
    1.5 MB · Views: 88
  • IMG-2897.jpg
    IMG-2897.jpg
    978.4 KB · Views: 88

Premier Sponsor

Our Sponsors

Top