I need a chair leg replaced

kelLOGg

Bob
Senior User
We have a set of six 100+ year-old dining room chairs from my wife's family and one of them has a broken leg. We a looking for someone to make and install a new leg. It requires bending and is something I should not undertake. Any takers? or recommendations of one?
 

Attachments

  • IMG_0988.jpg
    IMG_0988.jpg
    71.4 KB · Views: 119
  • IMG_0990.jpg
    IMG_0990.jpg
    52 KB · Views: 115
  • IMG_0989.jpg
    IMG_0989.jpg
    73.2 KB · Views: 117
Last edited:

Mike Davis

Mike
Corporate Member
That replacement leg will need to be split our of a log of white oak, rough shaped or finish turned to size, steam bent, mortices and through holes drilled. Then the chair has to be disassembled, the new part installed, adjusted, glued probably with hide glue, stained and varnished to match. It is a good week's work. Most shops that are capable of this are full up on production of new chairs and would not take time out for a repair. You may find a factory that makes similar chairs and buy a partially finished leg to alter and install.

Brian Boggs comes to mind. But that leg may cost 400-1000. Unless you know someone well enough to get a favor.
 
Bob:

Is the screw all that holds the seat to the rear leg? Is this consistent on all of the chairs?

If it were me, I would try to clean up the break by removing as little as possible from the bent leg. Perhaps a piece of tape across the break for reference, disassemble the leg from the chair and run a handsaw through the break several times, moving the joint closer each time, until it looks better. Then as best you can, center a 7/8" hole about 2" deep into each side of the break, then take a 3/4" oak dowel and some epoxy and completely fill the holes and joint, while aligning the leg parts and removing excess epoxy squeeze-out. (or depending on how big the leg is, a 1-1/8" hole and a 1" dowel; adjust accordingly) Sand and touch-up, reassemble, and at that point the screw can go back where it was. You might need to re-level the chair after the fact.

Hope this helps.
Tone
 

Mike Davis

Mike
Corporate Member
Bob:

Is the screw all that holds the seat to the rear leg? Is this consistent on all of the chairs?

If it were me, I would try to clean up the break by removing as little as possible from the bent leg. Perhaps a piece of tape across the break for reference, disassemble the leg from the chair and run a handsaw through the break several times, moving the joint closer each time, until it looks better. Then as best you can, center a 7/8" hole about 2" deep into each side of the break, then take a 3/4" oak dowel and some epoxy and completely fill the holes and joint, while aligning the leg parts and removing excess epoxy squeeze-out. (or depending on how big the leg is, a 1-1/8" hole and a 1" dowel; adjust accordingly) Sand and touch-up, reassemble, and at that point the screw can go back where it was. You might need to re-level the chair after the fact.

Hope this helps.
Tone
I think that is the most cost effective repair in this case.
 

kelLOGg

Bob
Senior User
That replacement leg will need to be split our of a log of white oak, rough shaped or finish turned to size, steam bent, mortices and through holes drilled. Then the chair has to be disassembled, the new part installed, adjusted, glued probably with hide glue, stained and varnished to match. It is a good week's work. Most shops that are capable of this are full up on production of new chairs and would not take time out for a repair. You may find a factory that makes similar chairs and buy a partially finished leg to alter and install.

Brian Boggs comes to mind. But that leg may cost 400-1000. Unless you know someone well enough to get a favor.
Thanks, Mike. Your response sounds realistic to me. I knew this is going to be a time-consuming job. Brian is in Asheville - a bit of a travel.
 

kelLOGg

Bob
Senior User
Bob:

Is the screw all that holds the seat to the rear leg? Is this consistent on all of the chairs?

If it were me, I would try to clean up the break by removing as little as possible from the bent leg. Perhaps a piece of tape across the break for reference, disassemble the leg from the chair and run a handsaw through the break several times, moving the joint closer each time, until it looks better. Then as best you can, center a 7/8" hole about 2" deep into each side of the break, then take a 3/4" oak dowel and some epoxy and completely fill the holes and joint, while aligning the leg parts and removing excess epoxy squeeze-out. (or depending on how big the leg is, a 1-1/8" hole and a 1" dowel; adjust accordingly) Sand and touch-up, reassemble, and at that point the screw can go back where it was. You might need to re-level the chair after the fact.

Hope this helps.
Tone
Tone,
The rear legs are about 1.25" dia. at the seat and have a notch 0.25" deep and 0.75" long in them to receive the seat. I assume the notch bears most of the weight of the seat. All 6 chairs are made the same way. Is "running a handsaw through the break" for the purpose of making the 2 broken surfaces mate closely together so a gap doesn't show when the epoxied dowel is inserted?
There is nothing to lose if I attempt a repair because we haven't used the chair in years. Yet, I still may seek another to do the repair.
Thanks.
 

Tarhead

Mark
Corporate Member
I like how Tom Johnson does this repair. Glue the two parts as they are after cleaning and in the proper orientation with the other legs. After the glue cures, saw the joint in two, drill, glue, and insert a dowel. Clean up the joint edges with epoxy paste and use stain to match the leg.
 

kelLOGg

Bob
Senior User
I just watched 2 of the videos and they boosted my confidence in how to use the dowels. Maybe that's what mquan01 was talking about. Thanks again.
 
Bob:

To respond, yes, the repeated handsaw cuts are to clean up the joint and also give you a flat upon which you can find a center for the drilling. The plain nature of the leg profile leaves no place to hide the joint, and your rear leg has to align with the rail spindles in two directions and the back slats on top, and as such I can not overemphasized the need for a reference (the piece of tape across both sides of the joint, some kind of reference lines or dots, etc.) so that it is glued up with the same orientation as when disassembled. You would also need to recut the seat notch a bit, but I can't imagine that cleaning up the joint would take out much more than 1/16" or 1/8" of the leg, so perhaps only two or three iterations with a handsaw would get you there. You may also need to plug and redrill the screw holes for both the seat and the quarter-circle brace.

The slop between the hole size and the dowel allows for alignment, as you may not drill exactly, and you don't want to have to sand the leg and make it thinner at the repair if your holes are not perfectly aligned and perpendicular.

You might also try the judicious use of a wire brush across the joint when you touch up; it may help to hide the joint by having the "grain" go across the repair. A spray can of matching tint lacquer will also be your friend.

If a proper replacement leg is in fact a week's worth of work, $1000 might be a little light for 40 hours and materials at a business shop rate, and that is assuming that someone will even take it on.

Good luck.
Tone
 

bob vaughan

Bob Vaughan
Senior User
Impressive replies from some very experienced woodworkers that have been there.
Repairing wooden chairs are the pits. I've done my share over the decades and have concluded that chairs should be made from welded steel tubing if they're going to last.
 

Martin Roper

Martin
Senior User
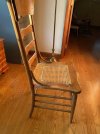
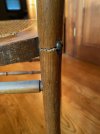
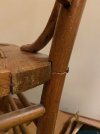
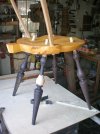
It looks to me like the only way to get any strength and have that screw tie the leg to the seat is to create a spline the width of the leg.

1706767606955.png


I would remove the screw, then pry the two pieces just far enough apart to syringe some glue in between them, then clamp them up as much as possible and let it set for a few days.

Cut a piece of scrap about 8" long x 1-1/4" wide x 3/4" thick and cut a shallow V-groove right down the center. Gently clamp it to the leg so that the V is directly on top of the screw hole. This should stabilize the leg like a splint while you press on.

1706772244135.png


From the photos the screw seems to enter the leg from a 45-degree angle relative to the seat. Mark and drill a few small pilot holes exactly 90-degrees away from the screw hole.

1706769549593.png


Drill one about 2" up from the joint and the other 2" down from it. The holes need to be parallel with one another. If the pilot holes aren't parallel, you can correct that as you increase the bit size. Increase the diameter of the drill bits until you get to about 3/8" which gives you roughly the "Rule of 3" like for a mortise. Draw parallel lines connecting the edges of the holes.

Using a coping saw, cut the waste from between the holes to make a kind of through mortise. Clean up the mortise with a rasp or file. This could be tedious.

Cut a piece of oak to fit the length of the mortise and mill it down to the correct thickness and width. Measure the thickness of the leg at the top and bottom of the mortise to account for the taper, then cut it or sand the spline to shape. Test fit the spline in the mortise and keep adjusting it until you get a decent fit.

Slather it with glue and slide it into the mortise and clamp.

When all is dry, smooth everything out, spot finish, redrill the screw hole, and reassemble.

It might not be pretty, but it should be reasonably strong.

Or I might be completely out to lunch.
 
Last edited:

Martin Roper

Martin
Senior User
A way to further strengthen the area around the screw is to bend a washer to fit the radius of the leg.
1706770507648.png

It could be painted a dark color to be less noticeable.
 

kelLOGg

Bob
Senior User
More good info. I like the spline idea because it involves initially gluing the break back together in situ assuring the curvature of the leg is oriented properly. Right? Then the leg could be removed for the making the spline slot and inserting it.

FWIW, I am adding a closeup of the leg, notch and seat.
 

Attachments

  • IMG_0993.jpg
    IMG_0993.jpg
    46.5 KB · Views: 34

danmart77

Dan
Corporate Member
Looking at Tom's repair I see only a "fluff repair" in the video. When you do a front leg repair not a rear leg the approach is diffferent and much less involved. I would just turn the leg and replace it. The rear leg broke because it is a poor design from the first day it was built. With a couple people rocking back on the chair a new crack will appear and you are in the same position.
Impressive replies from some very experienced woodworkers that have been there.
Repairing wooden chairs are the pits. I've done my share over the decades and have concluded that chairs should be made from welded steel tubing if they're going to last.
When the ladder back chair was replaced by the windsor style of construction, chairs improved their survivability. The leg is not the back of the chair in the photo.

I hope you can find a chairmaker and not a furniture builder like Tom to properly fix the leg. Good luck.
 

Attachments

  • 100_0125.JPG
    100_0125.JPG
    2 MB · Views: 27

kelLOGg

Bob
Senior User
The plot thickens. I don't know what approach I will take but I know it will not be soon. Wife and I are moving into retirement home (Croasdaile) in a month or so, so "repair" or whatever won't take place until after that. ugh.
 

danmart77

Dan
Corporate Member
Impressive replies from some very experienced woodworkers that have been there.
Repairing wooden chairs are the pits. I've done my share over the decades and have concluded that chairs should be made from welded steel tubing if they're going to last.
Not so fast Bob .. don't jump ship. Chairs with back legs that double as the leg suppor and the back rest are prone to lots of trouble.
 

Premier Sponsor

Our Sponsors

LATEST FOR SALE LISTINGS

Top