How would you repair this seat?

kelLOGg

Bob
Senior User
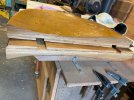
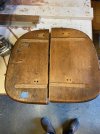
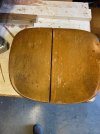
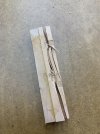
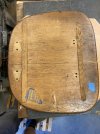
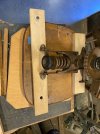
I'm helping a friend repair this broken seat. Would you use epoxy, Titebond or what else? I think dowels are asking for trouble...
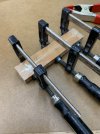
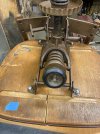
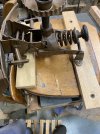
I've asked him to bring the base on which the seat is attached. Thanks for input.
 

Attachments

  • IMG_0752.jpg
    IMG_0752.jpg
    76.3 KB · Views: 138
  • IMG_0750.jpg
    IMG_0750.jpg
    85.4 KB · Views: 126
  • IMG_0748.jpg
    IMG_0748.jpg
    80.5 KB · Views: 131

kserdar

Ken
Senior User
Looks like a clean break along an old glue line - TiteBond III would be my choice.
Be interesting if the base is also separating in a similar direction.
 

kelLOGg

Bob
Senior User
Part of the break edge is very smooth which is consistent with a glue line break and part is rough. This makes it difficult to clean the surface before gluing without jointing it. If it is a glue line break, which it appears to be, then I would like for it to be clean to assure titebond III bonds as it should. Jointing will remove a few hundredths of an inch which wouldn’t be a problem unless the mounting holes in the bottom of the seat don’t line up with the base. I don’t have access to the base yet - maybe that won’t be a problem either.
 

Oka

Casey
Corporate Member
A heat gun will allow you to remove the glue. It takes time and is a slow to do but it does work. If it was originally titebond 3, then heat does not work very well. But, by the looks of it , it looks like it is old and not titebond 3 so, it should work.
 

kelLOGg

Bob
Senior User
There is no visible glue. My concern is that whatever glue was used could possibly affect the titebond adhesion. I'm leaning toward jointing but it will be my friends call.
This is a very old chair seat that his mother used on her job and eventually bought it, so there are a lot of memories associated with it.
 

Rwe2156

DrBob
Senior User
There is no visible glue. My concern is that whatever glue was used could possibly affect the titebond adhesion. I'm leaning toward jointing but it will be my friends call.
This is a very old chair seat that his mother used on her job and eventually bought it, so there are a lot of memories associated with it.
I did a little experiment once on whether dried glue really matters. I coated two sticks of wood with TB, allowed the film to thoroughly dry for a few days. Then I applied another layer of glue and clamped them up.

In trying to split them apart, they fractured along the grain line, not the glue line.

So I'm convinced residual glue doesn't matter unless it's interfering with closing a gap. So I would first clamp up the seat and see how the gap closes. If it closes to your satisfaction, I would glue it and go on. If you aren't comfortable with that, then remove what glue you can using a heat gun and wire brush but don't get to crazy with it.

You can always attach a few reinforcing straps across the gap on the bottom.
 

Attachments

  • IMG_1460.JPG
    IMG_1460.JPG
    1.4 MB · Views: 56
  • IMG_1462.JPG
    IMG_1462.JPG
    2.1 MB · Views: 53
Last edited:

John Reeves

John Reeves
Corporate Member
It is very important to make sure you know why it split in the first place and make sure you have addresses that issue. A good repair can negated if it splits again.

The old glue may have sealed the wood making it hard for anything to penetrate into the wood fibers. Heat and a soft wire brush will help clean it up. I am not sure that I would use a jointer on the split edges as the wood fibers usually can find a way to fit together helping alignment and giving some strength to the repair. Testing the fit of the the pieces as you clean it may be a good way to sense how clean it is. Also removing a few fibers in the split to get the fit as solid as you can may be advisable.

The glue you use depends on the fit, voids and visible cracks as you hold the pieces together. Tight Bond III is a great glue but it does not fill cracks that I usually have at this stage. I usually end up using an epoxy which will fill the cracks and voids, cures to an opaque color which may work on a lot of woods. You may need to add some saw dust to the epoxy to match the color.

Be patient and best of luck.
 

kelLOGg

Bob
Senior User
Someone stood on the seat and it broke. We are thinking of adding a steel plate under the seat.
 

John Reeves

John Reeves
Corporate Member
Depending on the quality of the chair, it should not have broken. May be another issue affecting it.
 
Last edited:

Graywolf

Board of Directors, President
Richard
Staff member
Corporate Member
It looks as though it’s been around a while. So I’d glue it with titebond reassemble and start sitting.
 

kelLOGg

Bob
Senior User
Here’s the seat as it was originally attached. I should’ve included the pic on the op. It is attached to steel but to pivoting parts that provide some stress relief.
 

Attachments

  • IMG_0775.jpeg
    IMG_0775.jpeg
    2.2 MB · Views: 66

Wilsoncb

Williemakeit
Corporate Member
Looks like it was repurposed. The way the leg mechanism is attached, sitting creates a force on the outside of the seat an pivoting on the attachment points. I would make use of those dado grooves and reinforce with a cross brace. At the very least make a splice plate to go between the seat and leg mechanism.
 

John Reeves

John Reeves
Corporate Member
So let’s call this a design failure. The repurposing of the seat was a good idea but it does need some support across the grain.
 

kelLOGg

Bob
Senior User
A few more pics to see if I understand what a splice plate is.
Those dado grooves are only 1/4 x 1/2. They had splines glued in and are so small I fail to see how they can help. I have added oak on the cross grain. Is that a spouse plate?
 

Attachments

  • IMG_0776.jpeg
    IMG_0776.jpeg
    2.4 MB · Views: 58
  • IMG_0777.jpeg
    IMG_0777.jpeg
    2 MB · Views: 56
  • IMG_0778.jpeg
    IMG_0778.jpeg
    2 MB · Views: 52

John Reeves

John Reeves
Corporate Member
You seem to be headed in a good direction. The oak will add the cross grain support. Looks like the oak is thick enough to handle any movement of the seat. I am talking about expansion from change in ambient humidity.

Use epoxy on the crack. Use TB or any other proper wood adhesive you would like on the oak.

Make sure you have fun with it. Woodworking needs to enjoyed by all of us.
 

Premier Sponsor

Our Sponsors

LATEST FOR SALE LISTINGS

Top