Grain continuity in a picture frame

Status
Not open for further replies.

faber

New User
faber
I'm working on a picture frame for a friend's Ketubah (Jewish wedding contract). I wanted to use it as an opportunity to play with grain continuity. I have a nice piece of quartersawn white oak, and I'm at a key turning point for how I process it into the four pieces for the frame. The stock is wide enough to be ripped down the center, and then long enough for a side piece and top piece to come from each half of the ripped stock. The question now is how to segment the two halves into the pieces for the frame.

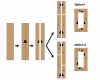
Option 1 - Grain continuity left to right and top to bottom.

Option 2 - Grain continuity in a circle

Hard to explain so here's a picture:
attachment.php


Honestly in the end it may not even matter with this particular piece of wood - the grain is very straight and the figure all come from the ray flecking, but hey, figured it's worth getting opinions on.
 

Attachments

  • Screenshot 2017-05-30 18.15.59.png
    Screenshot 2017-05-30 18.15.59.png
    143.5 KB · Views: 323

Jim M.

Woody
Corporate Member
Faber, Option 2 seems correct.

Could you use a color gradient (sometimes called a color ramp or color progression) on the first piece before you break them up in Sketchup? This would illustrate the sequence better. Jim
 

ehpoole

Moderator
Ethan
I generally prefer to focus on matching top and bottom, then left and right. The catch to watch out for if you try to run continuous grain through all four pieces in a circle (versus pairs) is that you can end up with a sudden and pronounced discontinuity where pieces one and four finally match up unless the grain was so perfectly straight to begin with that it did not really matter in the first place.

That said, frames are simple enough that they can be fun to experiment with if you like as they do not require much wood ordinarily, just some time and attention to detail. The most critical part in any frame is ensuring that the four corners are precisely 45-deg (or, at least, perfectly complementary if not precisely 45-deg) so that the corners all close up properly as that is what most differentiates a "so-so" frame from a well done frame visually as the corners can most capture attention. You can also opt to go for a more "rustic" frame through butt joints as well (essentially rail and stile type construction) and that can also look very nice even though it differs from the usual mitered corners.

Good luck and have some fun with your project.
 

Jeff

New User
Jeff
An interesting question and I don't have a good answer. It may not matter because the picture field, as yet unknown, may be the focal point that catches the eye. Option 1 suggests to me that pieces 1,4 and 2,3 are nearly mirror images so there may be some symmetry there. :icon_scra

Here's a nifty miter jig that doesn't require perfect 45 degree angles but ends up with complementary angles totaling 45 degrees. It works nicely.

http://www.finewoodworking.com/2005/10/25/picture-frame-jig-that-masters-the-miter
 

Gofor

Mark
Corporate Member
I try the pieces in different configurations to see what looks best to my eye. Sometimes it means flipping a piece end-to-end or back-to-front to get a symmetry of the grain running a little wider at one end, or to get complimentary (opposing) slants of the grain run. Another option if the wood is thick enough is to book-match the sides/top-bottom.

If ray-fleck chatoyance is a player, wet the wood with mineral spirits when doing the selecting to make it pop like it will look with a finish. I use mineral spirits because it evaporates slowly enough to allow time for you get a feel for the finished look. If you feel the need to remove any trace residue of the spirits before finishing with lacquer or acrylic, alcohol will do that nicely.

Go

Go
 
Status
Not open for further replies.

Premier Sponsor

Our Sponsors

LATEST FOR SALE LISTINGS

Top