First attempted chair

Status
Not open for further replies.

Melinapex

Mark
Corporate Member
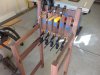
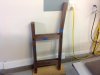
Wow, chairs are hard! (Yes, that's my commanding grasp of the obvious). I wanted a couple of spectator chairs for the pool table room and picked the easiest one I could find..... almost all straight lines! First time I have done thru mortises, first time I have done a seat. I tried the Mario Rodriguez table saw method for carving the seat and that got me about 3/4 of the way. The width was good but I needed more depth, and the jig was maxed out. So I went to Eds tool store in Pittsboro and he sold me my first gouge. Finished the last bit of the seat by hand with the gouge, scrapers, and sander. I figure I am about halfway thru with the first chair, and although it is slow going, i am learning a bunch.
Thanks for all the "finishing walnut" posts of late, think I'll try Waterlox on these.

attachment.php
attachment.php
attachment.php
 

Attachments

  • IMG_1393.jpg
    IMG_1393.jpg
    224.4 KB · Views: 353
  • IMG_0718.jpg
    IMG_0718.jpg
    296.6 KB · Views: 121
  • IMG_1380.jpg
    IMG_1380.jpg
    285.2 KB · Views: 350
  • IMG_1377.jpg
    IMG_1377.jpg
    187.3 KB · Views: 340

cyclopentadiene

Update your profile with your name
User
I do a lot of these. The tools are expensive but i have found the fastest way to shape the seat is 1) use a carbide burr on an angle grinder to rough the seat. 2) Follow up with a flap sander wheel on the grinder to level out the high and low spots. 3) the expensive portion. Use a festool Ro90 sander with 40-60 grit sand paper to rough sand the seat. 3) use a roynd edge card scraper rasps to remove the very large high and low spots. A travisher would work great but i have not made the plunge. 4) sand through the sandpaper grits for a finished seat. I can now finish a seat in about 1 hour.
I am interested if anyone has used the Veritas version of a travisher? I have also looked a the ones on line but i am afraid of the sharpening and a good quality unit is $250
 

Jim M.

Woody
Corporate Member
Great progress so far, the seat looks terrific, I can't wait to see it all assembled.
 

Jeff

New User
Jeff
I am interested if anyone has used the Veritas version of a travisher? I have also looked a the ones on line but i am afraid of the sharpening and a good quality unit is $250

I have the Lee Valley "chairmaker's scraper which is pretty nifty, but it doesn't hog a lot of wood. Lee Valley also has a Pullshave. Is that what you're referring to vs a Travisher?

http://www.leevalley.com/us/Wood/page.aspx?cat=1,310&p=54886

http://www.leevalley.com/us/wood/page.aspx?cat=1,310&p=54888
 

sawman101

Bruce Swanson
Corporate Member
It looks like your first attempt is coming together quite nicely Mel! Keep us posted on your progress; I'm looking forward to viewing the end result.
 

Jeff

New User
Jeff
Nice job on that beautiful walnut. Yes, chairs are a challenge, particularly scooping and shaping the seat which you've found out first hand.
 

Jeff

New User
Jeff
One day I will get up the courage to attempt to build a chair!

Pic one and just try building it after doing your homework, but I understand your hesitation as well.

I built this rocking chair without a "plan" other than some rough dimensions from a website and made my own seat-of-the-pants plans. It's not fine furniture but functional and comfortable for us. It's pine stuff from a BORG and the rockers are home made too with a few guesses as to length and rise for good rocking.

http://www.oxfordgarden.com/Rocking-Chairs/FRCH_Franklin-Rocking-Chair

P6120123.jpg


P6120121.jpg


cyclopentadiene

Update your profile with your name
User
I agree with Jeff. Start with inexpensive pine. I generally do a rough build of many items with pine to ensure my patterns are shaped correctly and the design is structurally sound. I then use the pine version to make patterns for the higher quality lumber.

Think of a chair as nothing more than a low side table with a back. The construction techniqu s are basically the same. Once you have completed a simple design, the next task is to add curvature to the back. This adds the most comfort (think about how uncomfortable a ladder back chair sits). Once this is mastered, it is all about the seat with shaping for comfort and tapering for appearance. This adds complexity as the tapers require joinery on an angle.
 

bash

New User
bash
Very nice. That is beautiful wood. I really like the grain pattern across the seat where you carved it out. Look forward to seeing the finished chair.
 
Status
Not open for further replies.

Premier Sponsor

Our Sponsors

LATEST FOR SALE LISTINGS

Top