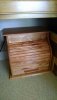
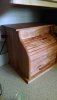
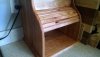
My wife got tired of the bread stuff just sitting on the counter so I offered to make a breadbox. This was another really fun build. I just love making stuff. I actually assembled it before lunch so I even stopped for lunch today. Yesterday, not so much. lol


You are using an out of date browser. It may not display this or other websites correctly.
You should upgrade or use an alternative browser.
You should upgrade or use an alternative browser.
Breadbox project
- Thread starter Boomer76
- Start date
- Status
- Not open for further replies.
Nicely done! I'm jealous that you can get projects together so quickly. At my current rate that would take a month.
I'm pretty lucky that my wife makes enough for me to be a stay at home step dad. And with him in school I get out in the garage/shop at around 8am and don't stop until around 3:30 or 4pm
Thank you very much. I'm flattered.
I did have one big oops moment while routing the tambour channel. Besides it taking a while freehanding it, I made two exact copies instead of mirrored sides. Luckily the material was still thick enough to send them through the planer to start one side over to make it right.
I did have one big oops moment while routing the tambour channel. Besides it taking a while freehanding it, I made two exact copies instead of mirrored sides. Luckily the material was still thick enough to send them through the planer to start one side over to make it right.

Thank you very much. I'm flattered.
I did have one big oops moment while routing the tambour channel. Besides it taking a while freehanding it, I made two exact copies instead of mirrored sides. Luckily the material was still thick enough to send them through the planer to start one side over to make it right.
Do you mean "Make it LEFT"?
BTW - How is it cheating to epoxy fabric on the back of the wood to build the tambour door? Is sounds like an innovative solution.
I was actually trying to figure out how to make it interlocking without having the correct tools to do it. But I guess when you get down to it this is how they did it way back in the day too. So I guess it isn't really cheating at all. I was kinda sad when it was done. I want to build another one with walnut now. LOL. Maybe take my time and photograph the process while drawing a plan to follow next time.
Besides a breadbox I was curious about tambour doors in general and how they work so I started exploring the idea. Boomer had the right idea using epoxy on canvas for the slats instead of buying an expensive router bit set for the slat joinery.
The groove for the slats looks like a candy cane hook
https://www.canadianwoodworking.com/plans-projects/breadbox
This one looks familiar but this Pinterest crap sucks.
https://www.pinterest.com/pin/480055641516249280/
Nonetheless, it shouldn't be too hard to design your own and wing it without a plan other than yours.
This is what was left over from a Tambour door I made years ago for a roll-up desk project for a customer. It's oak strips and I cut everything on the table saw.

- Status
- Not open for further replies.
Premier Sponsor
Our Sponsors
LATEST FOR SALE LISTINGS
-
-
-
 SOLD -- $75: Gast moa v113 Vacuum Pump Veneer, 60" bag and board
- Started by peterdnight
- Replies: 1
-
GONE: Gladiator 5 cleats, 10 hangers, Paper Towel and Shelf
- Started by peterdnight
- Replies: 3
-
SOLD -- $100 Makita mac700 portable air + grex pin nailer + 2 others + 50' hose
- Started by peterdnight
- Replies: 1