
Hello all,
I have been browsing the forum for some time now and learning a little all along. I have been woodworking for many years off and on during my military career but never for any extended period of time. Since retiring I have really started to build up my wood shop and in 2019 finally bought a place that has a large enough garage (not attached to the house) to put my woodshop together in. So, to quit babbling about what got me here and to get to my question
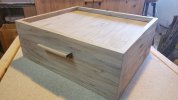
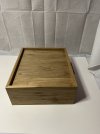
I built my father a certified coin box to hold 100 certified dollar coins, most PCGS but some NGC. It is built out of poplar and the dimensions are
13 7/8" L x 11 7/8" W x 5" T
The 4 main walls of the box are 1/2" thick and the top and bottom panels are 1/4" thick panels made from the same piece of poplar glued together. So, a basic box more or less, the bottom panel sits 3/8" from the bottom of the box and the top panel sits 5/8" down from the top of the box.
The deeper top gives him a place to bring out coins and place on the top to look at them or sort through new ones or whatever else he wants to do on the top without a coin sliding off of it. To answer another possible question, why all the 1/8" measurements? well certified coin cases are 3/8" thick and it just worked out for everything to come out to 1/8" measurements because of it.
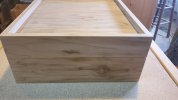
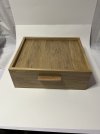
So, to continue on, the box was assembled and left to set overnight for the glue to dry. The top was then separated from the bottom using the table saw. The top is 2" deep and the bottom 3" deep.
Another side note, this was left in the shop, which is unheated, so the temp is what it is based on outside temps. This I think is going to be an important factor in what is happening with the top.
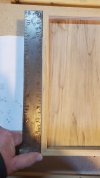
After separating the lid from the box, I decided to bring it in the house because it would not be done before Christmas, and it was supposed to be his Christmas present. I did sand it all up on the outside and showed it to him on Christmas eve when he came over. I noticed that one end of the top had started bowing in, not enough to stress the mitered corners but definitely noticeable. I took the box back out to the shop and left it, fast forward a week. The lid was now not bowed, and it looked as if I had just cut it from the box. I started working on the liner that would hold the top in place, this was a 1/4" thick and butt jointed then glued to the bottom part of the box. Once the glue dried it was a perfect fit for the top, well after I chamfered the edges a bit the top slid right on and had air lock resistance when taking it off. Back on track no warping.....
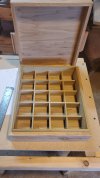
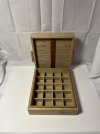
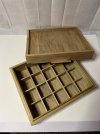
I then made the inserts that would separate the coins in groups of 5, long story short, there are 3 dividers length wise and 4 dividers width wise. Almost irrelevant at this point. Now I just needed to put a finish on it, I didn't want to add any kind of oil or finish to the inside as I didn't want to take the chance on it reacting with the coins being sealed up with them. So, I only used mineral oil to finish the outside and decided to use a butcherblock wax to top it off. Everything is now going great, bring it inside and have it ready to take to him once he gets back from his trip.
WELLLLLLL
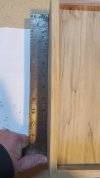
In the house for 1 day no change, by day 2 the lid and only the one end of the lid started to bow again. I thought that if this were to happen again that the inserts would help keep it at a minimum, NOT the case. So, that end of the box which was originally 1 piece of wood when the box was all glued up and then separated only has the lid piece (2" piece not the 3" bottom piece) bowing.
Finally, you made it to my question
Why is the bottom 3" piece not bowing like the top piece, and how do I go about fixing the top piece to stop bowing, or at least reinforce it so that it doesn't bow so much?
Just so you know where my mind is on it, I was thinking that I could run a saw kerf 1/4" deep along that piece and using the same wood but different grain orientation and glue an inlay into it and just call it the front of the box with a decorative inlay. I would of course leave it in the garage for a few days to see if it straightens back out like it did the first time. But if I do that inlay then the sides would look a bit odd with the end of the inlay showing through part of the miter. I really don't know I am just running through ideas, and that is why I decided to post here to get others' opinions.
Thank you for the answers and ideas in advance, I am signing off to go to RDU to pick my pops up from his trip tonight at 1240, and I am 2 hours away from there. This is not a fun trip for an old person and probably even less fun for my pops in his later 70's.
I have been browsing the forum for some time now and learning a little all along. I have been woodworking for many years off and on during my military career but never for any extended period of time. Since retiring I have really started to build up my wood shop and in 2019 finally bought a place that has a large enough garage (not attached to the house) to put my woodshop together in. So, to quit babbling about what got me here and to get to my question
I built my father a certified coin box to hold 100 certified dollar coins, most PCGS but some NGC. It is built out of poplar and the dimensions are
13 7/8" L x 11 7/8" W x 5" T
The 4 main walls of the box are 1/2" thick and the top and bottom panels are 1/4" thick panels made from the same piece of poplar glued together. So, a basic box more or less, the bottom panel sits 3/8" from the bottom of the box and the top panel sits 5/8" down from the top of the box.
The deeper top gives him a place to bring out coins and place on the top to look at them or sort through new ones or whatever else he wants to do on the top without a coin sliding off of it. To answer another possible question, why all the 1/8" measurements? well certified coin cases are 3/8" thick and it just worked out for everything to come out to 1/8" measurements because of it.
So, to continue on, the box was assembled and left to set overnight for the glue to dry. The top was then separated from the bottom using the table saw. The top is 2" deep and the bottom 3" deep.
Another side note, this was left in the shop, which is unheated, so the temp is what it is based on outside temps. This I think is going to be an important factor in what is happening with the top.
After separating the lid from the box, I decided to bring it in the house because it would not be done before Christmas, and it was supposed to be his Christmas present. I did sand it all up on the outside and showed it to him on Christmas eve when he came over. I noticed that one end of the top had started bowing in, not enough to stress the mitered corners but definitely noticeable. I took the box back out to the shop and left it, fast forward a week. The lid was now not bowed, and it looked as if I had just cut it from the box. I started working on the liner that would hold the top in place, this was a 1/4" thick and butt jointed then glued to the bottom part of the box. Once the glue dried it was a perfect fit for the top, well after I chamfered the edges a bit the top slid right on and had air lock resistance when taking it off. Back on track no warping.....
I then made the inserts that would separate the coins in groups of 5, long story short, there are 3 dividers length wise and 4 dividers width wise. Almost irrelevant at this point. Now I just needed to put a finish on it, I didn't want to add any kind of oil or finish to the inside as I didn't want to take the chance on it reacting with the coins being sealed up with them. So, I only used mineral oil to finish the outside and decided to use a butcherblock wax to top it off. Everything is now going great, bring it inside and have it ready to take to him once he gets back from his trip.
WELLLLLLL
In the house for 1 day no change, by day 2 the lid and only the one end of the lid started to bow again. I thought that if this were to happen again that the inserts would help keep it at a minimum, NOT the case. So, that end of the box which was originally 1 piece of wood when the box was all glued up and then separated only has the lid piece (2" piece not the 3" bottom piece) bowing.
Finally, you made it to my question
Why is the bottom 3" piece not bowing like the top piece, and how do I go about fixing the top piece to stop bowing, or at least reinforce it so that it doesn't bow so much?
Just so you know where my mind is on it, I was thinking that I could run a saw kerf 1/4" deep along that piece and using the same wood but different grain orientation and glue an inlay into it and just call it the front of the box with a decorative inlay. I would of course leave it in the garage for a few days to see if it straightens back out like it did the first time. But if I do that inlay then the sides would look a bit odd with the end of the inlay showing through part of the miter. I really don't know I am just running through ideas, and that is why I decided to post here to get others' opinions.
Thank you for the answers and ideas in advance, I am signing off to go to RDU to pick my pops up from his trip tonight at 1240, and I am 2 hours away from there. This is not a fun trip for an old person and probably even less fun for my pops in his later 70's.
")