Another saw handle!

Status
Not open for further replies.

Graywolf

Board of Directors, President
Richard
Staff member
Corporate Member
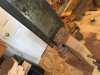
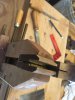
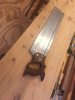
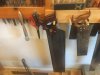
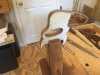
A few weeks back I had a request to re handle a mitersaw. I though it would be fun to document the process.
attachment.php

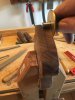
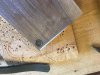
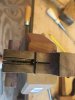
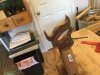
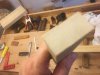
I choose a piece of quarter sawn walnut.
attachment.php

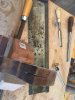
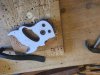
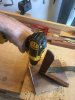
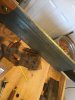
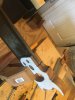
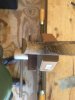
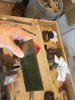
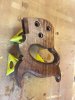
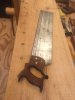
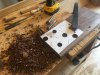
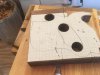
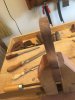
I glued on graph of the new handle, and drilled out some of the curved areas.
attachment.php

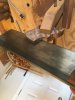
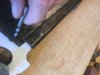
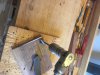
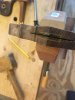
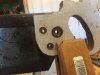
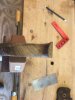
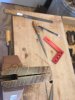
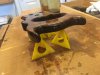
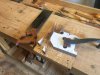
This gave me the opportunity to use my bowsaw and cut out the shape.
attachment.php
attachment.php
attachment.php
attachment.php

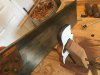
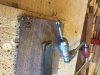
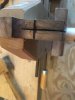
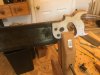
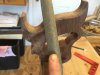
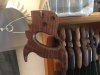
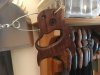
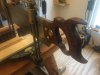
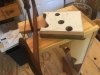
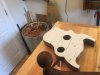
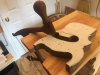
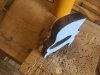
Now it's time smooth out the cuts and check for square.
attachment.php
attachment.php
attachment.php

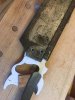
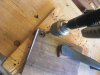
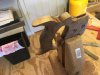
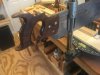
Next, will be cutting for the blade and back, then the bolt holes. I'll share that a little later.
 

Attachments

  • IMG_0353.JPG
    IMG_0353.JPG
    931.3 KB · Views: 330
  • IMG_0354.JPG
    IMG_0354.JPG
    593.6 KB · Views: 321
  • IMG_0355.JPG
    IMG_0355.JPG
    627.2 KB · Views: 311
  • IMG_0356.JPG
    IMG_0356.JPG
    567.7 KB · Views: 315
  • IMG_0357.JPG
    IMG_0357.JPG
    788.5 KB · Views: 316
  • IMG_0358.JPG
    IMG_0358.JPG
    518.9 KB · Views: 317
  • IMG_0359.JPG
    IMG_0359.JPG
    524.7 KB · Views: 310
  • IMG_0360.JPG
    IMG_0360.JPG
    653.2 KB · Views: 324
  • IMG_0361.JPG
    IMG_0361.JPG
    692.5 KB · Views: 316
  • IMG_0362.JPG
    IMG_0362.JPG
    823.8 KB · Views: 315

Graywolf

Board of Directors, President
Richard
Staff member
Corporate Member
I'll finish it up over the next several days. I've been processing a lot of lumber lately and needed a light diversion. This gives me six or seven projects underway.
 

Graywolf

Board of Directors, President
Richard
Staff member
Corporate Member
So before working another project I decided to continue and start moving toward fitting the blade.
attachment.php
attachment.php
attachment.php

Starting by finding and marking the center of the blank, this also where I generally step back and say dear load don't let me screw this up, or words similar to that.
attachment.php
I'm fortunate in that I have several saws that match or come close to the plate thickness. So all I had to do is follow the line.
attachment.php
I highly recommend flipping your blank often to help maintain a straight cut. Take your time and take full strokes. This saw is a beast and is made to eat wood, it's filed crosscut but will rip just as well, just a little slower in pace and in few minutes I'm down to stop line on both sides.
attachment.php
Next I'll set up for the bolt holes and fit the back into the handle. Ounce that is done I'll mount the blade with the bolts and check make sure nothing is binding or causing twist. From there we will shape it up, fit it to a hand and make it purtty.
until then see ya.
 

Attachments

  • IMG_0361.JPG
    IMG_0361.JPG
    692.5 KB · Views: 246
  • IMG_0364.JPG
    IMG_0364.JPG
    639 KB · Views: 245
  • IMG_0365.JPG
    IMG_0365.JPG
    795.6 KB · Views: 249
  • IMG_0366.JPG
    IMG_0366.JPG
    669.9 KB · Views: 244
  • IMG_0367.JPG
    IMG_0367.JPG
    686.2 KB · Views: 264
  • IMG_0368.JPG
    IMG_0368.JPG
    730.8 KB · Views: 245

sawman101

Bruce Swanson
Corporate Member
You sure make it look easy Richard! Perhaps your mini demos will entice others who haven't tried their hand at traditional woodworking to give it a go. Great job sir!
 

Graywolf

Board of Directors, President
Richard
Staff member
Corporate Member
So I had some time today to work a the bench and realized I got ahead of myself. Or was it my photographer (me!) had laid down on the job.
attachment.php

This is where I got to when it dawned on me that I'm a slacker. So I'll start back where I should and for part of this I'll use a stand in board.
attachment.php

This being a re-handle I have to line up the holes already in the saw plate. So aligning the saw with back with the handle. Maintaining the hange angle is important here. Once I'm satisfied with what I see, I select a drill bit that is snug fit to the holes in the saw plate to mark the handle blank.
attachment.php

Just a couple twists and it's marked.
attachment.php

This where the stunt blank comes in. I predrill a 3/32" hole at all the bolt locations all the way through the blank maintaining square.
attachment.php

In this demo I'm using 13/16" spade bit to recess for the medallion it is just that size. I generally drill a little deeper than needed and I'll plane the surface a little later.
attachment.php

So for the other side and all the other counter bores a 1/2" forstner bit works well.
attachment.php

Now to widen the through hole in this case about a 1/4"
attachment.php
attachment.php

And this get us back to here. More later
 

Attachments

  • IMG_0390.JPG
    IMG_0390.JPG
    853.6 KB · Views: 167
  • IMG_0383.JPG
    IMG_0383.JPG
    922.5 KB · Views: 173
  • IMG_0382.JPG
    IMG_0382.JPG
    645.3 KB · Views: 182
  • IMG_0384.JPG
    IMG_0384.JPG
    640.6 KB · Views: 175
  • IMG_0385.JPG
    IMG_0385.JPG
    658.6 KB · Views: 166
  • IMG_0386.JPG
    IMG_0386.JPG
    952.3 KB · Views: 171
  • IMG_0388.JPG
    IMG_0388.JPG
    598.5 KB · Views: 173
  • IMG_0389.JPG
    IMG_0389.JPG
    894.8 KB · Views: 171
Last edited:

Graywolf

Board of Directors, President
Richard
Staff member
Corporate Member
More from yesterday,
attachment.php
attachment.php

I carefully use a mortise gauge to center up and mark the area for the saw back to nest into. A little color pencil helps visibility.
attachment.php

A dovetail saw is used to define the side walls up to a point.
attachment.php

A chisel takes the rest of the waste out.
attachment.php

And you slowly adjust for fit.
attachment.php
attachment.php
attachment.php

Now we get to make it pretty and comfortable in the hand. I personally think the grain will speak for its self here, and make you want to use the miter box... just saying... that's been my demented experience.
 

Attachments

  • IMG_0391.JPG
    IMG_0391.JPG
    633.8 KB · Views: 181
  • IMG_0393.JPG
    IMG_0393.JPG
    565.7 KB · Views: 164
  • IMG_0395.JPG
    IMG_0395.JPG
    588.3 KB · Views: 163
  • IMG_0396.JPG
    IMG_0396.JPG
    616.2 KB · Views: 160
  • IMG_0397.JPG
    IMG_0397.JPG
    574.7 KB · Views: 165
  • IMG_0398.JPG
    IMG_0398.JPG
    644.6 KB · Views: 153
  • IMG_0399.JPG
    IMG_0399.JPG
    654.1 KB · Views: 165
  • IMG_0401.JPG
    IMG_0401.JPG
    629.7 KB · Views: 160

Graywolf

Board of Directors, President
Richard
Staff member
Corporate Member
So this is where this thing starts to show some life.
attachment.php
attachment.php
attachment.php
attachment.php

I'm starting to rough out the contours of this handle.one of the primary tools is rasps.
attachment.php
attachment.php

A few areas using a chisel works better
attachment.php
attachment.php

A card scraper makes easy work of this end grain.
attachment.php
attachment.php

It's starting to look like a saw handle you can get your hand on. It feels good to the hand and looks pretty good to. A little more fine tuning and it'll be ready for some finish. More later!
 

Attachments

  • IMG_0403.JPG
    IMG_0403.JPG
    660.6 KB · Views: 133
  • IMG_0404.JPG
    IMG_0404.JPG
    587 KB · Views: 137
  • IMG_0405.JPG
    IMG_0405.JPG
    563.3 KB · Views: 130
  • IMG_0406.JPG
    IMG_0406.JPG
    656.8 KB · Views: 130
  • IMG_0407.JPG
    IMG_0407.JPG
    707.5 KB · Views: 134
  • IMG_0408.JPG
    IMG_0408.JPG
    619.7 KB · Views: 129
  • IMG_0409.JPG
    IMG_0409.JPG
    636.9 KB · Views: 123
  • IMG_0410.JPG
    IMG_0410.JPG
    560.9 KB · Views: 129
  • IMG_0411.JPG
    IMG_0411.JPG
    726.2 KB · Views: 119
  • IMG_0412.JPG
    IMG_0412.JPG
    674.7 KB · Views: 123
Last edited:

Graywolf

Board of Directors, President
Richard
Staff member
Corporate Member
So, I didn't want to bore everyone with pics of this piece being detailed. Let's just say some scraping and some light sanding was involved.
attachment.php
attachment.php

Soaked in oil for about an hour, it'll need to hang out for a little while
attachment.php
attachment.php

Several more over the course of the week, from there wax and that should be it. I'll post the finished saw. Later
 

Attachments

  • IMG_0414.JPG
    IMG_0414.JPG
    737.1 KB · Views: 106
  • IMG_0415.JPG
    IMG_0415.JPG
    635.8 KB · Views: 105
  • IMG_0416.JPG
    IMG_0416.JPG
    663 KB · Views: 100
  • IMG_0417.JPG
    IMG_0417.JPG
    665.3 KB · Views: 96

danmart77

Dan
Corporate Member
Coming along nicely. I am trying to bring a small dovetail saw back to life. The screws that hold the handle to the saw blade need replacing.

Do you have a supplier for these unique parts?

Thanks
Dan
 

Graywolf

Board of Directors, President
Richard
Staff member
Corporate Member
If you want something new, www.tgiag.com would be my first choice. They have split nut saw nuts and are well made. If you are looking for some old ones then I have to direct you to eBay. I personally would go with the new ones.
 

mbromley

New User
Bromley
Excellent looking handle and thank you for all the information walking us through the build process! I always enjoy seeing the process just as much as the final product.
 

Graywolf

Board of Directors, President
Richard
Staff member
Corporate Member
Just when you thought this one had gone away. Two more coats of oil rubbed out over the past week and two coats of wax today. Oh and I polished the brass a little but old soldiers never forget how to polish brass.
attachment.php
attachment.php

So while working on some other projects last week chose to clean and sharpen the blade. I already was sharpening another saw so what the heck.
attachment.php
attachment.php

I sliped it into one of my miter boxes to give it a run. This is a small saw so I had to pad up the base to cut all the way through. However it ran smooth and cut clean.
attachment.php

So Mike if you bring your box to the Stokes Stomp we can marry these two together and tune the box..
attachment.php
So until then that's where it'll hang. :gar-Bi
 

Attachments

  • IMG_0425.JPG
    IMG_0425.JPG
    720.2 KB · Views: 76
  • IMG_0427.JPG
    IMG_0427.JPG
    722.9 KB · Views: 81
  • IMG_0423.JPG
    IMG_0423.JPG
    627.3 KB · Views: 71
  • IMG_0422.JPG
    IMG_0422.JPG
    697.2 KB · Views: 79
  • IMG_0424.JPG
    IMG_0424.JPG
    589.5 KB · Views: 73
  • IMG_0428.JPG
    IMG_0428.JPG
    652.2 KB · Views: 77

danmart77

Dan
Corporate Member
Richard have you ever separated the blade from the steel backer? I'm thinking I might try and replace the sawblade on my small dovetail saw.

Not sure about major surgery right now. Next step will be getting the teeth re-cut and set and then I will evaluate if blade update is in order.

Looking at the nice brass screws in your saw makes me jealous. Mine were just too bent and distorted from a hack that took it apart earlier in its life. I would like to find some simple brass screws to keep the handle secured.

For a first effort with this saw I'm OK but I think I'll be doing some more on it if the blade shows some potential. Remember.. I cut on the pull for the last 40 years.

sawhandle_82018_10_.JPG


sawhandle_82018_12_.JPG


Status
Not open for further replies.

Premier Sponsor

Our Sponsors

LATEST FOR SALE LISTINGS

Top