Got a new DP earlier this year and temporarily used my previous table. Version 2 is the same overall design with a few dimension changes and improvements. The fence is WoodRiver and I bought an extra flip stop for it.

The top and bottom layers are 1/2” BB ply and the middle layer is 5/8” BB ply. I extended the T-tracks for the fence a bit and that does make blind insertion by feel of the fence nut easier when re-installing the fence.

The T-track is slightly thicker than 1/2” BB and a router plane was the ideal tool to deepen the groove slightly.

The Kreg auto-adjust clamps have served me well. I almost always snap down both clamps or at least one clamp and the fence. No more whirling stock.

The clamps came with a piece of slippery adhesive plastic tape that kept twisting. I made these HDPE saddles and so far seem to be an improvement.

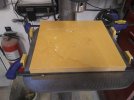
With a 2-1/2” Forstner, here are four positions on one side of a 5” square sacrificial insert. I miscut the square hole position by about 1/2”.

With the slight bevel on the table, the elevator crank seems to have enough clearance.

The top and bottom layers are 1/2” BB ply and the middle layer is 5/8” BB ply. I extended the T-tracks for the fence a bit and that does make blind insertion by feel of the fence nut easier when re-installing the fence.
The T-track is slightly thicker than 1/2” BB and a router plane was the ideal tool to deepen the groove slightly.
The Kreg auto-adjust clamps have served me well. I almost always snap down both clamps or at least one clamp and the fence. No more whirling stock.
The clamps came with a piece of slippery adhesive plastic tape that kept twisting. I made these HDPE saddles and so far seem to be an improvement.
With a 2-1/2” Forstner, here are four positions on one side of a 5” square sacrificial insert. I miscut the square hole position by about 1/2”.
With the slight bevel on the table, the elevator crank seems to have enough clearance.
Last edited: