Tool tote box

Graywolf

Board of Directors, President
Richard
Staff member
Corporate Member
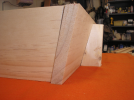
Ok, let get this right, you have never cut a dovetail before? Jumping into the deep end are we? Ok, then, I think we need to discuss some things. I truly recommend that you work with sample corners such as this.
187687

That way if or when you fail, and you will. Don't worry it's not anything that I haven't done before. You can cut away the offending joint and start a new. I do this type of thing all the time when I haven't cut a joint in a while, or I plane haven't done it before. I like setting up things and giving them a try before I commit to a project. It's a great learning tool. So please Jeff, go back to what I have posted and lets focus on one joint and do it until we have success. Trust me in this that is how I learned what I know is through practice, failure, and more practice, and then a little more failure. It keeps me humble, most days. So if you will step back and set up a practice joint up to where have posted, then we will proceed from there. Also if we need to step back and walk you through a dovetail then I guess we will.
 

Hmerkle

Board of Directors, Development Director
Hank
Staff member
Corporate Member
WAIT a minute - Richard - you haven't told us hoe to finish laying out a dovetail on th eangled boards...
or did you mean to just layout and make dovetails on square corners?
 

Graywolf

Board of Directors, President
Richard
Staff member
Corporate Member
No, Hank I'm going to walk this through to its conclusion. I've already shot the pics and completed the joint. This is a perfect opportunity to share this. That said, I was a little taken back when Jeff made his statement and this is an intermediate skill. So I kindly suggest he take a step back and build a foundation of skills before jumping into the deep end.
So you know I'm out on a jobsite installing a kitchen today, and this what my office looks like today
187690

187691

Looks like fun don't it!
 

Hmerkle

Board of Directors, Development Director
Hank
Staff member
Corporate Member
It DOES look like fun!
(I wish I was closer - I would come and help you
 

Jeff

New User
Jeff
That said, I was a little taken back when Jeff made his statement and this is an intermediate skill. So I kindly suggest he take a step back and build a foundation of skills before jumping into the deep end.

A foundation of skills making hand-cut dovetails? Yes, maybe I'm trying to run before walking and trying to do too much in one bite.

I'm going to step back and try making some regular hand-cut dovetails on the square ends of a couple of boards before trying the angled dovetails. I thank Richard for kindly getting me to this point.
 

Attachments

  • P1010014.png
    P1010014.png
    885.6 KB · Views: 103
  • P1010015.png
    P1010015.png
    845.3 KB · Views: 104
Last edited:

Berta

Berta
Corporate Member
Jeff, after a workshop, and having to stay after class and try again I did cut some hand cut dovetails. Go slow, take your time. You did bite off a big chew. I did it you can.
 

Mike Davis

Mike
Corporate Member
Jeff,

This lady went from never using woodworking tools to hand cutting dovetails in one day.

She learned how to saw, plane, chisel, layout dovetail, and made this corner.

When you break it down into small steps it is much easier to practice the needed skills.

I think it would be a great benefit to you if you could work with Richard or any of the guys that do this on a regular basis. You can do it on your own and that is how I learned, but I wasted so much time and frustration. I wish I had learned from someone willing to help.

Good luck how ever you decide to go.


187703
 

Graywolf

Board of Directors, President
Richard
Staff member
Corporate Member
OK, let's get back to this. It doesn't matter how you are used to laying out and or cutting your dovetails, in this situation you really need to layout and cut the pin board first. The reasoning behind this is the pins travel with the length of the board, making transferring the pins to the tail board easier. I have two half pins one full pin and two tails. The following pics show two examples of how the pins are the constant here and travel the length of the board.
187709

187710

So if we go back to where I left off earlier this week.
187711

We had stopped here, this layout I have done on my tail board on the inside and if you have noticed I put a witness mark that our layout has drawn over. The pin board has the same witness mark so can quickly identify and orient the boards. I place the pin board into my vise with the inside facing me.
You will want to have two sliding bevels if you have them. I set one to the angle of the ends of the boards, this will come in handy when we mark the sides of the pin board. The other will be used to adjust to the angles on the layout and then mark the angle on the end of the pin board.
187712

187713

I slide the blade of the bevel up to the top line of our layout, I use this as the top of my pins layout.
187714

I mark the top of the full pin and the top of the lower half pin.
187715

Now you readjust the bevel to the lower line on our layout and mark the lower half of the pins.
187716

From here you can transfer pin lines to the base line using the bevel set at the angle of the ends. Two things to keep you on track here is the fat part of your pins is always to the inside of the joint, and mark your waste areas as you go.
Now you're ready to cut the waste out and pair to the lines.
187717

187718

187719

187720

The pins are cut and looking good. Next we will transfer the pins to the tail board, but after I eat some oatmeal. Be back in a few!
 

Graywolf

Board of Directors, President
Richard
Staff member
Corporate Member
I'm back full of breakfast and even stopped by the Sunday morning chat.
One thing to keep in mind here is you laid off a base line that in relationship with the end of the board is not parallel to one another. So when you paring away your waste you will want a slight under cut from each base line. The base line is the angle you want and the ends of the board will stick out past the finished joint to be planed away later.
187723

Here is a good example.
Now we are ready to transfer the pins to the tails. I line up the pin board to the base line on the tail board.
187724

187725

As you can see we have a slight over hang on the joint.
I use a sharp pencil to mark the pins.

187726

Now mark your waste area and you can transfer across the end grain.
187727

You use the same sliding bevel setting you used to transfer on the face of the pin board.
This is a point even I have over looked over time, and that is I don't mark the outside of the tail board, I use follow the two lines and I keep an eye on the base line on both sides of the board.
187728

Make the cuts and pare away the waste staying with your base lines.
187729

You'll notice in this pic that I cut inside or split the lines. You can always remove some material.
So now I want to see how did, so lets look.
187730

Not bad.
187731

Over all it went together well, a little tight there is a slight split in the pin board, it's repairable.
187732

The joint sits square!
187733

As you can see the ends of the boards are proud of the joint to be planed away after glueing.
So Jeff this is it. The compound angle dovetail joint. You can use any angle you want and the same principles apply. After saying that if go in the direction of say 30 degrees then would just use the base line to compensate for the joint. I tried it and was not happy with the results.
I also know that some will look at these sample and say they look a little gappy but I assure you that when glued and then you plane away the waste the joint will be closed.
187734

187735

This is the finished tote from earlier this year.
I do hope this helps, and I hope it inspires you to build something along these lines. You could build a crib for a grandchild, or a child if you are younger. For that mater I hope several folks try this and are willing to share the results. Thanks for your patients. I will come back and reread what I have written, I will edit for grammar and content, mainly because this was a brain dump on this subject. If anyone would like to talk about a private lesson on handtool wood working start a conversation and we will talk time place and price.
 

Jeff

New User
Jeff
Thank you Richard I sure do appreciate you taking the time to lead me through this process. It's a lot more complicated than I thought and it'll take some time to digest it and then read it again and again using the pictures.

I have 1 sliding bevel gauge and it has a 10" long blade (Lee Valley) which is kind of cumbersome for this type of work. I saw your 2 bevel gauges with 4" blades. Where did you get them? The 4" bevel gauge from Lee Valley is no longer available.


These 4" sliding bevel gauges are from Blue Spruce Toolworks for $125!


Graywolf

Board of Directors, President
Richard
Staff member
Corporate Member
Jeff, mine are antiques, and I find them in a verity of places. Any of the used tool markets available to all of us will have them at competive prices. However, you can do it with one sliding bevel, you'll just have to switch between setups and that will lend itself to errors, I have found it useful over time to have several of these much like having several squares, dividers, and marking gauges. If you have several setups in one project then several tools of this nature will help.
 

Mike Davis

Mike
Corporate Member
The all steel one in Richard’s photos is a Stanley #18. I found several on EBay for $25-40. They are convenient to use because the locking screw is at the but end of the beam. I probably bought 6-8 of them and sold a couple so may have 3-5 left that I use.
 

Jeff

New User
Jeff
Jeff, mine are antiques, and I find them in a verity of places. Any of the used tool markets available to all of us will have them at competive prices. However, you can do it with one sliding bevel, you'll just have to switch between setups and that will lend itself to errors, I have found it useful over time to have several of these much like having several squares, dividers, and marking gauges. If you have several setups in one project then several tools of this nature will help.

How long are the blades on your antique bevel gauges? 4" or 6"? My 4" long guess may be wrong and maybe yours are 6". Today I looked at the Stanley #18 bevel gauges and can't find any with a 4" blade, but 6" is pretty easy to find on EBay.
 
Last edited:

Graywolf

Board of Directors, President
Richard
Staff member
Corporate Member
How long are the blades on your antique bevel gauges? 4" or 6"? My 4" long guess may be wrong and maybe yours are 6". Today I looked at the Stanley #18 bevel gauges and can't find any with a 4" blade, but 6" is pretty easy to find on EBay.
If I'm remembering correctly they are 6" blades. I find that is a handy size. I do have a couple that are bigger, but I tend to use the smaller ones more often.
 

Premier Sponsor

Our Sponsors

LATEST FOR SALE LISTINGS

Top