I have been seeing ads for the Høvel pencil sharpener plane for a while and I was thinking of getting one as a gift for my brother, but I decided I was getting good enough at plane making that I could try making one myself as a gift for him.
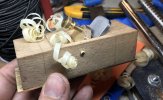
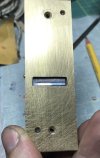
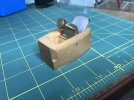
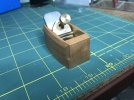
The overall size will be 1-1/4" wide x 2-1/4" long. Blade is 13/16" wide O1 steel I heat treated myself. The "lever cap" (or whatever you might call it), cross pin, sole and tensioning screw are all brass. The body is European beech. The sole is only epoxied to the wood body -- hopefully this will be OK if kept indoors. I figure the joint is very small, about the width of a typical knife handle, and I have several floats I made this way out of walnut and steel that are holding up well.
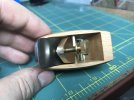
The plane can be set up for use tool-free by simply loosening the knob, putting it on a desk, letting the blade gently drop and settle, and then tightening the knob. This tends to give shavings about the thickness of a sheet of paper (~0.004") and you could just use tape as a shim if you wanted to do this on a harder surface such as granite. Having it be noiseless and simple to set up was a main goal for this project.
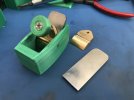
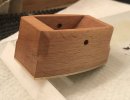
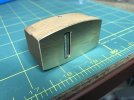
The main remaining things to do are just to cut off the excess length on both ends, shape the body (see green 3D printed prototype for final shape idea) and apply finish. I will probably spend some time polishing the brass so it has fewer scratch/filing marks too.
The overall size will be 1-1/4" wide x 2-1/4" long. Blade is 13/16" wide O1 steel I heat treated myself. The "lever cap" (or whatever you might call it), cross pin, sole and tensioning screw are all brass. The body is European beech. The sole is only epoxied to the wood body -- hopefully this will be OK if kept indoors. I figure the joint is very small, about the width of a typical knife handle, and I have several floats I made this way out of walnut and steel that are holding up well.
The plane can be set up for use tool-free by simply loosening the knob, putting it on a desk, letting the blade gently drop and settle, and then tightening the knob. This tends to give shavings about the thickness of a sheet of paper (~0.004") and you could just use tape as a shim if you wanted to do this on a harder surface such as granite. Having it be noiseless and simple to set up was a main goal for this project.
The main remaining things to do are just to cut off the excess length on both ends, shape the body (see green 3D printed prototype for final shape idea) and apply finish. I will probably spend some time polishing the brass so it has fewer scratch/filing marks too.