I haven't been posting here for a while, as I had a period where I could not do woodworking while I was taking care of my mother after her recovery from (successful) knee replacement surgeries. I am back home at my apartment now and I figured this would be a good thing to post to come back.
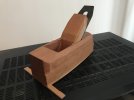
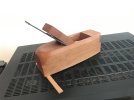
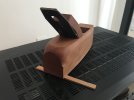
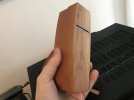
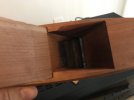
This is a 7" double iron cherry smoothing plane using a 1-3/4" Stanley blade + cap iron. The only power tools used were a drill press for hogging out the mortise and a bench grinder for touching up the blade bevel. It took approximately one month of little bits of work done each day, although most of the work was done in the first 3 weeks and then I had to wait a bit for the finish (Minwax Antique Oil) to arrive mail order.
The trickiest part was figuring out a geometry for the inside that worked with the raised bulge at the end of a Stanley cap iron. I think if I were to make another double iron plane I would go to the trouble of sourcing the classic style of cap iron that was common on wooden double iron planes as it solves some problems. Additionally, the mouth opening got away from me a little, but because it is a double iron plane tearout can be controlled by setting the chip breaker very finely instead. The iron is also bedded at 45* like a typical Stanley as a steeper angle is also not needed for tearout control reasons.
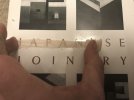
I will say that I got some of the Iwasaki "floats" and used them on this project and I found them very useful. They are not precisely the same as "true" floats but they are still very helpful and I may post about that later.
This is probably my best plane to date, and I am very excited to try making more with what I have learned. I have a jack plane that belonged to my great grandfather that I am thinking of making a copy of for my next project -- as long as I can find a suitable billet.
This is a 7" double iron cherry smoothing plane using a 1-3/4" Stanley blade + cap iron. The only power tools used were a drill press for hogging out the mortise and a bench grinder for touching up the blade bevel. It took approximately one month of little bits of work done each day, although most of the work was done in the first 3 weeks and then I had to wait a bit for the finish (Minwax Antique Oil) to arrive mail order.
The trickiest part was figuring out a geometry for the inside that worked with the raised bulge at the end of a Stanley cap iron. I think if I were to make another double iron plane I would go to the trouble of sourcing the classic style of cap iron that was common on wooden double iron planes as it solves some problems. Additionally, the mouth opening got away from me a little, but because it is a double iron plane tearout can be controlled by setting the chip breaker very finely instead. The iron is also bedded at 45* like a typical Stanley as a steeper angle is also not needed for tearout control reasons.
I will say that I got some of the Iwasaki "floats" and used them on this project and I found them very useful. They are not precisely the same as "true" floats but they are still very helpful and I may post about that later.
This is probably my best plane to date, and I am very excited to try making more with what I have learned. I have a jack plane that belonged to my great grandfather that I am thinking of making a copy of for my next project -- as long as I can find a suitable billet.