Mud room drop zone in alcove

Status
Not open for further replies.

Brogan

New User
.
Hello all.

I found the forum while searching for ideas and techniques for my first project.

We're having a house built and the drop zone the builder supplies isn't that great, so I’ve decided to build my own.

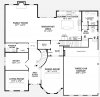
This is the area I have to work with - it's actually a closet as standard so I've asked them to omit the closet and leave the alcove 'clean' with flush side walls.

closet.JPG

So, without further ado, this is what I have planned – I don’t have a 3D rendering yet so this is just the front elevation.

render.png

The seat (blue) will be 18” off the floor and the underside of the cubby holes (green) will be 6’ off the floor, putting the coat hooks (grey circles) at 5’ 9” off the floor.
This is a bit higher than I’d like but it’s to ensure a minimum of 4’ 3” to the seat, to allow for long coats.

The dimensions of the alcove are as follows

dimensions.png

I plan to build it in 3 stages – the seat, the back wall, the cubby holes.

The seat will be a single open compartment with two hinged lids.
I decided to go for a single compartment to allow for larger items to be stored, such as umbrellas, etc.
It can always be divided up later if required, or even use baskets of some sort.

The back wall is just going to be some simple panelling using 6” x 1” poplar boards at the top and bottom and 3” x 1” poplar for the verticals.

The cubby holes will be 10” high internally, 12-18” deep (I haven’t decided yet).

I have deliberately over engineered it as I want all of the frame and edges to be chunky and I figured the easiest way to do that was to clad 2x4 in plywood and finish the face off with poplar.

What follows is my plan for the seat, which has two hinged lids.
Rather than type it all out, I’ve just saved my project plan as images and attached them to the post.

Slide1.PNG Slide2.PNG Slide3.PNG Slide4.PNG Slide5b.png Slide6b.png

I would appreciate any feedback, suggestions, or gotchas which I may have overlooked.


Regards
 
Last edited:

woodworker2000

Christopher
Corporate Member
I like the idea. I didn't give this a lot of thought but some small things you might want to consider:
- You might want the area under the bench to have some ventilation holes/slits if you are going to us it to store wet/damp umbrellas or shoes (have any teenage boys in the house who will keep athletic shoes in this area???);
- Any desire/need to incorporate an electrical outlet in the plan (maybe a charging station for electronics)? If you have an electrical outlet, you could easily add a switched light in the area if you decide you want one as you are building the insert;
- For the coat-hanging area, I wouldn't build it to accommodate anything longer than a "mid-length" coat unless you wear a full-length coat on a regular basis. In my family, all of the coats/jackets we wear on a regular basis are waist length or a little lower (I can't recall what the correct term is for a mid-length coat);
- Will this extend floor to ceiling? If so, you might consider putting doors on the top cubby area. Since those cubbies seem to be so high up, you might not be accessing them regularly and might want to "hide" whatever you put in there.
 

Brogan

New User
.
Thanks for the feedback.

The closet backs onto another closet in the laundry room, so putting ventilation in would be fairly easy, so I'll definitely consider it.

I did consider electrical outlets but this area is just a transition area from the garage to the house (see the attached floor plan), so it's unlikely we would charge anything there.
There is already a ceiling light so no problems there.

I would like to keep the coat hanging height to mid length coats but my wife is one of those people who shivers when it drops below 30C :rolleyes: so she has a lot of long coats.
I may though just relegate those to the closet in the laundry room ;)

I did originally consider having cupboards with doors above the cubby holes, up to the ceiling, but they would have been 7' off the floor and totally impractical without using steps to reach them.
That is actually an optional 4th step on the plan though, so they may make a return if I drop the cubby holes down a bit.

It's going to be an expensive first project as I have no tools at all (we moved over last year from the UK).
I could pay someone to do it for me but once I've purchased the tools, I'll be able to do other projects for just the cost of the materials.

Thanks again for the comments.
 

Attachments

  • floorplan.png
    floorplan.png
    93.3 KB · Views: 153

redknife

New User
Chris
Brogan,
Welcome to the site. Feel free to add a post to The 'Who we are'. I am curious as to your plan for the lid joinery?
At any rate, lots of ways to skin this cat. I do think this could be made much simpler and with much less wood. You also have designed exposed poplar end grain which will be less cosmetically satisfying. Personally, I would build a 3/4" plywood box with plywood dividers (extra lid support) to fit the space. You could use your Kreg screws for that box construction. I'd use either prefinished plywood or high quality plywood from a non-borg supplier. Add hardwood edge trimming to exposed plywood edges. Tack any trim to the front as you please. For the bench lid, I would favor edge jointed hardwood but you could use 3/4 plywood (again assuming underlying support) with hardwood edging. If you wanted to omit middle supports you could use a torsion box design on the lid. The back wall,etc is pretty self-evident.
Keep in mind that constructed walls are rarely flat and square, so you'll need to think about scribing or otherwise concealing wall-wood gap variation.
Just some thoughts off the cuff- good luck.
 

Raymond

Raymond
Staff member
Corporate Member
+1 to the ventilation holes and to the idea of at least one electrical outlet - you may want two.

You might want to make that large storage area under the seat into shoe boxes 4-6 square ones and one tall one. You can always add the umbrella stand to either side of the "hall tree"
Hall Tree.jpg
 

Brogan

New User
.
Brogan,
Welcome to the site. Feel free to add a post to The 'Who we are'. I am curious as to your plan for the lid joinery?
At any rate, lots of ways to skin this cat. I do think this could be made much simpler and with much less wood. You also have designed exposed poplar end grain which will be less cosmetically satisfying. Personally, I would build a 3/4" plywood box with plywood dividers (extra lid support) to fit the space. You could use your Kreg screws for that box construction. I'd use either prefinished plywood or high quality plywood from a non-borg supplier. Add hardwood edge trimming to exposed plywood edges. Tack any trim to the front as you please. For the bench lid, I would favor edge jointed hardwood but you could use 3/4 plywood (again assuming underlying support) with hardwood edging. If you wanted to omit middle supports you could use a torsion box design on the lid. The back wall,etc is pretty self-evident.
Keep in mind that constructed walls are rarely flat and square, so you'll need to think about scribing or otherwise concealing wall-wood gap variation.
Just some thoughts off the cuff- good luck.

Thanks, I posted here yesterday: http://www.ncwoodworker.net/forums/showthread.php?t=61219

The lid I'm not certain of the best way to do it.
I was considering a simple frame around the ply, with pocket screws and glue but I'm not sure how well that would hold up - a 2" edge may be okay for that but the 3" may not.
The other option is to cut a tongue around the ply with grooves in the poplar.

I'm not too worried about the small bit of end grain at the front of the seat and on the lids - our kitchen is shaker style with the same construction method - I don't want to use mitred corners as I want it to look the same.

I fully expect the walls to be out so I'll definitely need to scribe the side pieces - I don't want to use trim to cover any gaps - I'm all about clean, square edges :)

Thanks for the input.
 

Brogan

New User
.
You might want to make that large storage area under the seat into shoe boxes 4-6 square ones and one tall one.
Thanks Raymond.

I considered all of the options including cubby holes, drawers, cupboards, etc.
In the end I decided on the compartment with lids as my preferred option.
 

Brogan

New User
.
Based on the feedback so far, I'm going to revise the plan.

The house won't be ready for 6-8 months anyway, so plenty of time to make changes and fine tune it.

I'm going to look at doing a simpler framework - possibly using 2 sheets of ply to get a minimum 1 1/2" thick walls, faced with 1 1/2" poplar.
I want the cubby holes to have flush faces/sides and 3/4" is too thin for the frame (it looks cheap), hence why I need to use two pieces of ply.

I'm likely going to get rid of the frame and ply in the interior of the seat - the floor is tiled so I may as well just use that as the base - it will be more hard wearing than painted ply anyway, and more resilient to water (optionally I can use plastic trays/liners).
I'll run a clear silicone bead around the base of the ply on the sides, to stop any water seeping under the bottom edge.

I'm going to drop the height of the hooks - the wife's already been told she can't hang her long coats there ...

That means the cubby holes will be lower, so I'm going to look at having two rows with a slightly smaller height.
The top row can be used for storing hats/scarves/gloves etc. in the summer and then switch it around in the winter.

Back to the drawing board :D

Thanks everyone.
 

Jeff

New User
Jeff
The OP (Paul Brogan) is planning/designing his drop zone area in their new home and I told him I'd have a go at it with SketchUp (he doesn't have SU but is going to have a look at it on his computer).

The area is an alcove in the mud room with a tile floor (the house plan is above).

Alcove:Brogan1.jpg


A quick rendition based on his dimensions earlier in this thread. An end view cut-away for clarity. He intends it to be a built in and fastened to the wall studs so a free standing unit is nixed, nada, zilch, etc.

The lower box will be for storage and will have two hinged lids for seating and easy access. The cubby hole section will be fastened to 3 walls for vertical support.

Alcove:Brogan2.jpg


Dimensions are a bit seat-of-the-pants on my part.

The floor is now open for discussion, comments, critique, advice.


Brogan

New User
.
Thanks Jeff, that looks like a decent program - the renders look great.

Based on all the feedback and stuff I've read around the forum, some of the dimensions have changed and I've adopted my approach to how to do achieve some of it, but the overall design is the same (other than there are two rows of cubby holes).

I'm looking forward to getting started on it, once we move in.
 
Status
Not open for further replies.

Premier Sponsor

Our Sponsors

Top