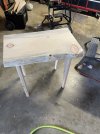
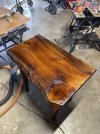
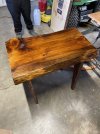
Hey all,
So like in my intro I stated being a new woodworker. Being able to fix almost anything, I’m at a loss of how to resolve the subject issue.
When working with much smaller knife handle scales, I’ve successfully used CA glue (sans accelerator) with zero issues.
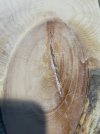
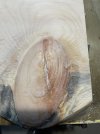
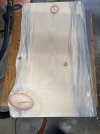
However, I’ve been initially defeated with this first table project. The knot splits are relatively large, with the largest being ~4”x1/8”, coursing entirely through the 2” board. Initially thought it was working to stabilize/fill the split as with previous small scale experience. Then the glue stopped hardening. Didn’t have any accelerator so decided to try acetone…that was a fail.
Then I switched over to titebond clear…also a fail. I’ve now dug out most of the glue but remnants of both still are present and are holding tight as an unsightly white mess.
I know pine is not an ideal wood but since first project I thought on the cheap side. I’d rather not cut the defects out but have thought about routing them “clean” with an engraving bit…but then how best to fill.
I turn to the group for advice
Tom
So like in my intro I stated being a new woodworker. Being able to fix almost anything, I’m at a loss of how to resolve the subject issue.
When working with much smaller knife handle scales, I’ve successfully used CA glue (sans accelerator) with zero issues.
However, I’ve been initially defeated with this first table project. The knot splits are relatively large, with the largest being ~4”x1/8”, coursing entirely through the 2” board. Initially thought it was working to stabilize/fill the split as with previous small scale experience. Then the glue stopped hardening. Didn’t have any accelerator so decided to try acetone…that was a fail.
Then I switched over to titebond clear…also a fail. I’ve now dug out most of the glue but remnants of both still are present and are holding tight as an unsightly white mess.
I know pine is not an ideal wood but since first project I thought on the cheap side. I’d rather not cut the defects out but have thought about routing them “clean” with an engraving bit…but then how best to fill.
I turn to the group for advice
Tom