Yet another dumbbell screw Moxon vise

pop-pop

Man with many vises
Corporate Member
This thread's vise had a couple of minor shortcomings (IMO, anyway) and I just finished this upgraded version. My goal was a superb vise for hand dovetailing in the way that I like to work. YMMV
image.jpeg


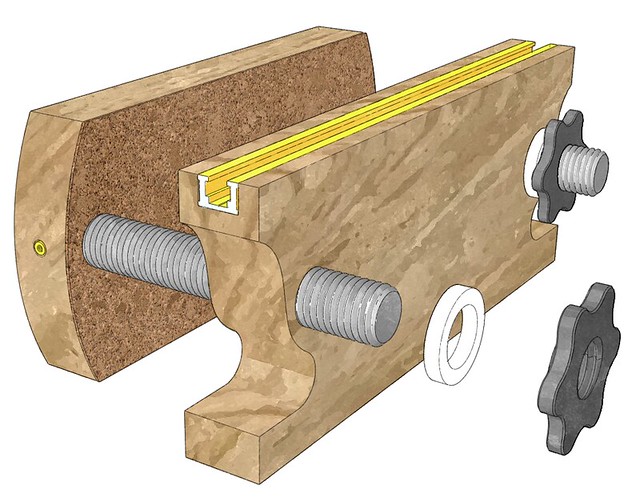
Some changes were larger clamping lugs, "crubber" on chop only, thicker stock, and a T-track.
image.jpeg


With the previous vise using clamps to hold the tail board for marking the pin board, I felt like I needed three hands. After much thought and discarded ideas, I decided on a T-track and Kreg track clamps to hold the tail board like this:
image.jpeg


The left clamp holds a Veritas saddle square which provides two surfaces to register the boards' top (or bottom) edges. First, insert the tail board so it overhangs the chop and temporarily clamp it with the right clamp. Insert the pin board from the bottom against the saddle square and the tail board and clamp it with the chop. Finally, align the tail board with the pin board, clamp, and you are ready to mark. This is a lot of words for steps that take well less than a minute!

image.jpeg
 
Last edited:

Dreuxgrad

Ed
Senior User
Mike, AKA Pop-Pop, you have out done yourself this time. Looks like you should be able to retire
from your vice of vise making. What edition is this one?
Ed
 

Hmerkle

Board of Directors, Development Director
Hank
Staff member
Corporate Member
Pending pop-pop's approval, I'll upload a PDF of a plan with full size patterns for the chops for his Dumbbell Screw Moxon Vise to the Resources section.

Dave - his hold-down rail appears to be in the rear chop - Or am I missing something?
I intend to make one with the screws moving through the vise so they are not sticking out the front...

But your drawing makes it look SO simple!:p
 

Dave Richards

Dave
Senior User
Dave - his hold-down rail appears to be in the rear chop - Or am I missing something?
I intend to make one with the screws moving through the vise so they are not sticking out the front...

But your drawing makes it look SO simple!:p

Hank, that's the rear chop in my model, too. The screws also extend only out the back like Pop-Pop's. The view is from the rear because it shows much more detail than viewing from the front.

It doesn't really look at that difficult to me other than cutting the dumbbell scree in half and cross drilling it for the pin.
 

Hmerkle

Board of Directors, Development Director
Hank
Staff member
Corporate Member
Hank, that's the rear chop in my model, too. The screws also extend only out the back like Pop-Pop's. The view is from the rear because it shows much more detail than viewing from the front.

It doesn't really look at that difficult to me other than cutting the dumbbell scree in half and cross drilling it for the pin.
Then in my mind, that is not going to work the way I thought it would...- standing "in front" you would have to reach around to the back to tighten the screws...
 

Dave Richards

Dave
Senior User
This thing isn't that big so reaching around the back wouldn't be that difficult. I guess this works well for the OP.

You could make it so the screws are tightened from the front, I suppose. You could thru-drill the front chop and add some sort of knobs on the end of the screws. Then secure the star knobs that come with the screw to the back of the rear chop. The overall length of the screw before cutting it in half is only 14 inches. It might be too short if you add knobs on the front.
 

pop-pop

Man with many vises
Corporate Member
Then in my mind, that is not going to work the way I thought it would...- standing "in front" you would have to reach around to the back to tighten the screws...

Having made numerous joints with this vise, I definitely prefer the screws going out the back. I use my left hand on the chop to temporarily hold the work and give the nuts a flick with my right hand and they spin into place tight enough so that the work does not fall. Then, I snug the nuts firmly.
 

pop-pop

Man with many vises
Corporate Member
In order to free my Veritas saddle square, I made a wooden equivalent for aligning the tops (or bottoms) of pin and tail boards. A hand cut box joint using the Moxon vise. Watch the glue dry atop the waxed paper.
image.jpeg
 
Last edited:

Hmerkle

Board of Directors, Development Director
Hank
Staff member
Corporate Member
Having made numerous joints with this vise, I definitely prefer the screws going out the back. I use my left hand on the chop to temporarily hold the work and give the nuts a flick with my right hand and they spin into place tight enough so that the work does not fall. Then, I snug the nuts firmly.
Cool!
Probably creating problems in my head that aren't there in real life since it is working for you!
I REALLY like the hold-down rail on the rear chop - I think that is ingenious!
 

Hmerkle

Board of Directors, Development Director
Hank
Staff member
Corporate Member
Thank you Dave for creating a plan much better than I could have!
It REALLY is nice and a clear and concise plan to go from!
Thank you for sharing pop-pop and Dave for you excellent drawings!
 

pop-pop

Man with many vises
Corporate Member
Twist drills and round surfaces do not play well together. To drill the 5/16" holes in the screws, I start the hole with a center drill and then switch to a regular twist drill.

image.jpeg


I have always called these center drills but industrial supplies call them countersinks. I keep a couple on my lathe's tail stock.
image.jpeg
 
Last edited:

Premier Sponsor

Our Sponsors

LATEST FOR SALE LISTINGS

Top