Table Saw Central

Jeremy Scuteri

Moderator
Jeremy
I have had table saw outfeed support on my "To Do" list for quite some time. Naturally another table saw is the obvious choice for outfeed support. I went with a Grizzly table saw and I finally have everything in place.

Here is the saw when it first arrived. I bribed some neighbor kids to move it from the driveway to my basement since my knee was messed up at the time. Definitely worth every penny. I purchased a hydraulic lift from Northern Tool that was on sale to help with some heavy pieces. Should have gotten one of these a long time ago.

188894


This worked pretty well, but the blocking was too big and was a pain because it was in the way when attaching bolts.
188895


All assembled.
188896


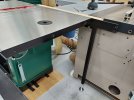
Next I had to move it next to the other table saw. The Harbor Freight Shop Crane came to the rescue here.
188897


188898


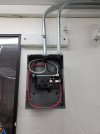
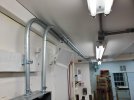
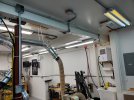
I had to get the new saw in the same plane as the existing saw. A piece of plywood to get close and shims after that. The plywood is screwed to the floor and there is wood blocking around the saw to keep it in place. I also ran dust collection to the saw. I had to add a new Wye to the existing run down the column.
188902
 

Attachments

  • 20190810_204722.jpg
    20190810_204722.jpg
    1.3 MB · Views: 212
  • 20190810_204736.jpg
    20190810_204736.jpg
    704.7 KB · Views: 192
  • 20190810_204808.jpg
    20190810_204808.jpg
    839.8 KB · Views: 194

Jeremy Scuteri

Moderator
Jeremy
I filled the small narrow space between the saws with a few pieces of hardwood glued together. I put double stick tape on a couple of jointed 2x4 scraps to hold the piece at the right height and then shimmed it and screwed the piece in place from the underside.
188905


188906


Next was filling in the "holes". I put in some aluminum angle iron to support the mdf panel. Two 3/4" thick pieces glued and screwed together with hardwood edge banding.
188904


188907


Clearance holes for the bolts.
188908


In place. I had to cut a shallow groove along the edges to recess the panel into angle iron supports to get at the right height. Again screwed in from the underside.
188909


188910


Same kind of deal on the other side, but a larger panel and this one was blocked up and shimmed in place. Again screwed form the underside through the angle iron.

188911


Installed with dados for the miter slots.
188912


Support for both saws.
188913
 

Attachments

  • 20190818_173119.jpg
    20190818_173119.jpg
    1.1 MB · Views: 172

nn4jw

New User
Jim
Something that caught my eye is this roll around chest.

188925


Jeremy, did you build that? Are the drawer fronts solid or veneered? If you already discussed this cabinet in another thread please point me to it. And finally, what do you store in it?

I ask because I've been thinking about building something similar but taller for my chisels and planes and such. I really like the looks of yours.
 

nn4jw

New User
Jim

Jeremy Scuteri

Moderator
Jeremy
Thanks everyone. I'm really excited about this addition to the shop.

Speaking of the knee, how is it feeling?
It is slowly feeling better. It definitely got instantly much worse right after surgery, but I don't think that is unexpected. Lots of swelling to deal with initially. I just had my first physical therapy session yesterday, so I am on the right path.


Why? Because every shop needs two table saws! :p Great job on getting the second on in place and aligned.
I learned it from watching you Bill! :)


Something that caught my eye is this roll around chest.

View attachment 188925

Jeremy, did you build that? Are the drawer fronts solid or veneered? If you already discussed this cabinet in another thread please point me to it. And finally, what do you store in it?

I ask because I've been thinking about building something similar but taller for my chisels and planes and such. I really like the looks of yours.

I did build the shop cart. It is veneered with scraps from a veneer run back in 2013 (https://ncwoodworker.net/forums/ind...rsday-mar-21-friday-mar-22.48241/#post-439714). It was my first time using veneer, so shop project seemed like a good choice.

Here are links to the build:
Sketchup Modeling: https://ncwoodworker.net/forums/index.php?threads/shop-cart-w-drawers-sketchup-model.54601
Cabinet Construction: North Carolina Woodworker
Veneering and Completion: https://ncwoodworker.net/forums/index.php?threads/shop-cart-completed-4-26-2015.55938/#post-515378
 

drw

Donn
Corporate Member
Jeremy, what an awesome shop! The second tablesaw is a great addition...I am also impressed with all the equipment you have to make shop-life easier, especially the crane and lift.
 

Jeremy Scuteri

Moderator
Jeremy
Jeremy, what an awesome shop! The second tablesaw is a great addition...I am also impressed with all the equipment you have to make shop-life easier, especially the crane and lift.

I wish I had gotten both of those long ago. I didn't get either of them until I hurt my knee. They helped a lot.
 

JimD

Jim
Senior User
An engine lift was my backup plan when I got a Sawstop PCS. I managed without it by tilting and rotating the saw and avoiding picking it up. My son has one he volunteered but they are relatively inexpensive at Harbor Freight. Given the infrequency of use and limited storage capacity, borrowing one was attractive.
 

sawman101

Bruce Swanson
Corporate Member
Your shop becomes more amazing to see every time you post a photo. When I was at your shop a year ago, it was amazingly neat and well laid out with top of the line machinery then Jeremy, but now I wanna see you make something for your wife or kids! You rock brother!
 

Premier Sponsor

Our Sponsors

LATEST FOR SALE LISTINGS

Top