Some advice on creating a replacement pew arm

Bill J

Bill
User
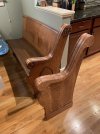
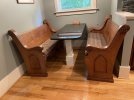
I have seen several posts about renewing/resizing old church pews so I thought I'd ask for some help. My kitchen seating is an old pew that was cut to match the kitchen banquette. It was here when I bought the house and LOML and I both love the look. The problem is that when it was installed, it was cut too short and has about an 8 inch gap between the end and the wall so things keep getting dropped in the gap. My guess is that the carpenter who installed it cut it to length to match the table and then discovered that you couldn't get in or out because of the arms so they just moved it out enough to allow passage. So I decided to build a matching end and arm to finish the bench.
Here is the problem....
I have created a pattern to match the shape and am in the process of cutting, routing, and gluing 4, 3/4 think pieces of quartersawn oak to make matching arms. But the arm has a rather complex groove pattern in the top. After going through all my router bits and looking at the inventory at every online store, I have been able to closely match the groove pattern (see photo of SWP test piece) but have to use a sanding block pattern to create the final rounded center. Hand sanding that much oak is something I am willing to do (and forgo the gym that day) but I'd rather not. So I am asking this esteemed group of experts for any ideas.

2022-01-29 12.23.36.jpg
2022-01-29 12.23.51.jpg
2022-01-29 12.24.01.jpg
 

JimD

Jim
Senior User
I agree with Mark's scraper suggestion. McMaster Carr may also be a source of material to make a scraper out of. They sell a wide variety of materials and normally provide very good service. A card scraper could also be reshaped to what you need, I think.

I had to read your post a couple times but I think I understand and I agree with your guess as to why you have the gap at the wall. I've cut down pews several times now including one that was upholstered like yours. It is much easier for me to do the solid mahogany ones that are not upholstered. I have a 12 foot long one I did not cut down in my house. When my church decided to get rid of a bunch of pews we had a lot more requests for cut down pews than we had end pieces. None of us wanted to make the end pieces like you are working on. Our pews were simpler with painted MDF for most of the piece but somewhat ornate mahogany moldings on the top and bottom. The bottom molding is straight so no big deal but the top is curved like yours and we just did not want to attempt it. I commend you for taking on a pretty challenging project.

Is extending the bottom and back to the wall another option to consider? I mean make a new bottom and back that are long enough to leave the one end where it is. They look like they would be a lot easier to make. Probably more material but much simpler wood pieces (no curved moldings).
 

Claus

Claus
User
Flip them around so that the existing arm is up against the wall and use the armless end for access to the table???
 

creasman

Jim
Staff member
Corporate Member
I make custom scrapers for use by hand or mounted in a scratch stock from old handsaw blades. Just score the blade with a rototool or file and snap off the piece. You're in for a lot of hand work. They increased the arm thickness by applying the side pieces at about 45 degree angles to uprights (hence the crack due to expansion of the upright). The grain will be at opposing angles the whole way.

Begin by carefully marking the grooves using a marking gauge or pencil. Start removing material with carving tools. Find a sweep that matches the groove and remove as much material as you can. The grain will keep switching directions on you so you'll have to keep that in mind as you work. After that go with a curved rasp like this one. Finally, finish with the scraper. By the time you get to the scraping work there should be very little material left to remove. Use the scraper mounted in a stock to make it all uniform.

Keep us posted on how it goes.
 

Mark Johnson

Mark
Corporate Member
If you haven't glued yet, I would look for a router bit that shaped each of the four sections before gluing. They clearly are the same shape. Shape them and then glue together. You will still have some clean up, but not too much.
 

Bill J

Bill
User
If you haven't glued yet, I would look for a router bit that shaped each of the four sections before gluing. They clearly are the same shape. Shape them and then glue together. You will still have some clean up, but not too much.
That was my initial plan and I think I just figured out how to use a large roundover bit to get the curve I want. I'll need to test it on scrap several times before I make a any real cuts but I think it will work. There will still be a lot of hand sanding!
 

Bill J

Bill
User
I agree with Mark's scraper suggestion. McMaster Carr may also be a source of material to make a scraper out of. They sell a wide variety of materials and normally provide very good service. A card scraper could also be reshaped to what you need, I think.

I had to read your post a couple times but I think I understand and I agree with your guess as to why you have the gap at the wall. I've cut down pews several times now including one that was upholstered like yours. It is much easier for me to do the solid mahogany ones that are not upholstered. I have a 12 foot long one I did not cut down in my house. When my church decided to get rid of a bunch of pews we had a lot more requests for cut down pews than we had end pieces. None of us wanted to make the end pieces like you are working on. Our pews were simpler with painted MDF for most of the piece but somewhat ornate mahogany moldings on the top and bottom. The bottom molding is straight so no big deal but the top is curved like yours and we just did not want to attempt it. I commend you for taking on a pretty challenging project.

Is extending the bottom and back to the wall another option to consider? I mean make a new bottom and back that are long enough to leave the one end where it is. They look like they would be a lot easier to make. Probably more material but much simpler wood pieces (no curved moldings).
Extending the bottom and back was an option that we considered along with making a storage box to fill the space. I was worried that the back and seat would have a seam and there is no cushion on the back. And I decided that this would really be something challenging (boy was I right).
 

Mark Johnson

Mark
Corporate Member
That was my initial plan and I think I just figured out how to use a large roundover bit to get the curve I want. I'll need to test it on scrap several times before I make a any real cuts but I think it will work. There will still be a lot of hand sanding!
I suspect that it might take two bits. I'm guessing a large roundover and then a fairly large cove bit for the deepest portion (probably only a minor cut from the cove bit. So probably 3 passes on a router table.
 

Rick Mainhart

Rick
Corporate Member
Hi Bill,

1/4" radius bit on the edges, then use a 1/2" ball nose bit to cut the two coves. Looks pretty easy on a router table.

Hope this helps.

Regards,

Rick
 

Bill J

Bill
User
Hi Bill,

1/4" radius bit on the edges, then use a 1/2" ball nose bit to cut the two coves. Looks pretty easy on a router table.

Hope this helps.

Regards,

Rick
Hi Rick,
I can't use a standard bull nose because of the curvature of the arm and the location of the groove but I found this bit on Woodworker Supply which will work.
1643896254954.png
 

Bill J

Bill
User
I finally finished the pew arms! This is one of those projects that really stretched my skill and made me learn some techniques. Getting the finish to match was a challenge too.
 

Attachments

  • 2022-09-19 17.22.06.jpg
    2022-09-19 17.22.06.jpg
    2 MB · Views: 108
  • 2022-09-22 14.18.54.jpg
    2022-09-22 14.18.54.jpg
    5.5 MB · Views: 105

Premier Sponsor

Our Sponsors

LATEST FOR SALE LISTINGS

Top