
You are using an out of date browser. It may not display this or other websites correctly.
You should upgrade or use an alternative browser.
You should upgrade or use an alternative browser.
Raised panel question
- Thread starter Dreuxgrad
- Start date
I do the rails and stiles first, then the panel. You can adjust the panel thickness (by rabbeting it if it's too thick), but not the width of the dado.Making just two panel doors for the house.
Does it matter if the rails and stiles are shaped before
doing the cove and relief on the panel?
Or should I run the panel first?
Same principle as doing mortise and tenon. Mortise first, adjust the tenon to fit.
Does it matter if the rails and stiles are shaped before
doing the cove and relief on the panel? Absolutely do the sticking first. Assemble the frame and measure the exact size for the panel. If the panel(field) is made of wood that expands make adjustments for the swelling.
Like your photo in the request above, you want to finish the panels BEFORE you assemble the door.
Or should I run the panel first? NO.
Technically flush is not a raised panel, but rather a bevel panel. The bevel panel was born when wide belt sanders became popular, allowing the whole door to be sanded in one pass.If its a matched door set it wouldn't matter.
That said, I always run the rails and stiles first, then match the panel because I usually make the panel face flush with the frame.
Does it matter if the rails and stiles are shaped before
doing the cove and relief on the panel?
IMO, two router tables is a must. Having to remake a rail or stile often happens for one reason or another.
Also, if your rail stock is wide, consider doing the cope cut before ripping to width. Potential benefits are less tearout and better control of the stock.
I agree with what has been said but will say it my way in case that is useful. The reason to cope and stick first is that establishes where the groove for the panel will be. If the panel will be recessed, it is less important to cope and stick first. But if they are all the same thickness, it is important that the shaped area of the panel removes the right amount of material from both sides to have everything flush.
When doing the cope and stick, you cope, cut the end grain, first. That is because it tends to result in a little tearout that can then be removed when you do the sticking, the cut along the grain. So you cope and stick the frame, in that order, then raise the panel. Then I sand the panel and the inside of the frame and put a couple coats of finish on them before assembly. After assembly sand the frame joints flush and then finish the frame and when it has two coats, I put the last coat on everything. The reason to finish the panel before assembly is because it may shrink and show an unfinished edge if you don't.
When I can, I also like to cope a wider piece. That will eliminate some of the tearout since it only occurs as the bit exits the workpiece. So if you make 4 two inch rails from a 8.5 inch piece of wood only one of them would have tearout if you cope before cutting to width. I usually use a coping sled, however, which has a backer piece so it is not as important.
Well said, Jim...
I agree with what has been said but will say it my way in case that is useful. The reason to cope and stick first is that establishes where the groove for the panel will be. If the panel will be recessed, it is less important to cope and stick first. But if they are all the same thickness, it is important that the shaped area of the panel removes the right amount of material from both sides to have everything flush.
When doing the cope and stick, you cope, cut the end grain, first. That is because it tends to result in a little tearout that can then be removed when you do the sticking, the cut along the grain. So you cope and stick the frame, in that order, then raise the panel. Then I sand the panel and the inside of the frame and put a couple coats of finish on them before assembly. After assembly sand the frame joints flush and then finish the frame and when it has two coats, I put the last coat on everything. The reason to finish the panel before assembly is because it may shrink and show an unfinished edge if you don't.
When I can, I also like to cope a wider piece. That will eliminate some of the tearout since it only occurs as the bit exits the workpiece. So if you make 4 two inch rails from a 8.5 inch piece of wood only one of them would have tearout if you cope before cutting to width. I usually use a coping sled, however, which has a backer piece so it is not as important.
I have three shapers set up to doors two with power feeders and one with a pneumatic jig to do the copes with zero tear-out. It really does not matter to me what happens first or last. I lay out my sizes and just stick to accurate dimensions, so everything fits perfect.
It's not a must for the hobbyist. Just run the stiles, then rails, checking quality and fit of the joints and finished dimensions as you go. THEN run the panels. Very unusual in my experience to need to re-run the rails or stiles because of an issue with the panels.IMO, two router tables is a must. Having to remake a rail or stile often happens for one reason or another.
<snip>
I guess one could mess up the finishing badly enough to re-run the R&S, but that means re-running the panel too. Maybe messing up the hardware install - but I test-install the hardware on my test/scrap pieces from the R&S so...
-Mark
I always keep a few scrap pieces with the rails and stiles routed for future projects. It makes setup easy.I guess one could mess up the finishing badly enough to re-run the R&S, ...
As for messing up, I've managed to put the tenons on the wrong pieces. But that's stupidity, not a panel error.
It's also an excellent way to create scrap pieces for future setup
")
Here is the "sticking" for the doors of a desk and bookcase that I photograped years ago. The stiles are not wide but the rails are both different and wider than the stiles. You will note the tenons are full depth and more and the stiles are long. This helps a great deal as you adjust and trim the joints. If you don't have the waste, you bang on the inside of the stiles and damage the bead.


This can be tricky as you cope the top rail to the shape of the cove on the stile. Having the tenons long to undo the pieces save lots of time.

This is the bottome rail before checking for errors in the joinery.

Closing the rail to the bottom and top the corner bead seems to be mitered but again this is coping and it will not open with time.


With the frame built it makes a handy border to figure how you want to match the panels. This is very important in some cases.

With the doors installed and the bookcase above the desk.
This can be tricky as you cope the top rail to the shape of the cove on the stile. Having the tenons long to undo the pieces save lots of time.
This is the bottome rail before checking for errors in the joinery.
Closing the rail to the bottom and top the corner bead seems to be mitered but again this is coping and it will not open with time.
With the frame built it makes a handy border to figure how you want to match the panels. This is very important in some cases.
With the doors installed and the bookcase above the desk.
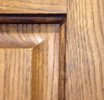
this has nothing to do with the OP's question, but I just had to say it...View attachment 187891
With the doors installed and the bookcase above the desk.
Dan,
You have shown a lot of techniques from your build of the secretary, but every time I see this picture, I simply sit back and stare at it thinking how lucky I am to know and met someone with this level of talent!
Premier Sponsor
Our Sponsors
LATEST FOR SALE LISTINGS
-
 SOLD -- $75: Gast moa v113 Vacuum Pump Veneer, 60" bag and board
- Started by peterdnight
- Replies: 1
-
GONE: Gladiator 5 cleats, 10 hangers, Paper Towel and Shelf
- Started by peterdnight
- Replies: 3
-
SOLD -- $100 Makita mac700 portable air + grex pin nailer + 2 others + 50' hose
- Started by peterdnight
- Replies: 1
-
-
