Precondition and stain water based fail

Status
Not open for further replies.

redknife

Chris
Corporate Member
I’m finishing up a simple bookcase. Maple plywood with solid maple face frames. There was some perceived urgency to get it done, so I decided to use GF water based clear pre-conditioned and water based stain. Plan was to topcoat with water based poly. In theory, each layer can be added fairly quickly assuming all goes well. I normally like to spray but I’m in a new house and not yet set up. I also normally use oil based stain or gel stain.
Everything was prepared and applied per instructions and videos.

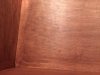
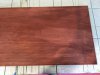
Here is where finishing met ruining:
attachment.php

attachment.php

If you look closely, you can see every sweep of the preconditioner. The preconditioner also accumulated in the edges of the cabinet. I had a helper for the preconditioner and we worked as quickly as possible- liberal application then immediately wipe off. I will say it dried very quickly. It is a clear product so you can’t really tell how much is accumulating.
I tried to salvage this with gel stain but the prestain conditioner wipes still showed through. I’m taking the finish down now to redo with different products. It is somewhat difficult to know how far to sand since the preconditioner is clear.

So, I can’t say this is a bad product but it is difficult to get right compared to other approaches. I like a number of Gf products and hate to relay a bad experience.
I definitely should have used the extender for the prestain conditioner, which is mentioned in their video.

Lessons learned: (some of these I’ve “learned” many times)
  • Sample boards- would have avoided most of this. Especially given a “new to me” product.
  • Don’t rush finish
  • These products aren’t for me but in the right hands I guess they are fine

Has anyone used the water based preconditioner and stain with success?
 

Attachments

  • 51C2BD14-E81D-471A-9993-AC24CC6869B3.jpg
    51C2BD14-E81D-471A-9993-AC24CC6869B3.jpg
    343.1 KB · Views: 231
  • B4EF817C-127F-4F63-AA95-30D721AB1E70.jpg
    B4EF817C-127F-4F63-AA95-30D721AB1E70.jpg
    367.9 KB · Views: 243

ehpoole

Administrator
Ethan
If I may ask, how precisely did you apply the pre-stain conditioner to the wood?

I ask as it looks as if the wood was spot treated whereas the usual protocol is to apply the pre-stain conditioner much like a wipe-on stain where you apply it, allow it to sit for a period of time, then promptly wipe off the excess. This helps to partially seal the most absorbent areas preferentially to help reduce splotching during the staining step (albeit at the expense of reducing the overall intensity of the stain).

Along the edges you have to be more careful because the exposed endgrain pores are going to aggressively wick up whatever you apply, essentially receiving an especially heavy treatment as they receive conditioner, stain, and finish both on their facegrain as well as absorbing it in abundance along the endgrain. Finely sanding the endgrain edges by an additional grit, or two, can help to greatly reduce this effect as well as moderating what is applied to the endgrain versus the facegrain.

The residual brush strokes are generally the result of finish either not having had enough time to settle before drying or, more likely with a water based finish, the result of dragging the brush back through finish that has already started to congeal and thus can no longer level out. With water-based finishes in particular, you really want to avoid brushing back over areas that have already had finish applied, which means working quickly to lay down the next stripe of finish before the one it will over lap with has had a chance to dry much, then not touching that area again until after the finish has finished curing. You may find that you need to thin the finish a bit when brushing if you can not work quickly enough or have unusually dry or hot ambient environmental conditions.
 

redknife

Chris
Corporate Member
If I may ask, how precisely did you apply the pre-stain conditioner to the wood?

I ask as it looks as if the wood was spot treated whereas the usual protocol is to apply the pre-stain conditioner much like a wipe-on stain where you apply it, allow it to sit for a period of time, then promptly wipe off the excess. This helps to partially seal the most absorbent areas preferentially to help reduce splotching during the staining step (albeit at the expense of reducing the overall intensity of the stain).

Along the edges you have to be more careful because the exposed endgrain pores are going to aggressively wick up whatever you apply, essentially receiving an especially heavy treatment as they receive conditioner, stain, and finish both on their facegrain as well as absorbing it in abundance along the endgrain. Finely sanding the endgrain edges by an additional grit, or two, can help to greatly reduce this effect as well as moderating what is applied to the endgrain versus the facegrain.

The residual brush strokes are generally the result of finish either not having had enough time to settle before drying or, more likely with a water based finish, the result of dragging the brush back through finish that has already started to congeal and thus can no longer level out. With water-based finishes in particular, you really want to avoid brushing back over areas that have already had finish applied, which means working quickly to lay down the next stripe of finish before the one it will over lap with has had a chance to dry much, then not touching that area again until after the finish has finished curing. You may find that you need to thin the finish a bit when brushing if you can not work quickly enough or have unusually dry or hot ambient environmental conditions.

I didn’t spot apply. As per instructions, I wet the surface entirely (in sections), then wiped off immediately with a shop towel. They have a video in addition to writtten instructions which I followed to the letter. No overbrushing on the stain. It immediately became apparent that the preconditioner was uneven and the source of the swipe marks.
 

Raymond

Raymond
Staff member
Corporate Member
Could it be possible that you had a container of bad product? It got frozen or has been sitting on a shelf since Moses parted the waters?
 

redknife

Chris
Corporate Member
I guess that’s possible, Raymond. I bought it and used it. My hypothesis is that it dried so fast that I didn’t leave an even coat, I.e. thicker areas that would have been wiped off but dried before wiping. 70 degree 50 Rh. Maybe the extender would have allowed a more effective wet down and wipe off. I wondered if anyone has used this specific product with success?
 

JeffH

Jeff
Senior User
I might be off base here, but what was the prep before applying the pre-conditioner? Possibly a tack cloth involved? Or any other application? Spot sanding with higher grit? Spot planing?
 

redknife

Chris
Corporate Member
I might be off base here, but what was the prep before applying the pre-conditioner? Possibly a tack cloth involved? Or any other application? Spot sanding with higher grit? Spot planing?
Good thoughts, Jeff. Think I was OK there, though.
Prep included the following. Never tack cloth. Face frame pieces were dimensioned, then run through drum sander. After assembly, the piece was evaluated with a raking light. Any defects were managed with 80 grit ROS, followed by uniform 80 grit RO sanding. Spot sanding therefore was “front-loaded”. Vacuum. 120 grit ROS. Vacuum. 180 ROS. Vacuum. 180 hand sand with grain. GF recommends max 180 for maple. Vacuum. Fresh cloth (t shirt type) clean. I use “the Woodman’s” technique for vacuuming where I first vacuum with the Festool mounted with a brush on the end. I use my clean hand to pick up dust and vacuum of my hand until no appreciable dust remains. One could posit that hand oils played a role but the variability in the finish was not in the form of hand swipes. I have used that technique many, many times without problem with waterborne and oil based finishes. At each step, I used raking light and touch to ensure uniformity.
Now of course this product must work somehow, so I am not trying to be defensive or forgo blame. Appreciate the comments.
 

Jeff

New User
Jeff
You may have had better success if the case was not assembled up before starting. Nonetheless, you were skimpy with the sealer coat so it began drying before you could wipe it off and even it out wiping with the grain (like the corners in pic 1).

I prefer Zinsser SealCoat diluted with DNA and slathered on liberally but no wiping off.
 

redknife

Chris
Corporate Member
You may have had better success if the case was not assembled up before starting. Nonetheless, you were skimpy with the sealer coat so it began drying before you could wipe it off and even it out wiping with the grain (like the corners in pic 1).

I prefer Zinsser SealCoat diluted with DNA and slathered on liberally but no wiping off.

Sure seemed like we heaped a bunch of product on the wood, but maybe you are right and it wasn’t enough. Used 2 pints of preconditioner on the bookcase. It’s a gel like consistency. We smeared it around and it just dried in a flash. For insight, the lighter areas in the corners have more preconditioner product. Maybe the best summary is ‘tried something new and messed it up’ :) Hopefully someone can learn from the story and discourse.
 
Status
Not open for further replies.

Premier Sponsor

Our Sponsors

Top