I have an older Porter Cable belt sander & shortly after starting to use it today (less than 2 minutes) noticed it was getting very hot, lost some power, and had an excessive amout of blue sparks coming from the motor housing. I haven't had any problems with it in the past. Any idea what's going on with it?

You are using an out of date browser. It may not display this or other websites correctly.
You should upgrade or use an alternative browser.
You should upgrade or use an alternative browser.
Porter Cable Belt Sander Problem
- Status
- Not open for further replies.
First the disclaimer!
Diagnosing electrical problems sight unseen is like getting a haircut over the telephone.
The usual suspect with universal motors are the brushes. If they're not worn out, there could be dust buildup restricting the tension applied to the commutator. Try blowing air around the brush area first, but check your brushes annually.
Good luck,
From the description, my money is on one, or both, carbon brushes having disintegrated -- if you are lucky. If you are unlucky the windings overheated (possibly in prior use), shorted out, and took the brushes with them. Universal motors pack quite a punch when everything is going good, but once they overheat (for whatever reason) they tend to self-destruct in a blaze of glory (brilliant sparks, flames, fragmented carbon, and molten copper). DAMHIKT.
That your motor still turns under power will likely be in your favor so long as the commutator has not been severely damaged.
Hopefully all you'll need are new brushes, though I have lost a couple of motors over the years when cutting and grinding steel.
That your motor still turns under power will likely be in your favor so long as the commutator has not been severely damaged.
Hopefully all you'll need are new brushes, though I have lost a couple of motors over the years when cutting and grinding steel.
Which "Older" sander you have can make a difference.
Some of the inexpensive older sanders has a sleeve bearing in one end of the armature. That sleeve wears and allows the armature to drift very close to the field coil. The closer it gets, the worse the problem can become until the armature finally touches the field coil and shorts out one or the other or both. With ball bearings, sometimes the bearing's lubricant fails and the bearing seizes. The commutator (rotor) will spin inside the bearing and wear, allowing the outside of the commutator to approach contacting the field coil.
Another potential place to look is at the brush holding device. On many of the older Porter Cable sanders, this was held to the body with a little set screw pressing against a phenolic outer insulating cylinder. This setscrew can come loose allowing the brush to rotate slightly out of parallel with the commutator bars. Remove the brushes. Observe as to whether or not the rectangular brush slot aligns with the copper commutator bars below.
The brushes are the first thing to check. They should be at least as long as they are wide at their widest point.
Sometimes the brush spring fails and the brush doesn't press against the commutator bars as it should. A failed spring will be real obvious when removing the brushes.
There's a copper wire going to the back of the brush to the top of the brush assembly. Observe whether or not those connections are good.
Loose screws on the housings can allow the the commutator and field coil to mis-align.
I like the analogy about getting a haircut over the phone. With electrical problems, you never know for sure until its repaired.
Re: Porter Cable Belt Sander Problem (LONG)
It helps if you first know what healthy brushes look like, so that is what I will tackle in this post.
Although brush assemblies come in many styles, if you analyze the two I focus on below you will notice certain commonalities present in all brushes: 1) the actual carbon/graphite brush, 2) a spring assembly that keeps the brush mated against the motor commutator as the brush wears, 3) a housing that retains the brush and allows it to be referenced againsg the motor housing and 4) an electrical connection to provide power to the brush.
NOTE: When you remove your brushes (or brush assemblies), you should make note of the orientation of the brush. Although the curvature is obvious when aligning brushes, you should also try to keep the brushes in the same orientation to ensure they maintain an optimal seating. This only applies to used brushes since they have already seated themselves to perfectly match the curvature of your motor's commutator relative to how their housing aligns with the commutator. I usually use a pencil or marker to mark a 'C' on the side that is closest to the power cord and I work ONE brush at a time so that I don't get brushes mixed up. When you reseat, or if you install new brushes, run the device at full speed under no load for several minutes to allow the brushes to fully reseat. Do not use the device under load until you have done this since freshly installed brushes may not be fully seated until the dervice has run for several minutes.
First an exaggerated outline of what an intact brush should look like. The curvature is exaggerated for clarity, in reality the curvature will be mor subtle.
 The following examples are from a Porter Cable 690 Router. I chose this motor as a starting point simply because it is a rather large motor with large brushes, which I felt would provide some good photos. This motor has very robust brush assemblies compared to many motors and is more indicative of better-quality higher-end universal motors.
 This is the servicable portion of the brush assembly. The unit consists of a graphite brush and integral spring assembly. Observe the curvature of the brush where it mates with the motor's commutator. Also notice there is plenty of length remaining in this bush, so many more years of service may be expected from this brush.
 Notice the smooth face where the brush mates with the motor's commutator. I little bit of wear along the trailing edge can be seen, but this is typical of normal wear. A brush in good condition will look much like this brush -- smooth faces, plenty of length, and no signs of abnormal wear, arcing or pitting.
 This photo shows the brush housing (brass housing at left), the graphite brush (center, just visible between brush housing and motor commutator), and the motor commutator (the circular array of copper conduction strips). Notice how intimately the brush and commutator mate with one another, indicative of a well seated brush. Also notice no obvious damage, pitting, or overheating in the commutator (the copper strips). The blackening is normal and is reside from the graphite brush -- it also provides lubrication between the brush and commutator. (Note: near the brush a small bit of dust -- likely Purpleheart -- is visible, this is not a defect in the commutator.)
 A view from another angle of brush housing, brush, and commutator. Also visible in the background are the motor windings.
 This is the brush housing and is where you insert the serviceable brush/spring assembly. Not shown is the brush/service cap which screws in place to lock down and secures the brush and spring assembly.
The following photos come from an old Ryobi 1/4-sheet Palm Sander. This is more indicative of the type of brush assembly found in many smaller as well as lower-end universal motor products.
 This is an overview of the rear end of the motor... Note the two brushes assemblies, left and right, in the brass housings. For this motor, each brush assembly is a compete assembly and must be replaced in whole (that is, the brush, spring, and housing are a single integral unit). You can also see the rear bearing and to motor commutator (copper strips in center).
 This closeup shows the curvature of the graphite brush. Notice the smooth face of the brush where it mates with the commutator. Also notice that, as is common in cheaper motors, this brush sits offset slightly so the left most portion of the brush has not yet seated to the commutator. Fortunately good contact is made with the portion that has seated. As this motor is used more in the future this brush will wear down some more and ultimately fully seat as a consequence of normal wear.
Also notice that there is still a good bit of travel left in this brush (this brush housing traps the brush, so additional length is located inside the housing -- the portion you can see is the wearable portion of the brush). We only need about 3/64" travel with this brush to ensure good contact. Also note that there is a spring internal to the housing which keeps the brush securely mated with the commutator.
 This is an overview of the complete serviceable brush assembly for this motor. Since the brush is an integral part of the housing, the entire assembly must be replaced when the brushes become worn. As noted earlier, as is common on cheaper motors you can see that this brush seats slightly off center relative to the commutator. As such, the curvature you would expect to see is shifted upward slightly with the lower portion of the brush not yet worn sufficiently to mate with the commutator at present.
To replace this assembly, disconnect the power cable via the quick disconnect. You then press the new assembly's brush against the motor's commutator, then press fit the entire assembly into the manufacturer-provided receiver for this brush assembly. Then reconnect the power cable. Afterwards you will want to run the motor no-load for about 5 minutes to allow the new brush assembly to seat with your motor. If possible, running the motor for 15-20 minutes before load is applied allows ever better seating. If you expect to need to run the motor at considerable load after installing new brushes, the longer you can allow it to run no-load to seat the new brushes the better (up to 30-minutes). The extra time allows the brushes to more completely mate with the commutator.
 This photo shows the brush mated with the commutator. Also inspect the commutator for any signd of pitting, arcing, melting, or other signs of damage. Especially inspect the commutator if your brushes disentigrated during use since they may have suffered extensive damage during the event.
 Another view of the brush assembly and commutator. Notice there are no signs of obvious damage to the commutator contacts -- no pitting, scratches, burning, or other signs of abnormal wear.
Of course, while you have the motor disassembled, go ahead and turn it through multiple revolutions manually. Exert lateral pressure on the motor assemblies. Look for any signs of wearing, rubbing, abnormal contact or friction with non-moving parts. Make sure there are no signs of excess runout in your bearings and that your bearings are spinning freely. These checks are especially important if you have noticed excessive vibration when in use since bearing (or sleeve) runout is typically the cause -- especially bearings subject to extensive lateral forces as is common with routers. Also check how the bearing seats into the motor housing, large lateral forces can distort the housing around the bearing allowing an otherwise good bearing to vibrate within its seat. This sort of repear involves some sort of shimming to restore a tight fit around the bearing (plastic, brass or copper foil, etc. work well for this).
With respect to where to obtain replacement brushes (as well as other parts)... The best source is nearly always the manufacture of your tool. Porter Cable is still in business. Visit their website or call their service number with your model number, type or revision code (if present) and serial number and ask them what part you need to order to replace the brushes, etc. In the case of brushes, always order them in pairs and replace both pairs at the same time.
Good luck restoring your sander. I hope this information proves helpful.
Thanks to both of you. When I pull the brushes out, how do I tell if they are shot? Also, where can I buy replacements?
It helps if you first know what healthy brushes look like, so that is what I will tackle in this post.
Although brush assemblies come in many styles, if you analyze the two I focus on below you will notice certain commonalities present in all brushes: 1) the actual carbon/graphite brush, 2) a spring assembly that keeps the brush mated against the motor commutator as the brush wears, 3) a housing that retains the brush and allows it to be referenced againsg the motor housing and 4) an electrical connection to provide power to the brush.
NOTE: When you remove your brushes (or brush assemblies), you should make note of the orientation of the brush. Although the curvature is obvious when aligning brushes, you should also try to keep the brushes in the same orientation to ensure they maintain an optimal seating. This only applies to used brushes since they have already seated themselves to perfectly match the curvature of your motor's commutator relative to how their housing aligns with the commutator. I usually use a pencil or marker to mark a 'C' on the side that is closest to the power cord and I work ONE brush at a time so that I don't get brushes mixed up. When you reseat, or if you install new brushes, run the device at full speed under no load for several minutes to allow the brushes to fully reseat. Do not use the device under load until you have done this since freshly installed brushes may not be fully seated until the dervice has run for several minutes.
First an exaggerated outline of what an intact brush should look like. The curvature is exaggerated for clarity, in reality the curvature will be mor subtle.
The following photos come from an old Ryobi 1/4-sheet Palm Sander. This is more indicative of the type of brush assembly found in many smaller as well as lower-end universal motor products.
Also notice that there is still a good bit of travel left in this brush (this brush housing traps the brush, so additional length is located inside the housing -- the portion you can see is the wearable portion of the brush). We only need about 3/64" travel with this brush to ensure good contact. Also note that there is a spring internal to the housing which keeps the brush securely mated with the commutator.
To replace this assembly, disconnect the power cable via the quick disconnect. You then press the new assembly's brush against the motor's commutator, then press fit the entire assembly into the manufacturer-provided receiver for this brush assembly. Then reconnect the power cable. Afterwards you will want to run the motor no-load for about 5 minutes to allow the new brush assembly to seat with your motor. If possible, running the motor for 15-20 minutes before load is applied allows ever better seating. If you expect to need to run the motor at considerable load after installing new brushes, the longer you can allow it to run no-load to seat the new brushes the better (up to 30-minutes). The extra time allows the brushes to more completely mate with the commutator.
Of course, while you have the motor disassembled, go ahead and turn it through multiple revolutions manually. Exert lateral pressure on the motor assemblies. Look for any signs of wearing, rubbing, abnormal contact or friction with non-moving parts. Make sure there are no signs of excess runout in your bearings and that your bearings are spinning freely. These checks are especially important if you have noticed excessive vibration when in use since bearing (or sleeve) runout is typically the cause -- especially bearings subject to extensive lateral forces as is common with routers. Also check how the bearing seats into the motor housing, large lateral forces can distort the housing around the bearing allowing an otherwise good bearing to vibrate within its seat. This sort of repear involves some sort of shimming to restore a tight fit around the bearing (plastic, brass or copper foil, etc. work well for this).
With respect to where to obtain replacement brushes (as well as other parts)... The best source is nearly always the manufacture of your tool. Porter Cable is still in business. Visit their website or call their service number with your model number, type or revision code (if present) and serial number and ask them what part you need to order to replace the brushes, etc. In the case of brushes, always order them in pairs and replace both pairs at the same time.
Good luck restoring your sander. I hope this information proves helpful.
I'm impressed with that very detailed and graphic answer. That took some time to put together. Very good photographs.
I'm impressed with that very detailed and graphic answer. That took some time to put together. Very good photographs.
Thanks, I spent about 2 hours pulling everything together and writing it up -- and I still made a bunch of typos (I really *used* to be a better speller!).
I thought this information might be useful not only to the OP, but other users who might need to service their universal motors in the future. These are not difficult motors to service -- pretty much just brushes and bearings as regular service items, and the occassional blowing out with compressed air -- but if you have never disassembled a motor before they can seem daunting initially.
Hopefully the post will prove useful to other woodworkers as well.
Re: Porter Cable Belt Sander Problem (LONG)
Without a doubt, this detailed reply to a brush problem is IMHO one of the most comprehensive and detailed answers I have ever seen on any forum. :thumbs_up You obviously know more about universal motors than what you are showing here. Thanks for the response. It should be added somewhere in the forum as a permanent reply for others to refer to.
Without a doubt, this detailed reply to a brush problem is IMHO one of the most comprehensive and detailed answers I have ever seen on any forum. :thumbs_up You obviously know more about universal motors than what you are showing here. Thanks for the response. It should be added somewhere in the forum as a permanent reply for others to refer to.
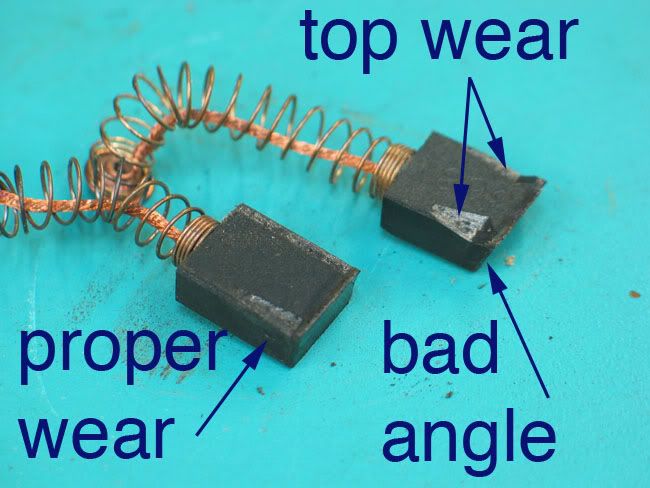
Coincidentally, I came across a failed brush last night on an old Delta router/shaper motor I was working on.
When I removed the brushes, I found this anomaly:
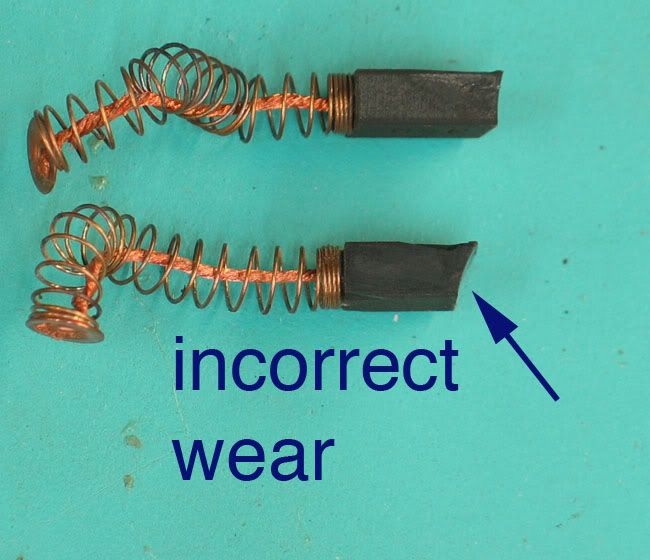
Not only was the angle wrong on one brush, but the top had worn in. Obviously something was wrong. The wear at the top of the brush was the tip-off. The brush holder was too far back out from the commutator.
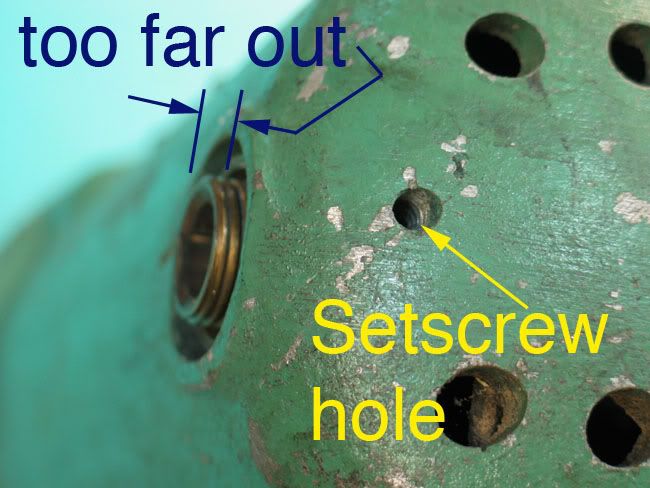
The brush holder had backed out somehow over the years. I stuck a screwdriver down in the setscrew hole, loosened the setscrew, and pushed the brush holder in until it was about 1/16" off the commutator. The older motors had a slotted setscrew. Newer ones have a socket head setscrew like the router in the above post.
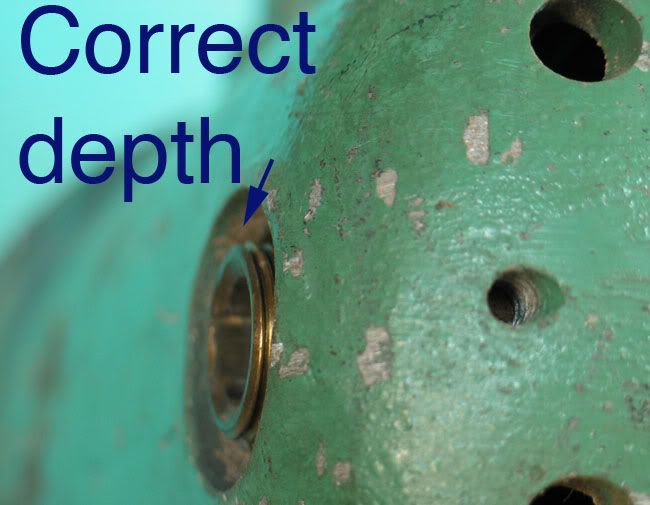
Here's the other side. Note how that end of the brush holder is fairly flush with the outer surface of the motor case.
With new bearings installed and the brushes correctly adjusted, the motor ran like a new one.
When I removed the brushes, I found this anomaly:
Not only was the angle wrong on one brush, but the top had worn in. Obviously something was wrong. The wear at the top of the brush was the tip-off. The brush holder was too far back out from the commutator.
The brush holder had backed out somehow over the years. I stuck a screwdriver down in the setscrew hole, loosened the setscrew, and pushed the brush holder in until it was about 1/16" off the commutator. The older motors had a slotted setscrew. Newer ones have a socket head setscrew like the router in the above post.
Here's the other side. Note how that end of the brush holder is fairly flush with the outer surface of the motor case.
With new bearings installed and the brushes correctly adjusted, the motor ran like a new one.
Great, comprehensive write ups. Ethan and Bob, how about one or both of you collating your posts into a tutorial and placing it into the DOWNLOAD LIBRARY, so that such a helpful work won't be lost when this thread goes away.
Great, comprehensive write ups. Ethan and Bob, how about one or both of you collating your posts into a tutorial and placing it into the DOWNLOAD LIBRARY, so that such a helpful work won't be lost when this thread goes away.
Joe, I'd be happy to try and merge the posts by Bob and myself sometime later this week. However, I am still relatively new to this site (and vBulletin) so I may need some help and instruction in properly placing and uploading the tutorial in the Download Library. I've only just begun to master uploading photos to the site -- so any tips are appreciated (particularly with regard as to how to place it in an optimal location for future users to locate). I am assuming PDF would be the preferred document format?
I'm sure others will find the information valuable, especially with Bob's timely addition, so it is worth preserving.
BUSTER: I'm glad our posts did their job and helped you troubleshoot your PC Belt Sander issue. That alone makes the tutorials worth the time and effort invested. I know there is no greater satisfaction than successfully repairing and maintaining your own equipment.
Good luck -- I hope it runs as good as new when you get your new brushes!
froglips (Jim Campbell) or Bas can get you on the right track. And thanks for taking on the project.
Re: Porter Cable Belt Sander Problem - TUTORIAL AVAILABLE
Tonight I uploaded the tutorial on Brush Maintenance and Inspection for Universal Motors, compiled from postings to this thread by Bob and myself, to the NCWW Download Library under the Tutorial section.
To view or download the Tutorial:
http://www.ncwoodworker.net/forums/downloads.php?do=file&id=300
I hope everyone finds this to be a useful reference. I will also create a new thread to announce the new tutorial for members who have not been following this particular thread.
REMINDER: Don't forget to rate the download after you review it.
Ok, I finally found a set of replacement brushes (very hard to find!). However, my problem still exists. It almost seems like it's under a heavy load & it begins to smell hot after 15-20 sec. Maybe I have a bad bearing somewhere? Any other thoughts?
Before I proceed, I should remind you that it is quite possible that the motor windings have suffered irreversible damage due to overheating. If this is the case then this motor is going to self-destruct shortly no matter what you do, so you may not have much to lose at this point. ALSO: with new brushes, there will be a period of time where excess ozone will be produced from the sparks that are created as the brushes seat. If it is ozone you smell then it may just be that the brushes are still seating, if it is other than ozone then that is not a good sign.
I would first disassemble your sander and see if the motor is connected via a belt to the sander transmission. If so, temporarily remove this belt, reassemble the sander to a point where the motor portion is fully assembled and then try running the motor for an extended period (atleast a few minutes if you can). If the motor spins freely in the bearings and if, under power, it sounds to be running at full speed, then the bearings are likely ok. If the motor sounds like it is under extreme load in this state, then it could be the bearings, but you would likely feel the resistance in the motor when it is powered off -- or you will feel excess vibration from the motor while it is running.
If the motor sounds to be running at full speed and not straining I would go ahead and run it for several minutes to break in the brushes. If it survives this several minutes of running without self-destructing then there is hope. If it self-destructs during this break-in period then you will be presented with a spectacular moment of excitement as it goes up in smoke, with sparklers, brief flames, followed by a motor better suited to life as a paperweight.
If the motor does appear to be straining when it is running free, then you might remove the bearings and take them to a local auto-parts store for replacement (or order from manufacturer, like you did for the brushes).
If the motor survives the break-in and doesn't smell any more, then you can try reconnecting the belt. If the problem returns then you will need to disassemble the transmission/drive gear assembly and inspect it for damage and lubrication. Once that is taken care of you will want to inspect the two belt rollers and their bearings -- make sure they turn freely. Again, if you find bad bearings here, replace them. Where appropriate add lubrication (but make sure not to over-lubricate; you don't want oil or grease all over your projects!).
Once you have troubleshooted the transmission and belt rollers, try running the sander without a belt installed and see if you still have a problem. If things go OK here, try installing a new belt and see what happens.
If, after all this you still have a problem, then you will have to decide how much more time, effort, and money you wish to invest in this tool -- only you can answer what it is worth to your. If you decide to give up -- or if the motor self-destructs early on -- then your next step is a trip to the hardware store for a new belt sander -- problem solved!
Good luck, let us know what you discover. I hope this helps you troubleshoot your problem.
Ok, I have finally fixed my problem...............just returned from my local Klingspor store!:wink_smil
If I'm interpreting the above correctly it was RIP for you sander? If so, I hope you enjoy your new toy.
If not, let us know what you discovered so that others may learn from the experience.
Enjoy!
- Status
- Not open for further replies.
Premier Sponsor
Our Sponsors
LATEST FOR SALE LISTINGS
-
-
Graco 395 FinishPro air assisted airless sprayer for sale
- Started by RobH
- Replies: 1
-

-
-