Seems @Scott H and I had the same idea of making our own floats. I just completed my set. I posted previously on making the handles. Here I'll describe my process for making a set of four floats -- two edge floats and two side floats. The difference in each pair is that one cuts on the pull stroke and the other on the push stroke. I'm not sure how important this will be for the side floats. However, there is a change in grain direction between floating the bed versus breast angle. Having both kinds of floats means you can always cut with the grain and (hopefully) eliminate tear out.
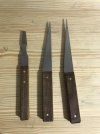
These are the completed floats, sharpened and ready to work. The blades are 7" long, give or take. I kept the angles at 10 degrees or less so that they would fit in the wedge slot. All come to a point that will allow them to work right up to the mouth.

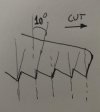
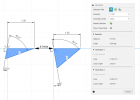
I began by ordering a 3' section of 3/16" x 1" O1 tool steel from McMaster-Carr (part number 9516K65). That was enough to make all four floats with about 14" left over. While it takes a fair amount of time making these the good news is that for less than the price of a single, new float you have four. I started with the edge floats since these are the easiest to file. First step is to cut the two blanks. The overlap in the angle means you can almost get two for the same length as one, saving a considerable amount of material.

Smooth up the sawn edges, cover with Dykem and layout the teeth. Mine are 3/16" apart. It just a matter of filing the teeth at that point. I have no idea what rake angle I used. These are cut with a standard triangular file. Make sure to have a slightly negative angle for the rake as these work like a file rather than a saw. Here, I'm just cutting/shaping the teeth. Before installing the handle I joint and sharpen the blade as the final step.

The side floats call for a little more thought in the planning stage. Had I separated these before filing the teeth it would have been difficult to clamp the triangular blade in the vise for filing. Instead, I laid these out as a pair and filed the teeth before cutting them apart. This requires a slight angle to the teeth rather than perpendicular to the side. Another benefit is that not only do you teeth both floats at the same time, but you get one push and one pull as well (b/c the layout has them facing each other). It's helpful to use a layout ruler that has 3/16" graduations.

Filing the teeth on these removes a lot of steel in comparison to the edge floats. It takes patience, a good set of files, and a hacksaw. I began by making a guide block with the angle matching the teeth. I pushed this against the steel bar as a guide for the hacksaw. Saw a notch about 1/32" deep to guide the file. I found I could cut about 4 teeth before moving the steel in the vise.
Next step was to use a square file with one scratch free side. Angle the file and run the scratch free side against one edge of the saw slot (i.e., what will be the tooth edge). With a coarse file I could remove the bulk of the material in a matter of 10-15 strokes. After this the final shaping is done with a standard triangular file. The Dykem acts as a guide to help keep you filing straight and true, and let you know when to stop.


A few words about files. Don't bother with the ones you find in hardware or big box stores. These aren't worth the money. Quality new files will cost you money, or you can keep your eye out at estate sales. I have purchased most of the files I use for around $2 each by looking for old files at these sales which still have a bite -- as most do. Purchase a file card and clean the files frequently as you work. I also keep a small whisk brush nearby to sweep away the filings as I work. These can clog the file or cause it to cut unevenly. Here are the files I used in this project.

Another piece of advice to "file" away is that wives, children and some animals absolutely cannot stand the sound of metal scraping agains metal (DAMHIKT). I plan my heaviest filing (and hacksawing) when I have the house to myself as my shop is in the basement.
As with the edge floats the final step before installing the handles is to joint and sharpen each. For the side floats I use a #400 diamond stone. A few passes over this evened the teeth. Apply a coat of Dykem and then use the triangular file to sharpen each tooth until the Dykem just disappears. With these wider teeth it's likely that a high spot is in the center of the blade. Careful, slow, steady passes allows you to sneak up on a straight, even tooth. File so that the Dykem disappears evenly across the tooth and stop when it's gone. That's about it.

Finally, I can get back to making the planes that started me on this side project.
These are the completed floats, sharpened and ready to work. The blades are 7" long, give or take. I kept the angles at 10 degrees or less so that they would fit in the wedge slot. All come to a point that will allow them to work right up to the mouth.
I began by ordering a 3' section of 3/16" x 1" O1 tool steel from McMaster-Carr (part number 9516K65). That was enough to make all four floats with about 14" left over. While it takes a fair amount of time making these the good news is that for less than the price of a single, new float you have four. I started with the edge floats since these are the easiest to file. First step is to cut the two blanks. The overlap in the angle means you can almost get two for the same length as one, saving a considerable amount of material.
Smooth up the sawn edges, cover with Dykem and layout the teeth. Mine are 3/16" apart. It just a matter of filing the teeth at that point. I have no idea what rake angle I used. These are cut with a standard triangular file. Make sure to have a slightly negative angle for the rake as these work like a file rather than a saw. Here, I'm just cutting/shaping the teeth. Before installing the handle I joint and sharpen the blade as the final step.
The side floats call for a little more thought in the planning stage. Had I separated these before filing the teeth it would have been difficult to clamp the triangular blade in the vise for filing. Instead, I laid these out as a pair and filed the teeth before cutting them apart. This requires a slight angle to the teeth rather than perpendicular to the side. Another benefit is that not only do you teeth both floats at the same time, but you get one push and one pull as well (b/c the layout has them facing each other). It's helpful to use a layout ruler that has 3/16" graduations.
Filing the teeth on these removes a lot of steel in comparison to the edge floats. It takes patience, a good set of files, and a hacksaw. I began by making a guide block with the angle matching the teeth. I pushed this against the steel bar as a guide for the hacksaw. Saw a notch about 1/32" deep to guide the file. I found I could cut about 4 teeth before moving the steel in the vise.
Next step was to use a square file with one scratch free side. Angle the file and run the scratch free side against one edge of the saw slot (i.e., what will be the tooth edge). With a coarse file I could remove the bulk of the material in a matter of 10-15 strokes. After this the final shaping is done with a standard triangular file. The Dykem acts as a guide to help keep you filing straight and true, and let you know when to stop.
A few words about files. Don't bother with the ones you find in hardware or big box stores. These aren't worth the money. Quality new files will cost you money, or you can keep your eye out at estate sales. I have purchased most of the files I use for around $2 each by looking for old files at these sales which still have a bite -- as most do. Purchase a file card and clean the files frequently as you work. I also keep a small whisk brush nearby to sweep away the filings as I work. These can clog the file or cause it to cut unevenly. Here are the files I used in this project.
Another piece of advice to "file" away is that wives, children and some animals absolutely cannot stand the sound of metal scraping agains metal (DAMHIKT). I plan my heaviest filing (and hacksawing) when I have the house to myself as my shop is in the basement.
As with the edge floats the final step before installing the handles is to joint and sharpen each. For the side floats I use a #400 diamond stone. A few passes over this evened the teeth. Apply a coat of Dykem and then use the triangular file to sharpen each tooth until the Dykem just disappears. With these wider teeth it's likely that a high spot is in the center of the blade. Careful, slow, steady passes allows you to sneak up on a straight, even tooth. File so that the Dykem disappears evenly across the tooth and stop when it's gone. That's about it.
Finally, I can get back to making the planes that started me on this side project.