
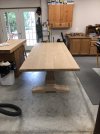
I finally put the last coat of finish on the table this weekend! Now all that remains is to get the table to my daughter's house in Jacksonville, FL. All things considered, I am very happy with the final result. I don't think I want to build another BIG project anytime soon (or ever, I am getting too old to manhandle large projects).


The finish schedule is a bit different than I typically use. Since the table was made for my daughter, I told her to find a finish she liked. While she was making a decision, I sanded the table to 220 and used a Timbermate slurry as a grain filler and sanded again to 220. As it turns out, the schedule she chose used a grain filler mixed with stain. So, in addition to the Timbermate filler the schedule is a follows:
1) 2 parts Old Masters grain filler to one part Weathered Oak Stain (Minwax), applied with a brush, allowed to sit for 20 minutes and excess wiped off and dried for 24 hours.
2) A second coat of stain applied, allowed to sit for 20 minutes and excess removed.
3) After 24 hours of drying, I began applying wipe-on poly (Minwax). The first two coats were gloss, all subsequent coats were satin finish. In total the top has 8 coats, the other parts received six coats.
4) I sanded after every second coat with a 1000 grit sanding pad and a Festool finish sander. ( I really like this approach, it does a great job of removing nibs but you don't worry about sanding through the finish.)
Not sure what I will be building next, but it will be a smaller project!
_______________________________
In recent days I have made good progress on the table. I was able to purchase some nice 5/4 QSWO from Scott Smith (thank you, Scott) for the tabletop. The table is so big (8'x42") that I built the top in sections. The top consists of seven 6" wide boards; I used dominos to secure the three boards on each side of the table. Putting a three-board section through the drum sander wasn't too difficult; once that task was completed I secured the two outside sections to a center board (dominos), so I ended up with a total of seven 6" boards on the top. Since the top was too big for me to manhandle through the drum sander, I smoothed the center board seams with a hand sander. Certainly not as efficient as the drum sander, but with patience and persistence everything blends nicely.
Originally, the two outer boards were over 8" wide, which I cut down to 6" and "folded" the 2" cutoffs under the table...thus, the 1" table top looks to be 2". I did the same on ends. (The top is now much too big to handle, but I have young neighbors). I have a little more sanding, but the next big phase will be to apply the finish. My daughter, who asked for the table, is coming up from Jacksonville, FL to supervise/approve the finish work.


A
The finish schedule is a bit different than I typically use. Since the table was made for my daughter, I told her to find a finish she liked. While she was making a decision, I sanded the table to 220 and used a Timbermate slurry as a grain filler and sanded again to 220. As it turns out, the schedule she chose used a grain filler mixed with stain. So, in addition to the Timbermate filler the schedule is a follows:
1) 2 parts Old Masters grain filler to one part Weathered Oak Stain (Minwax), applied with a brush, allowed to sit for 20 minutes and excess wiped off and dried for 24 hours.
2) A second coat of stain applied, allowed to sit for 20 minutes and excess removed.
3) After 24 hours of drying, I began applying wipe-on poly (Minwax). The first two coats were gloss, all subsequent coats were satin finish. In total the top has 8 coats, the other parts received six coats.
4) I sanded after every second coat with a 1000 grit sanding pad and a Festool finish sander. ( I really like this approach, it does a great job of removing nibs but you don't worry about sanding through the finish.)
Not sure what I will be building next, but it will be a smaller project!
_______________________________
In recent days I have made good progress on the table. I was able to purchase some nice 5/4 QSWO from Scott Smith (thank you, Scott) for the tabletop. The table is so big (8'x42") that I built the top in sections. The top consists of seven 6" wide boards; I used dominos to secure the three boards on each side of the table. Putting a three-board section through the drum sander wasn't too difficult; once that task was completed I secured the two outside sections to a center board (dominos), so I ended up with a total of seven 6" boards on the top. Since the top was too big for me to manhandle through the drum sander, I smoothed the center board seams with a hand sander. Certainly not as efficient as the drum sander, but with patience and persistence everything blends nicely.
Originally, the two outer boards were over 8" wide, which I cut down to 6" and "folded" the 2" cutoffs under the table...thus, the 1" table top looks to be 2". I did the same on ends. (The top is now much too big to handle, but I have young neighbors). I have a little more sanding, but the next big phase will be to apply the finish. My daughter, who asked for the table, is coming up from Jacksonville, FL to supervise/approve the finish work.
A
Attachments
Last edited:
")